Wo macht ihr lieber Urlaub? Mein Favorit ist das erste, das man mit einem Wort zusammenfassen kann „Paradies“ (Paradeisos (griechisch παράδεισος) park).
Oder doch Raspberry Pi Projekte?
Wenzlaff.de – Rund um die Programmierung
mit Java, Raspberry Pi, SDR, Linux, Arduino, Sicherheit, Blender, KI, Statistik, Krypto und Blockchain
Alles rund um den Raspberry Pi
Wo macht ihr lieber Urlaub? Mein Favorit ist das erste, das man mit einem Wort zusammenfassen kann „Paradies“ (Paradeisos (griechisch παράδεισος) park).
Oder doch Raspberry Pi Projekte?
Am 9.11.2014 wurde nach einem Jahre, eine neue Version von Fhem veröffentlicht. Die Änderungsliste ist umfangreich.
FHEM wird kontinuierlich weiterentwickelt, und die neue Version ist nur als Startpunkt für den update Prozess gedacht. Wer also FHEM laufen hat, braucht nur das update und restart Kommando ausfuehren, um den aktuellen Stand herunterzuladen.
Wer Fhem noch nicht installiert hat, kann es wie hier beschrieben tun.
Der Raspberry Pi wird zum empfangen von Flugdaten verwendet wie hier schon beschrieben.
Wie weit ist nun die Reichweite wenn die Antenne innen auf der Fensterbank ohne freie Sicht nach alle Richtungen steht? Und in welche Richtungen ist der Empfang am besten?
Die bisher weiteste Empfang eines Flugzeuges sind 138 nm (255 km).
Das geht aus diesem Diagramm hervor (1 nm = 1852 m)
Bin gespannt, wie es aussieht wenn die Antenne aussen montiert wird.
Und wieviele Flugzeuge werden so an einem Tag in Langenhagen empfangen? 872 Flugzeuge wurden an einem Tag (24 Stunden) empfangen.
Mit dem alten Freewarprogramm SBSplotter können die empfangenen Flugzeugdaten grafisch dargestellt werden. Das Programm läuft nur unter Windows (getestet mit Win7). Die von mir getestete Version aus dem Jahre 2006 kann hier geladen werden.
Wenn der DUMP1090 Server läuft, wie hier im blog schon beschrieben, braucht nur die IP Adresse und die Lat und Long eingegeben zu werden. Das Signal wird dann über Port 30003 von Dump1090 an SBSplotter gesendet.
Dann ein klick auf den „Start“ Button und nun werden die Pakete eingelesen und schön dargestellt.
Man kann schon nach ein paar Minuten sehen, aus welcher Entfernung die Flugzeuge erfasst werden (1 nm = Nautisch Meile = 1852 m)
Gibt es noch ein neueres Programm das ähnlich arbeitet für den Raspberry Pi oder für den Mac?
Wie in diesem Post beschrieben können Flugdaten mit dem Raspberry Pi empfangen werden. Diese Daten können auch automatisch an Flightradar24.com gesendet werden damit auch andere davon etwas haben ;-). Die Anmeldung wird hier für Windows User beschrieben. Es geht aber auch viel einfacher, nur mit dem Raspberry Pi unter Debian. Das beschreibe ich hier mal.
Das Programm von Flightradar24 kann (von hier) manuell geladen und installiert werden.
Es geht aber einfach so:
# download
wget https://dl.dropboxusercontent.com/u/66906/fr24feed_arm-rpi_242.tgz
# entpacken
tar xf fr24feed_arm-rpi_242.tgz
# Progamm ausführbar machen
chmod +x fr24feed_arm-rpi_242
# Archive löschen
rm fr24feed_arm-rpi_242.tgz
Die Geoposition vom Standort suchen über Google Maps. Z.B. von Langenhagen:
Latitude: 52.4388
Longitude: 9.7428
Starten der einmaligen Anmeldung bei Flightradar24 mit:
1 |
./fr24feed_arm-rpi_242 --signup |
Der folgende Dialog muss einmal erfolgreich durchlaufen werden und die abgefragen Parameter eingegeben werden:
1 2 3 4 5 6 7 8 9 10 11 12 13 14 15 16 17 18 19 20 21 22 23 24 25 26 27 28 29 30 31 32 33 34 35 36 37 38 39 40 41 42 43 44 45 46 47 48 49 50 51 52 53 54 55 56 57 58 59 |
[i]FR24Feed v242 - built on Aug 15 2014/08:32:38 Welcome to the FR24 Feeder sign up wizard! Before you continue please make sure that: 1 - You have a working receiver/decoder providing Basestation compatible stream 2 - You know the network address of the data feed (localhost:30003 by default) 3 - You know your receivers location up to 1 decimal point 4 - You have a working email address that will be used to contact you To terminate - press Ctrl+C at any point Step 1/5 - Enter Latitude (DD.DDDD) $:52.4610 Step 2/5 - Enter Longitude (DD.DDDD) $:9.6850 Step 3/5 - Enter your email address (username@domain.tld) $:email@gültige-adresse.de Step 4/5 - Enter your the hostname of the data feed (leave empty for localhost) $:piplus Step 5/5 - Enter your the port number of the data feed (leave empty for 30003) $: Validating form data...OK The closest airport found is ICAO:EDDV IATA:HAJ near Hannover. Latitude: 52.461048 Longitude: 9.685078 Country: Germany Flightradar24 may, if needed, use your email address to contact you regarding your data feed. Would you like to continue using these settings? (yes/no)$:yes Taking data sample, minimum 3 AC required including at least 2 ADS-B: [b]connecting to piplus:30003 [b]connected [i]00:00 - Connected to the data feed [b]working [i]Data feed time difference OK abs(18:52:55.869 - 18:52:55.879)=0 [b]00:05 - 4 AC in range [b]00:10 - 5 AC in range [b]00:15 - 6 AC in range [b]00:20 - 5 AC in range [b]00:25 - 7 AC in range [b]00:30 - 7 AC in range [b]00:35 - 8 AC in range [i]Removed 0 of 9 AC [b]disconnected Sending data sample to the server, completing registration...OK Account registered successfully! Your sharing key is: xxxxxxxxx Your radar code is: x-xxxxx |
Nach der Registrierung wird auch eine E-Mail mit den Key gesendet, dann wie folgt starten:
1 |
/dump1090 --fix --net --net-sbs-port 30003 --net-ro-port 31001 --quiet > /dev/null |
Ergebnis:
1 2 3 4 5 6 7 |
Found 1 device(s): 0: Generic, RTL2832U, SN: 777711111777777 (currently selected) Found Rafael Micro R820T tuner Max available gain is: 49.60 Setting gain to: 49.60 Exact sample rate is: 2000000.052982 Hz Gain reported by device: 49.60 |
Dann in einer neuen Konsole den senden Feed starten mit:
1 |
./fr24feed_arm-rpi_242 --fr24key=KEY |
Ergebnis der Daten die gesendet werden (wenn –quiet > /dev/null vom obigen Aufruf entfernt werden):
1 2 3 4 5 6 7 8 9 10 11 12 13 14 15 16 17 18 19 20 21 22 23 24 25 26 27 28 29 30 31 32 33 34 |
[i]Downloading configuration...OK [i]Parsing configuration...OK [c]Interval: 5s [c]Latitude: 52.4610 [c]Longitude: 9.6850 [c]GND: YES [c]NonADSB: YES [i]Source defined as Basestation [n]defined 1 server [n]EDV@xx.xxx.xxx.xxx:8099/UDP [n]connecting [i][stats]Stats thread started [b]connecting to piplus:30003 [b]connected [b]working [i]Data feed time difference OK abs(19:01:25.531 - 19:01:25.500)=0 [n]connected [n]switching to UDP [n]working [i]sent 2 planes in 1 packets [i]sent 6 planes in 1 packets [i]sent 4 planes in 1 packets [i]sent 5 planes in 1 packets [i]sent 4 planes in 1 packets [i]sent 4 planes in 1 packets [i]sent 4 planes in 1 packets [i]sent 4 planes in 1 packets [i]sent 5 planes in 1 packets [i]sent 4 planes in 1 packets [i]sent 4 planes in 1 packets [i]sent 4 planes in 1 packets [i]sent 4 planes in 1 packets [n]pinging the server [i]sent 5 planes in 1 packets |
Wenn es Probleme gibt, kann mit
1 |
netstat -naep |
geschaut werden, ob die Programme dump1090
und fr24feed_arm-r
auf verbunden stehen.
Wenn die Daten erfolgreich an Flightradar24 gesendet werden, kann man mit der gleichen E-Mail Adresse wie oben bei der Anmeldung einen kostenlosen Premium Account auf der Webseite anlegen. Die Anmeldung ist da etwas schwer auffindbar. Der bleibt aber nur 7 Tage länger, als die letzte Übertragung gültig ist aktiv.
Da ich direkt am Flughafen wohne, kann ich den Start und die Landung von Flugzeugen sehr gut beobachten. Die meisten Flugzeuge senden über transponder ihre Daten an den Tower und andere Flugzeuge. Diese Signale kann man leicht auch mit einem Raspberry Pi und etwas Hardware empfangen.
Es gibt da viele Anleitungen im Internet wie man das installieren kann. Einfach so vorgehen, wie hier beschrieben.
Hier mal die Schritte kurz zusammengefasst und um einige Anmerkungen mit Fotos ergänzt:
1 2 3 4 5 6 7 8 |
sudo apt-get update sudo apt-get upgrade sudo apt-get install git git-core cmake libusb-1.0-0-dev build-essential git clone git://git.osmocom.org/rtl-sdr.git cd rtl-sdr/ mkdir build cd build/ cmake ../ -DINSTALL_UDEV_RULES=ON |
Oder anstatt des letzten Befehls, wenn ein WLAN Stick das Modul benötigt sudo cmake ../ -DINSTALL_UDEV_RULES=ON -DDETACH_KERNEL_DRIVER=ON
Ergebnis:
1 |
sudo make |
1 |
sudo make install |
1 2 3 4 5 6 |
sudo ldconfig cd ~ sudo cp ./rtl-sdr/rtl-sdr.rules /etc/udev/rules.d/ sudo reboot lsusb |
Ergebnis:
1 |
Bus 001 Device 004: ID 0ccd:008e TerraTec Electronic GmbH Cinergy HTC XS |
1 |
rtl_test -t |
ok, der USB-Stick läuft nicht und wird nicht unterstüzt.
Dann einen neuen bestellt, der liefert auch das richtige Ergebnis mit einem RTL2832U Chip (USB DVB-T & RTL-SDR Realtek RTL2832U & R820T DVB-T Tuner Receiver MCX Input):
1 |
Bus 001 Device 004: ID 0bda:2832 Realtek Semiconductor Corp. RTL2832U DVB-T |
Ergebnis: Es kommt die Fehlermeldung das der USB-Stick nicht unterstützt wird:
1 2 3 4 5 6 7 8 9 10 11 12 13 |
No supported devices found. Found 1 device(s): 0: Generic, RTL2832U, SN: 7777111117777777 Using device 0: Generic RTL2832U Kernel driver is active, or device is claimed by second instance of librtlsdr. In the first case, please either detach or blacklist the kernel module (dvb_usb_rtl28xxu), or enable automatic detaching at compile time. usb_claim_interface error -6 Failed to open rtlsdr device #0. |
Dann fix des Fehlers in dem er auf die Blacklist gesetzt wird:
1 2 3 4 5 6 7 8 |
cd /etc/modprobe.d # Datei no-rto.conf anlegen sudo nano no-rtl.conf # ergänzen um diese drei Zeilen blacklist dvb_usb_rtl28xxu blacklist rtl2832 blacklist rtl2830 sudo reboot |
Ok, dann nochmal
1 |
rtl_test -t |
Ergebnis:
1 2 3 4 5 6 7 8 |
Found 1 device(s): 0: Generic, RTL2832U, SN: 7777111117777777 Using device 0: Generic RTL2832U Found Rafael Micro R820T tuner Supported gain values (29): 0.0 0.9 1.4 2.7 3.7 7.7 8.7 12.5 14.4 15.7 16.6 19.7 20.7 22.9 25.4 28.0 29.7 32.8 33.8 36.4 37.2 38.6 40.2 42.1 43.4 43.9 44.5 48.0 49.6 Sampling at 2048000 S/s. No E4000 tuner found, aborting. |
Super, so muss es sein. Hier noch einmal den USB-Stick mit der kleinen 15 cm Antenne:
Nun noch DUMP1090 holen und starten
1 2 3 4 5 |
cd /home/pi/ git clone git://github.com/MalcolmRobb/dump1090.git cd dump1090 make ./dump1090 --interactive |
Mit der kleine 15 cm Antenne auf der Fensterbank werden schon einige Flugdaten empfangen.
Nach ein paar Minuten werden die Flugzeugdaten wie folgt angezeigt:
Habe mal eins etwas verfolgt, um die Reichweite zu checken. Von Langenhagen bis weit über Hameln hinaus! Das ist ja schon mal ganz gut.
Nun mal weiter Infos zu dem dump1090 mit
1 |
./dump1090 --help |
abgefragt um zu erfahren, wie die Daten in metrische Daten angezeigt werden:
1 2 3 4 5 6 7 8 9 10 11 12 13 14 15 16 17 18 19 20 21 22 23 24 25 26 27 28 29 30 31 32 33 34 35 36 37 38 39 40 41 42 43 44 45 46 47 48 49 50 51 52 53 |
----------------------------------------------------------------------------- | dump1090 ModeS Receiver Ver : 1.10.3010.14 | ----------------------------------------------------------------------------- --device-index <index> Select RTL device (default: 0) --gain <db> Set gain (default: max gain. Use -10 for auto-gain) --enable-agc Enable the Automatic Gain Control (default: off) --freq <hz> Set frequency (default: 1090 Mhz) --ifile <filename> Read data from file (use '-' for stdin) --
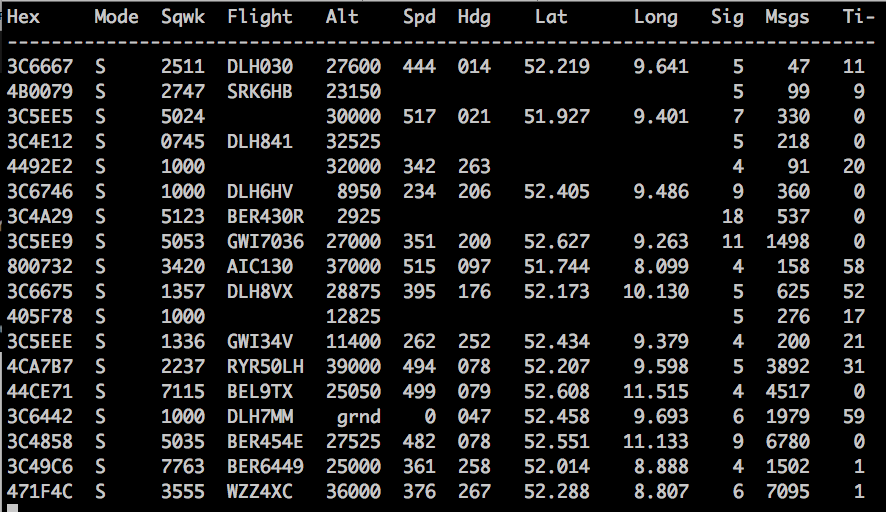
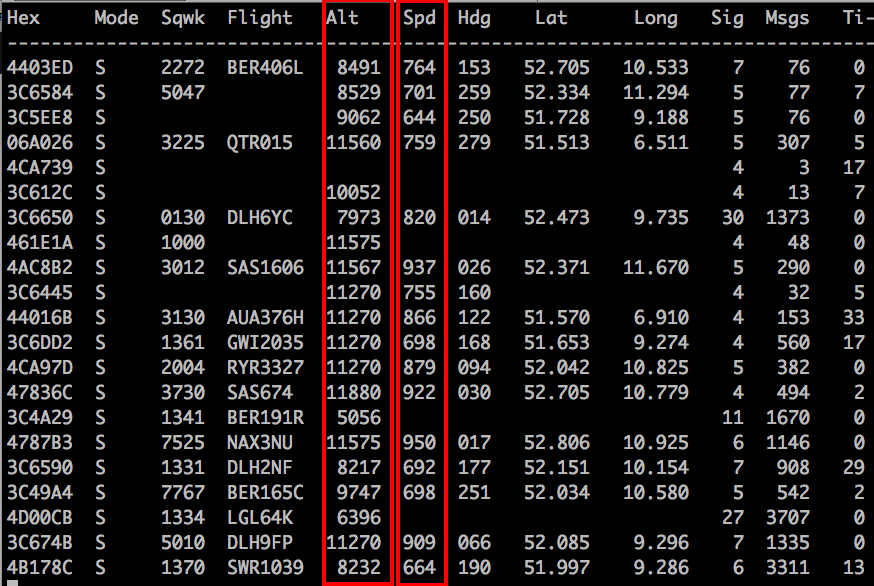
interactive Interactive mode refreshing data on screen --interactive-rows <num> Max number of rows in interactive mode (default: 15) --interactive-ttl <sec> Remove from list if idle for <sec> (default: 60) --interactive-rtl1090 Display flight table in RTL1090 format --raw Show only messages hex values --
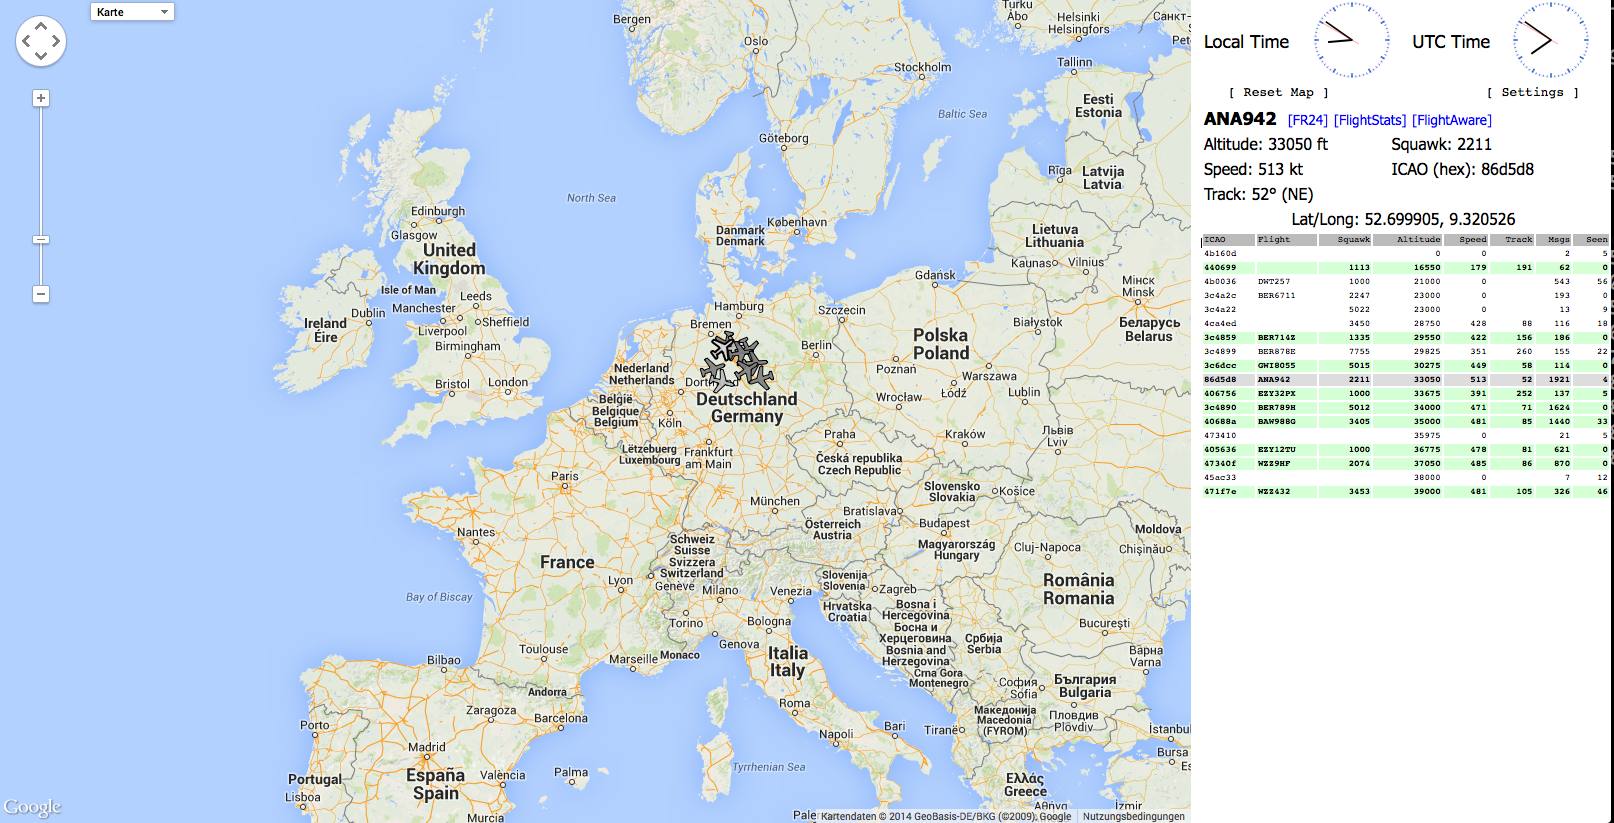
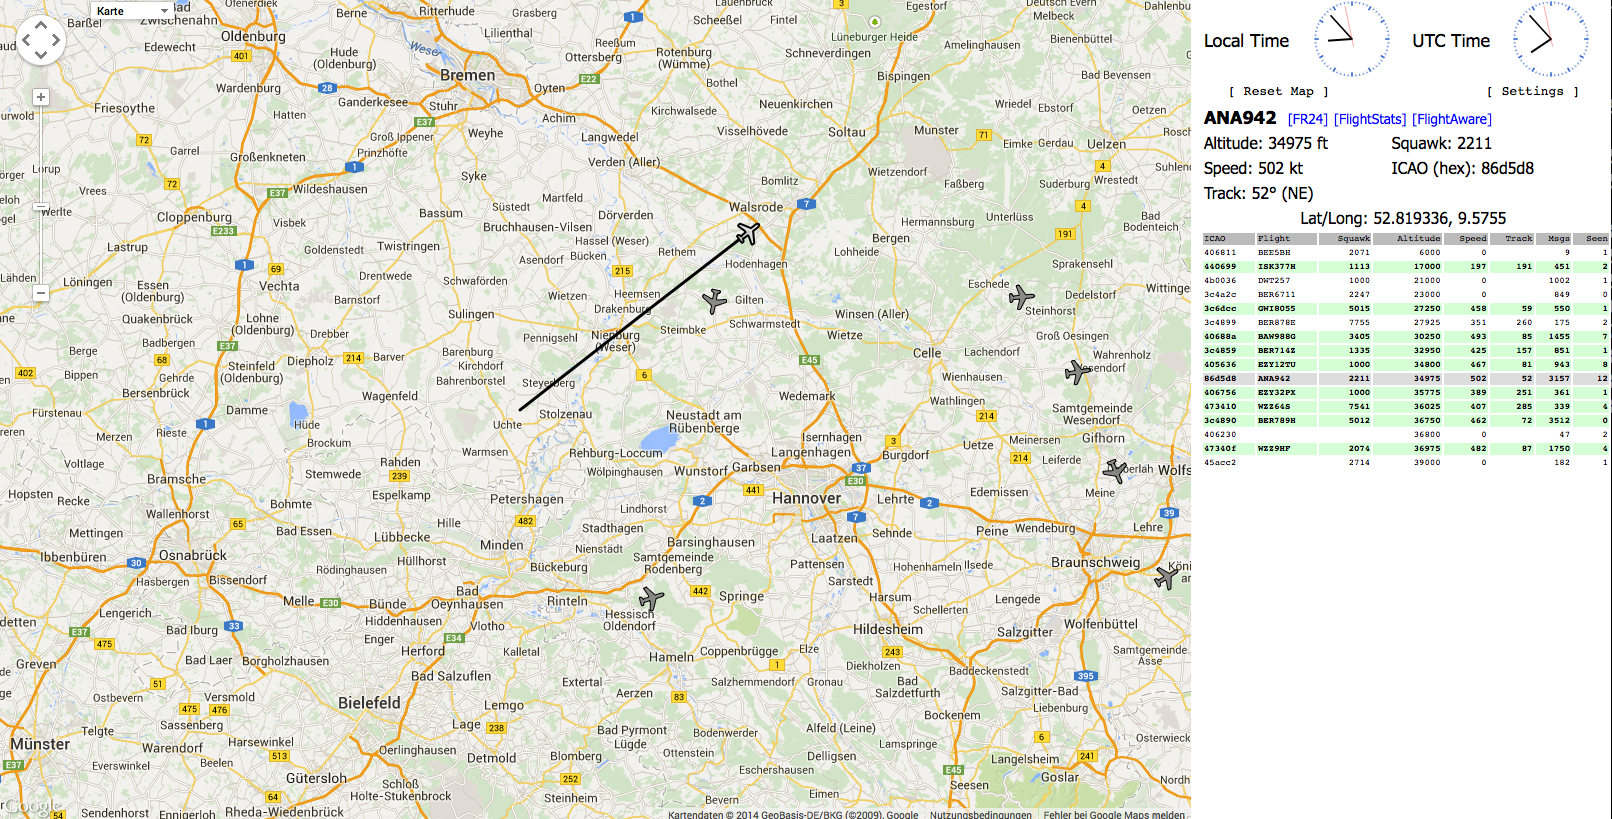
net Enable networking --modeac Enable decoding of SSR Modes 3/A & 3/C --net-beast TCP raw output in Beast binary format --net-only Enable just networking, no RTL device or file used --net-bind-address <ip> IP address to bind to (default: Any; Use 127.0.0.1 for private) --net-http-port <port> HTTP server port (default: 8080) --net-ri-port <port> TCP raw input listen port (default: 30001) --net-ro-port <port> TCP raw output listen port (default: 30002) --net-sbs-port <port> TCP BaseStation output listen port (default: 30003) --net-bi-port <port> TCP Beast input listen port (default: 30004) --net-bo-port <port> TCP Beast output listen port (default: 30005) --net-ro-size <size> TCP raw output minimum size (default: 0) --net-ro-rate <rate> TCP raw output memory flush rate (default: 0) --net-heartbeat <rate> TCP heartbeat rate in seconds (default: 60 sec; 0 to disable) --net-buffer <n> TCP buffer size 64Kb * (2^n) (default: n=0, 64Kb) --lat <latitude> Reference/receiver latitude for surface posn (opt) --lon <longitude> Reference/receiver longitude for surface posn (opt) --fix Enable single-bits error correction using CRC --no-fix Disable single-bits error correction using CRC --no-crc-check Disable messages with broken CRC (discouraged) --phase-enhance Enable phase enhancement --aggressive More CPU for more messages (two bits fixes, ...) --mlat display raw messages in Beast ascii mode --stats With --ifile print stats at exit. No other output --stats-every <seconds> Show and reset stats every <seconds> seconds --onlyaddr Show only ICAO addresses (testing purposes) --metric Use metric units (meters, km/h, ...) --snip <level> Strip IQ file removing samples < level --debug <flags> Debug mode (verbose), see README for details --quiet Disable output to stdout. Use for daemon applications --ppm <error> Set receiver error in parts per million (default 0) --help Show this help Debug mode flags: d = Log frames decoded with errors D = Log frames decoded with zero errors c = Log frames with bad CRC C = Log frames with good CRC p = Log frames with bad preamble n = Log network debugging info j = Log frames to frames.js, loadable by debug.html |
Ok, der Aufruf muss wie folgt geschehen damit die Geschwindigkeit (Spd) in KM/H und die Höhe (Alt) in Meter angezeigt wird:
1 |
./dump1090 --interactive --metric |
Jetzt wollen wir noch den Server Modus starten und auf einer schönen Karte im Browser anzeigen. Das geht mit dem Aufruf:
1 |
./dump1090 --interactive --metric --net --net-beast --net-ro-port 31001 |
Dann im Browser die http://raspi-ip:8080 aufrufen und es werden alle Flugzeuge die empfangen werden angezeigt. Es können die Zeilen markiert werden, um das Flugzeug zu verfolgen:
Habe mal den Dreamliner 787-8 von Düsseldorf nach Tokyo mit der Nr. ANA942 -NH942 markiert. Die Links gehen auch gleich nach Flightradar24 ua.:
Cool, da bekommt man ja wieder Lust auf fliegen…
Weitere URLs zum Thema in englisch:
http://www.flightradar24.com/software/
https://uk.flightaware.com/adsb/piaware/
Die Homepage von podget zeigt nicht wirklich, wie schnell podget
auch auf den Raspberry Pi installiert werden kann.
Installation:
1 2 3 |
sudo apt-get update sudo apt-get upgrade sudo apt-get install podget |
Das Programm podget hat folgende Abhängigkeiten auf dem jessie Debian unter Raspberry Pi, wie diese Mindmap (puh, geschaft) zeigt:
Dann einmal podget
starten, damit die Konfig Dateien angelegt werden mit:
1 |
/usr/bin/podget |
Dann werden schon autom. einige Linux Podcast (von http://thelinuxlink.net/tllts/tllts.rss Englisch) geladen. Die Podcast landen im Verzeichnis POD
. Das laden kann aber mit ctrl+c
abgebrochen werden.
Nun wurde das Verzeichnis .podget
angelegt. In diesem sind die Dateien podgetrc
und serverlist
zu finden die bearbeitet werden können.
Wir öffnen nun die serverlist
mit:
1 |
nano .podget/serverlist |
und löschen die letzte Zeile. Dann fügen wir diese Podcasts vom NDR oder auch andere hinzu:
1 2 |
http://www.ndr.de/info/podcast2986.xml http://www.ndr.de/ndr2/fruehstueck_bei_stefanie/podcast2956.xml |
Nach dem speichern können wird podget
wieder starten mit:
1 |
podget |
es werden nun alle Podcasts geladen und in das POD
Verzeichnis abgelegt. Das ganze könnte dann automatisiert werden, in dem der Befehl in der crontab ergänzt wird. So hat man dann immer seine mp3 autom. nachts geladen.
In der .podget/podgetrc
können verschiedene Einstellungen und Konfigurationen gemacht werden. Z.b. welche neuen Dateien und wieviele geladen werden können.
Das Programm podget
hat auch eine Online-Hilfe die mit potget -h
aufgerufen werden kann:
Welche Podcasts könnt Ihr empfehlen?
Screen gibt es nicht nur für den Mac, wie hier schon mal beschrieben. Es ist hilfreich um eine Sitzung von mehreren Personen zugleich zu benutzen oder um Progamme parallel zu nutzen.
Installiert ist es schnell mit:
1 2 3 |
sudo apt-get update sudo apt-get upgrade sudo apt-get install screen |
Folgende Abhängigkeiten werden installiert, wie diese Mindmap zeigt:
Ein
1 |
screen -help |
gibt die Syntax und Verwendung aus:
1 2 3 4 5 6 7 8 9 10 11 12 13 14 15 16 17 18 19 20 21 22 23 24 25 26 27 28 29 30 31 32 33 34 35 36 37 |
Use: screen [-opts] [cmd [args]] or: screen -r [host.tty] Options: -4 Resolve hostnames only to IPv4 addresses. -6 Resolve hostnames only to IPv6 addresses. -a Force all capabilities into each window's termcap. -A -[r|R] Adapt all windows to the new display width & height. -c file Read configuration file instead of '.screenrc'. -d (-r) Detach the elsewhere running screen (and reattach here). -dmS name Start as daemon: Screen session in detached mode. -D (-r) Detach and logout remote (and reattach here). -D -RR Do whatever is needed to get a screen session. -e xy Change command characters. -f Flow control on, -fn = off, -fa = auto. -h lines Set the size of the scrollback history buffer. -i Interrupt output sooner when flow control is on. -l Login mode on (update /var/run/utmp), -ln = off. -ls [match] or -list Do nothing, just list our SockDir [on possible matches]. -L Turn on output logging. -m ignore $STY variable, do create a new screen session. -O Choose optimal output rather than exact vt100 emulation. -p window Preselect the named window if it exists. -q Quiet startup. Exits with non-zero return code if unsuccessful. -Q Commands will send the response to the stdout of the querying process. -r [session] Reattach to a detached screen process. -R Reattach if possible, otherwise start a new session. -s shell Shell to execute rather than $SHELL. -S sockname Name this session <pid>.sockname instead of <pid>.<tty>.<host>. -t title Set title. (window's name). -T term Use term as $TERM for windows, rather than "screen". -U Tell screen to use UTF-8 encoding. -v Print "Screen version 4.02.01 (GNU) 28-Apr-14". -wipe [match] Do nothing, just clean up SockDir [on possible matches]. -x Attach to a not detached screen. (Multi display mode). -X Execute <cmd> as a screen command in the specified session. |
Oder aber die Tastaturbefehle können mit ctrl+A + ?
wie folgt ausgegeben werden:
Beispiel: Wir starten in einer Konsole einen Prozess der länger dauert, hier mal htop
um den Speicher und CPU Verbrauch anzuzeigen.
1 2 3 4 5 6 7 8 9 10 11 12 13 14 |
screen -S Beispiel htop # Tasten ctrl+a -> d # htop wird in den Hintergrund gesendet, läuft noch weiter, es kommt diese Meldung: [detached from 4605.Beispiel] # Nun ein neues Terminal Fenster öffnen und screen -ls # alle laufenden screen Prozesse anzeigen # Ausgabe: # There is a screen on: # 4605.Beispiel (01.11.2014 11:49:03) (Detached) # 1 Socket in /var/run/screen/S-pi. # Nun verbinden wir uns mit dem im Hintergrund laufenden htop Prozess mit screen -r Beispiel # Es erscheint das laufende Programm htop |
Einige weitere Beispiele für den Einsatz findet man hier.
Um schnell ein Raspberry Pi System was aufwendig erstellt wurde, jederzeit wiederherzustellen ist ein Backup oder eine Sicherungskopie nötig.
So hat man seine wichtigsten Daten und Einstellungen jederzeit vorhanden. Manuell ein Backup zu erstellen vergisst man doch immer, so musste eine automatisch Lösung her.
Es gibt da ein gutes Script, welches automatisch Backups anlegt und das mit guter Anleitung.
Hier mal die Installation des Scriptes und weitere Hinweise, die dort nicht erwähnt werden und bei mir nötig waren.
Installation des raspibackup Scriptes:
1 2 3 4 5 6 |
# Script downloaden wget http://www.linux-tips-and-tricks.de/de/downloads/raspibackup-sh/download -O raspiBackup.sh # und nach /usr/local/bin verschieben mv raspiBackup.sh /usr/local/bin # Ausführungs Rechte vergeben sudo chmod 755 /usr/local/bin/raspiBackup.sh |
Für das formatieren und mounten des USB-Sticks kann man hier schauen.
Kurz:
1 2 3 4 5 6 7 8 9 10 11 12 13 14 15 16 17 18 19 20 21 22 23 24 |
# Schauen wo der USB-Stick ist cat /var/log/messages # oder ls -l /dev/sd* # Mount Verzeichnis anlegen mkdir /media/usbstick # Usb-Stick mit ext4 formatieren mkfs.ext4 /dev/sda1 # Mounten sudo mount /dev/sda1 /media/usbstick # das Mounten überprüfen cat /etc/mtab # UUID ermitteln ls -l /dev/disk/by-uuid/ # umount sudo umount /dev/sda1 # für das autom. Booten eintragen sudo nano /etc/fstab # in /etc/fstab ergänzen UUID=ermittelte uuid /media/usbdisk ext4 defaults 0 0 # reboot sudo reboot # check ob autom. gemountet cat /etc/mtab |
Das Backup soll nun automatisch ausgeführt werden. Dazu wird die cron verwendet.
Die crontab muss mit einer Leerzeile enden.
Um das Script automatisch zu starten, und eine E-Mail Benachrichtigung zu versenden in der Crontab die folgenden Befehle ergänzen.
Öffnen der Crontab Datei:
1 |
sudo crontab -e |
Folgende Zeilen ergänzen (leer Zeile am Ende nicht vergessen):
1 2 3 4 5 6 |
# Jeden Sonntag um 22 Uhr ein Backup nach usbstick im tar Format der ganzen SD-Karte und 4 Versionen vorhalten und e-mail versenden 00 22 * * 0 /bin/bash --login /usr/local/bin/raspiBackup.sh -p /media/usbstick -t tar -k 4 -s ssmtp -e email@kein-spam.de # Jeden Samstag um 5 Uhr ein dd backup auf den usbstick der ganzen SD-Karte und 4 Versionen behalten und e-mail versenden 00 5 * * 6 /bin/bash --login /usr/local/bin/raspiBackup.sh -p /media/usbstick -t dd -k 4 -s ssmtp -e email@kein-spam.de # Jeden Mittwoch um 23 Uhr ein tar backup auf den usbstick der ganzen SD-Karte und 4 Versionen behalten und e-mail versenden 00 23 * * 3 /bin/bash --login /usr/local/bin/raspiBackup.sh -p /media/usbstick -t tar -k 4 -s ssmtp -e email@kein-spam.de |
Restarten der crontab mit:
1 |
sudo /etc/init.d/cron restart |
Um E-Mails zu versenden, muss wie hier beschrieben ssmtp installiert und eingerichtet sein.
Wenn es Fehler gibt kann man im Log unter /var/log/syslog
nachschauen. Z.b. mit
1 |
cat /var/log/syslog |
Was nun noch fehlt, ist eine ausführliche Beschreibung für die Wiederherstellun im Fehlerfall oder das Clonen des Systems mit den erstellen Sicherungskopien. Das kommt dann in einen eigenen Blogeintrag.
Oder die Datensicherung mit zwei oder mehr USB-Sticks nach dem Türme von Hanoi Prinzip.
Vor ein paar Tagen ist eine neue Firmware für den Raspberry Pi erschienen. Wie kann die installiert werden? Wie kann die installierte Version angezeigt werden?
Am einfachsten benutzt man den update Befehl sudo rpi-update
mit dem Hexxeh updater. Wenn es eine neue Firmware gibt, wird die in ein paar Minuten installiert. Wenn die Firmware schon aktuell ist, wird auch eine Meldung ausgegeben.
So läuft der Updateprozess:
1 2 3 4 5 6 7 8 9 10 11 12 13 14 15 16 17 18 19 20 21 22 23 24 25 |
sudo rpi-update *** Raspberry Pi firmware updater by Hexxeh, enhanced by AndrewS and Dom *** Performing self-update % Total % Received % Xferd Average Speed Time Time Time Current Dload Upload Total Spent Left Speed 100 7635 100 7635 0 0 26509 0 --:--:-- --:--:-- --:--:-- 27967 *** Relaunching after update *** Raspberry Pi firmware updater by Hexxeh, enhanced by AndrewS and Dom *** Downloading specific firmware revision (this will take a few minutes) % Total % Received % Xferd Average Speed Time Time Time Current Dload Upload Total Spent Left Speed 100 168 0 168 0 0 291 0 --:--:-- --:--:-- --:--:-- 298 100 22.9M 100 22.9M 0 0 295k 0 0:01:19 0:01:19 --:--:-- 1153k *** Updating firmware *** Updating kernel modules *** depmod 3.12.30+ *** Updating VideoCore libraries *** Using HardFP libraries *** Updating SDK *** Running ldconfig *** Storing current firmware revision *** Deleting downloaded files *** Syncing changes to disk *** If no errors appeared, your firmware was successfully updated to 11bfdffaca95e630b1fed0a8992fee880c17c26d *** A reboot is needed to activate the new firmware |
Wie oben steht, ist nun noch ein sudo reboot
nötig und die neue Firmware ist aktualisiert.
Ist die Firmware schon aktuell, gib es folgende Meldung:
1 2 3 4 5 6 7 8 9 |
sudo rpi-update *** Raspberry Pi firmware updater by Hexxeh, enhanced by AndrewS and Dom *** Performing self-update % Total % Received % Xferd Average Speed Time Time Time Current Dload Upload Total Spent Left Speed 100 7635 100 7635 0 0 21159 0 --:--:-- --:--:-- --:--:-- 21876 *** Relaunching after update *** Raspberry Pi firmware updater by Hexxeh, enhanced by AndrewS and Dom *** Your firmware is already up to date |
Aber wie kann nun die aktuelle Version angezeigt werden?
Mit
1 |
uname -a |
Ergebnis:
1 |
Linux pi-entw 3.12.30+ #717 PREEMPT Fri Oct 17 18:46:31 BST 2014 armv6l GNU/Linux |
Oder auch mit mehr Details:
1 |
/opt/vc/bin/vcgencmd version |
Ergebnis:
1 2 3 |
Oct 17 2014 17:56:05 Copyright (c) 2012 Broadcom version 845092531e360acd37f2f1964157f8079c77edfb (clean) (release) |
Dabei ist der lange Sting hinter Version der Hashwert der Version.
Sollte der rpi-updater nicht vorhanden sein, kann er leicht wie auch hier beschrieben mit
1 |
sudo apt-get install rpi-update |
installiert werden. Er wird dann diese Abhängigkeiten, wie in dieser Mindmap verwenden:
Die aktuellste Firmware gibt es auf Github. Dort gibt es auch die Beschreibung, was es neu gibt. Zitat:“
1 2 3 4 5 6 7 8 9 10 11 12 13 14 15 16 17 |
kernel: Bump to 3.12.30 kernel: bcm2708: Eliminate i2s debugfs directory error Qualify the two regmap ranges uses by bcm2708-i2s ('-i2s' and '-clk') to avoid the name clash when registering debugfs entries. kernel: Improve __copy_to_user and __copy_from_user performance Provide a __copy_from_user that uses memcpy. On BCM2708, use optimised memcpy/memmove/memcmp/memset implementations. kernel: bcm2708-dmaengine: nobble peak throughput to prevend SD host lockups Artificially throttling DMA throughput to/from the SD host prevents errors seen on very high-spec UHS-1 cards.See: http://www.raspberrypi.org/forums/viewtopic.php?f=63&t=5057&start=275#p626694 firmware: dpi: Add options to alter dpi settings through dpi_output_format See: http://www.raspberrypi.org/forums/viewtopic.php?f=100&t=86658&p=628061#p628061 firmware: arm_loader: Avoid gpioman spam when POWER_LOW is not defined" |
Truecrypt 7.1 kann gut wie in dieser Anleitung beschrieben installiert werden.
Hier in Kurzform wie die nötigen Packages geladen, ausgepackt und selbst compiliert werden können, da es für den rPi keine fertigen Packages gibt. Der compile Vorgang dauert ca. 1 Stunde, dabei darf das Terminal Fenster nicht geschlossen werden.
1 2 3 4 5 6 7 8 9 10 11 12 13 14 15 16 17 18 19 20 21 22 23 |
sudo apt-get update sudo apt-get upgrade sudo apt-get install libfuse-dev screen wget "https://github.com/AuditProject/truecrypt-verified-mirror/raw/master/Source/TrueCrypt%207.1a%20Source.tar.gz" tar xfz "TrueCrypt 7.1a Source.tar.gz" cd truecrypt-7.1a-source wget ftp://ftp.rsasecurity.com/pub/pkcs/pkcs-11/v2-20/*.h wget http://prdownloads.sourceforge.net/wxwindows/wxWidgets-2.8.12.tar.gz tar xfz wxWidgets-2.8.12.tar.gz make NOGUI=1 WX_ROOT=~/truecrypt-7.1a-source/wxWidgets-2.8.12 wxbuild make NOGUI=1 WXSTATIC=1 cp Main/truecrypt /usr/local/bin/ sudo chmod +x /usr/local/bin/truecrypt rm -rf truecrypt-7.1a-source/ rm TrueCrypt\ 7.1a\ Source.tar.gz truecrypt --version |
Ergebnis: TrueCrypt 7.1a
Nun alle Befehle ausgeben mit:
1 |
truecrypt --help |
liefert die Anleitung:
1 2 3 4 5 6 7 8 9 10 11 12 13 14 15 16 17 18 19 20 21 22 23 24 25 26 27 28 29 30 31 32 33 34 35 36 37 38 39 40 41 42 43 44 45 46 47 48 49 50 51 52 53 54 55 56 57 58 59 60 61 62 63 64 65 66 67 68 69 70 71 72 73 74 75 76 77 78 79 80 81 82 83 84 85 86 87 88 89 90 91 92 93 94 95 96 97 98 99 100 101 102 103 104 105 106 107 108 109 110 111 112 113 114 115 116 117 118 119 120 121 122 123 124 125 126 127 128 129 130 131 132 133 134 135 136 137 138 139 140 141 142 143 144 145 146 147 148 149 150 151 152 153 154 155 156 157 158 159 160 161 162 163 164 165 166 167 168 169 170 171 172 173 174 175 176 177 178 179 180 181 182 183 184 185 186 187 188 189 190 191 192 193 194 195 196 197 198 199 200 201 202 203 204 205 206 207 208 209 210 211 212 213 214 215 216 217 218 219 220 221 222 223 224 225 226 227 228 229 230 231 232 233 234 235 236 237 238 |
Synopsis: truecrypt [OPTIONS] COMMAND truecrypt [OPTIONS] VOLUME_PATH [MOUNT_DIRECTORY] Commands: --auto-mount=devices|favorites Auto mount device-hosted or favorite volumes. --backup-headers[=VOLUME_PATH] Backup volume headers to a file. All required options are requested from the user. -c, --create[=VOLUME_PATH] Create a new volume. Most options are requested from the user if not specified on command line. See also options --encryption, -k, --filesystem, --hash, -p, --random-source, --quick, --size, --volume-type. Note that passing some of the options may affect security of the volume (see option -p for more information). Inexperienced users should use the graphical user interface to create a hidden volume. When using the text user interface, the following procedure must be followed to create a hidden volume: 1) Create an outer volume with no filesystem. 2) Create a hidden volume within the outer volume. 3) Mount the outer volume using hidden volume protection. 4) Create a filesystem on the virtual device of the outer volume. 5) Mount the new filesystem and fill it with data. 6) Dismount the outer volume. If at any step the hidden volume protection is triggered, start again from 1). --create-keyfile[=FILE_PATH] Create a new keyfile containing pseudo-random data. -C, --change[=VOLUME_PATH] Change a password and/or keyfile(s) of a volume. Most options are requested from the user if not specified on command line. PKCS-5 PRF HMAC hash algorithm can be changed with option --hash. See also options -k, --new-keyfiles, --new-password, -p, --random-source. -d, --dismount[=MOUNTED_VOLUME] Dismount a mounted volume. If MOUNTED_VOLUME is not specified, all volumes are dismounted. See below for description of MOUNTED_VOLUME. --delete-token-keyfiles Delete keyfiles from security tokens. See also command --list-token-keyfiles. --export-token-keyfile Export a keyfile from a security token. See also command --list-token-keyfiles. --import-token-keyfiles Import keyfiles to a security token. See also option --token-lib. -l, --list[=MOUNTED_VOLUME] Display a list of mounted volumes. If MOUNTED_VOLUME is not specified, all volumes are listed. By default, the list contains only volume path, virtual device, and mount point. A more detailed list can be enabled by verbose output option (-v). See below for description of MOUNTED_VOLUME. --list-token-keyfiles Display a list of all available security token keyfiles. See also command --import-token-keyfiles. --mount[=VOLUME_PATH] Mount a volume. Volume path and other options are requested from the user if not specified on command line. --restore-headers[=VOLUME_PATH] Restore volume headers from the embedded or an external backup. All required options are requested from the user. --save-preferences Save user preferences. --test Test internal algorithms used in the process of encryption and decryption. --version Display program version. --volume-properties[=MOUNTED_VOLUME] Display properties of a mounted volume. See below for description of MOUNTED_VOLUME. MOUNTED_VOLUME: Specifies a mounted volume. One of the following forms can be used: 1) Path to the encrypted TrueCrypt volume. 2) Mount directory of the volume's filesystem (if mounted). 3) Slot number of the mounted volume (requires --slot). Options: --display-password Display password characters while typing. --encryption=ENCRYPTION_ALGORITHM Use specified encryption algorithm when creating a new volume. --filesystem=TYPE Filesystem type to mount. The TYPE argument is passed to mount(8) command with option -t. Default type is 'auto'. When creating a new volume, this option specifies the filesystem to be created on the new volume (only 'FAT' and 'none' TYPE is allowed). Filesystem type 'none' disables mounting or creating a filesystem. --force Force mounting of a volume in use, dismounting of a volume in use, or overwriting a file. Note that this option has no effect on some platforms. --fs-options=OPTIONS Filesystem mount options. The OPTIONS argument is passed to mount(8) command with option -o when a filesystem on a TrueCrypt volume is mounted. This option is not available on some platforms. --hash=HASH Use specified hash algorithm when creating a new volume or changing password and/or keyfiles. This option also specifies the mixing PRF of the random number generator. -k, --keyfiles=KEYFILE1[,KEYFILE2,KEYFILE3,...] Use specified keyfiles when mounting a volume or when changing password and/or keyfiles. When a directory is specified, all files inside it will be used (non-recursively). Multiple keyfiles must be separated by comma. Use double comma (,,) to specify a comma contained in keyfile's name. Keyfile stored on a security token must be specified as token://slot/SLOT_NUMBER/file/FILENAME. An empty keyfile (-k "") disables interactive requests for keyfiles. See also options --import-token-keyfiles, --list-token-keyfiles, --new-keyfiles, --protection-keyfiles. --load-preferences Load user preferences. -m, --mount-options=OPTION1[,OPTION2,OPTION3,...] Specifies comma-separated mount options for a TrueCrypt volume: headerbak: Use backup headers when mounting a volume. nokernelcrypto: Do not use kernel cryptographic services. readonly|ro: Mount volume as read-only. system: Mount partition using system encryption. timestamp|ts: Do not restore host-file modification timestamp when a volume is dismounted (note that the operating system under certain circumstances does not alter host-file timestamps, which may be mistakenly interpreted to mean that this option does not work). See also option --fs-options. --new-keyfiles=KEYFILE1[,KEYFILE2,KEYFILE3,...] Add specified keyfiles to a volume. This option can only be used with command -C. --new-password=PASSWORD Specifies a new password. This option can only be used with command -C. -p, --password=PASSWORD Use specified password to mount/open a volume. An empty password can also be specified (-p ""). Note that passing a password on the command line is potentially insecure as the password may be visible in the process list (see ps(1)) and/or stored in a command history file or system logs. --protect-hidden=yes|no Write-protect a hidden volume when mounting an outer volume. Before mounting the outer volume, the user will be prompted for a password to open the hidden volume. The size and position of the hidden volume is then determined and the outer volume is mounted with all sectors belonging to the hidden volume protected against write operations. When a write to the protected area is prevented, the whole volume is switched to read-only mode. Verbose list (-v -l) can be used to query the state of the hidden volume protection. Warning message is displayed when a volume switched to read-only is being dismounted. --protection-keyfiles=KEYFILE1[,KEYFILE2,KEYFILE3,...] Use specified keyfiles to open a hidden volume to be protected. This option may be used only when mounting an outer volume with hidden volume protected. See also options -k and --protect-hidden. --protection-password=PASSWORD Use specified password to open a hidden volume to be protected. This option may be used only when mounting an outer volume with hidden volume protected. See also options -p and --protect-hidden. --quick Do not encrypt free space when creating a device-hosted volume. This option must not be used when creating an outer volume. --random-source=FILE Use FILE as a source of random data (e.g., when creating a volume) instead of requiring the user to type random characters. --slot=SLOT Use specified slot number when mounting, dismounting, or listing a volume. --size=SIZE Use specified size in bytes when creating a new volume. -t, --text Use text user interface. Graphical user interface is used by default if available. This option must be specified as the first argument. --token-lib=LIB_PATH Use specified PKCS #11 security token library. --volume-type=TYPE Use specified volume type when creating a new volume. TYPE can be 'normal' or 'hidden'. See option -c for more information on creating hidden volumes. -v, --verbose Enable verbose output. IMPORTANT: If you want to use TrueCrypt, you must follow the security requirements and security precautions listed in chapter 'Security Requirements and Precautions' in the TrueCrypt documentation (file 'TrueCrypt User Guide.pdf'). Examples: Create a new volume: truecrypt -t -c Mount a volume: truecrypt volume.tc /media/truecrypt1 Mount a volume as read-only, using keyfiles: truecrypt -m ro -k keyfile1,keyfile2 volume.tc Mount a volume without mounting its filesystem: truecrypt --filesystem=none volume.tc Mount a volume prompting only for its password: truecrypt -t -k "" --protect-hidden=no volume.tc /media/truecrypt1 Dismount a volume: truecrypt -d volume.tc Dismount all mounted volumes: truecrypt -d |
Dieser BPMN 2.0 Prozess wurde mit Eclipse modeliert und dann als Grafik exportiert.
Diese BPMN 2.0 Diagramme können auch leicht als Grafik exportiert werden. Dazu in dem Diagramm mit rechts klick und dann im Kontexmenü auf „Export Diagram…“.
Es öffnet sich dann der Export Dialog, dort können nun im BMP, GIF, JPG, PNG oder RLE Format die BPMN 2.0 Diagramme exportiert werden.
Es währe doch toll, wenn man bei eintreffender E-Mail benachrichtigt würde oder?
So braucht man nicht immer die 148 Mails checken, und kann die Welt retten.
In diesem Projekt, beschreibe ich wie das Betreff jeder eintreffende E-Mail per Sprachausgabe ausgegeben wird. Dazu wird der Karotz benutzt, der nicht nur für Sprachausgabe nützlich ist.
Zuerst das System aktuallisieren und die nötigen cpan Packages installieren:
1 2 3 4 5 6 7 8 9 10 11 12 13 14 |
sudo apt-get update sudo apt-get upgrade sudo cpan install Mail::IMAPClient # bei Nachfrage mit ja antworten: # yes # bei der nächsten Nachfage mit return bestätigen # local::lib # ... Stunden später ... sudo cpan install IO::Socket::SSL sudo cpan install IO::Socket::INET # und optional damit Umlaute auch dargestellt werden sudo cpan install MIME::Parser # und optional GnuPG wenn nur signierte E-Mails gelesen werden sollen sudo cpan install Mail::GnuPG |
Folgende Zeile in der Datei fhem.cfg
ergänzen:
1 |
define name mailcheck host user password |
z.B. der IMAP von Strato:
define mailcheck mailcheck imap.strato.de e-mail-von@wenzlaff.de passwort
Nach einem restart von Fhem steht die letzte Betreffzeilen der E-Mails als Reading bereit. So sieht es dann in Fhem aus:
Jetzt fehlt noch den Subject als userReadings zu setze und eine notify Funktion in der fhem.cfg die das Subject liest und an eine Funktion übergibt. Diese Funktion macht die Sprachausgabe des Karotz und wurde an anderer stelle hier im Blog beschrieben.
1 2 3 4 5 6 7 8 |
# Folgende events werden generiert # # 2014-10-11 19:13:02 mailcheck mailcheck Subject: Ohne Umlaute # define mailcheckAnsage notify mailcheck:Subject.* {\ my $betreff=ReadingsVal("mailcheck", "Subject", "E-Mail ohne Betreff");;\ Set_Karotz_Nachricht('karotz-token',"$betreff");;\ } |
Nach einem reread von Fhem, wird jetzt jedesmal das Betreff von Karotz angesagt.
Mögliche Fehler:
1. Wenn dieser Fehler im Log steht, wurden die obigen cpan Packages nicht oder nicht richtig installiert:
1 2 3 4 5 6 |
2014.10.11 15:58:46 1: reload: Error:Modul 32_mailcheck deactivated: Can't locate Mail/IMAPClient.pm in @INC (@INC contains: /etc/perl /usr/local/lib/perl/5.14.2 /usr/local/share/perl/5.14.2 /usr/lib/perl5 /usr/share/perl5 /usr/lib/perl/5.14 /usr/share/perl/5.14 /usr/local/lib/site_perl . ./FHEM ./FHEM/lib) at ./FHEM/32_mailcheck.pm line 11, <> line 85. BEGIN failed--compilation aborted at ./FHEM/32_mailcheck.pm line 11, <> line 85. 2014.10.11 15:58:46 0: Can't locate Mail/IMAPClient.pm in @INC (@INC contains: /etc/perl /usr/local/lib/perl/5.14.2 /usr/local/share/perl/5.14.2 /usr/lib/perl5 /usr/share/perl5 /usr/lib/perl/5.14 /usr/share/perl/5.14 /usr/local/lib/site_perl . ./FHEM ./FHEM/lib) at ./FHEM/32_mailcheck.pm line 11, <> line 85. BEGIN failed--compilation aborted at ./FHEM/32_mailcheck.pm line 11, <> line 85. |
2. Wenn der MIME::Parser nicht installiert ist, wird aus diesem Betreff:
mit üüüüääää
dann
Wenn der MIME Parser aber installiert wurde, und Fhem restartet wurde, klappt es auch mit den Umlauten:
3. Fhem aktualisieren.
Habe festgestellt, das Fhem mit einem update
nicht mehr die Scripte autom. aktualisiert. Mit einem update force
hat es nach ein paar Fehlermeldungen wieder geklappt. Es waren an einigen Dateien nicht mehr die nötigen Userrechte gesetzt.
Zuerst mal eine Mindmap zu TShark, dem Kommandline-Tool von Wireshark (frühe Ethereal).
Zuerste den rPi aktualisieren und das Packet installieren mit:
1 2 3 |
sudo apt-get update sudo apt-get upgrade sudo apt-get install tshark |
Zuerst einmal die Befehle und die Version für die Komandozeile mit
1 |
tshark -h |
ausgeben:
1 2 3 4 5 6 7 8 9 10 11 12 13 14 15 16 17 18 19 20 21 22 23 24 25 26 27 28 29 30 31 32 33 34 35 36 37 38 39 40 41 42 43 44 45 46 47 48 49 50 51 52 53 54 55 56 57 58 59 60 61 62 63 64 65 66 67 68 69 70 71 72 73 74 75 76 77 78 79 80 81 82 83 84 85 86 87 88 89 90 91 92 93 94 95 |
TShark 1.12.1 (Git Rev Unknown from unknown) Dump and analyze network traffic. See http://www.wireshark.org for more information. Copyright 1998-2014 Gerald Combs <gerald@wireshark.org> and contributors. This is free software; see the source for copying conditions. There is NO warranty; not even for MERCHANTABILITY or FITNESS FOR A PARTICULAR PURPOSE. Usage: tshark [options] ... Capture interface: -i <interface> name or idx of interface (def: first non-loopback) -f <capture filter> packet filter in libpcap filter syntax -s <snaplen> packet snapshot length (def: 65535) -p don't capture in promiscuous mode -I capture in monitor mode, if available -B <buffer size> size of kernel buffer (def: 2MB) -y <link type> link layer type (def: first appropriate) -D print list of interfaces and exit -L print list of link-layer types of iface and exit Capture stop conditions: -c <packet count> stop after n packets (def: infinite) -a <autostop cond.> ... duration:NUM - stop after NUM seconds filesize:NUM - stop this file after NUM KB files:NUM - stop after NUM files Capture output: -b <ringbuffer opt.> ... duration:NUM - switch to next file after NUM secs filesize:NUM - switch to next file after NUM KB files:NUM - ringbuffer: replace after NUM files Input file: -r <infile> set the filename to read from (- to read from stdin) Processing: -2 perform a two-pass analysis -R <read filter> packet Read filter in Wireshark display filter syntax -Y <display filter> packet displaY filter in Wireshark display filter syntax -n disable all name resolutions (def: all enabled) -N <name resolve flags> enable specific name resolution(s): "mntC" -d <layer_type>==<selector>,<decode_as_protocol> ... "Decode As", see the man page for details Example: tcp.port==8888,http -H <hosts file> read a list of entries from a hosts file, which will then be written to a capture file. (Implies -W n) Output: -w <outfile|-> write packets to a pcap-format file named "outfile" (or to the standard output for "-") -C <config profile> start with specified configuration profile -F <output file type> set the output file type, default is pcapng an empty "-F" option will list the file types -V add output of packet tree (Packet Details) -O <protocols> Only show packet details of these protocols, comma separated -P print packet summary even when writing to a file -S <separator> the line separator to print between packets -x add output of hex and ASCII dump (Packet Bytes) -T pdml|ps|psml|text|fields format of text output (def: text) -e <field> field to print if -Tfields selected (e.g. tcp.port, _ws.col.Info) this option can be repeated to print multiple fields -E<fieldsoption>=<value> set options for output when -Tfields selected: header=y|n switch headers on and off separator=/t|/s|<char> select tab, space, printable character as separator occurrence=f|l|a print first, last or all occurrences of each field aggregator=,|/s|<char> select comma, space, printable character as aggregator quote=d|s|n select double, single, no quotes for values -t a|ad|d|dd|e|r|u|ud output format of time stamps (def: r: rel. to first) -u s|hms output format of seconds (def: s: seconds) -l flush standard output after each packet -q be more quiet on stdout (e.g. when using statistics) -Q only log true errors to stderr (quieter than -q) -g enable group read access on the output file(s) -W n Save extra information in the file, if supported. n = write network address resolution information -X <key>:<value> eXtension options, see the man page for details -z <statistics> various statistics, see the man page for details --capture-comment <comment> add a capture comment to the newly created output file (only for pcapng) Miscellaneous: -h display this help and exit -v display version info and exit -o <name>:<value> ... override preference setting -K <keytab> keytab file to use for kerberos decryption -G [report] dump one of several available reports and exit default report="fields" use "-G ?" for more help WARNING: dumpcap will enable kernel BPF JIT compiler if available. You might want to reset it By doing "echo 0 > /proc/sys/net/core/bpf_jit_enable" |
Erst wollen wir uns die vorhandenen Interfaces anschauen und die Nummer merken.
1 |
sudo tshark -D |
Liefert die folgende Liste der verfügbaren Interfaces:
1. eth0
2. wlan0
3. wlan0mon
4. any
5. lo (Loopback)
6. nflog
7. nfqueue
8. usbmon1
Dann mal 10 Sekunden in die Datei traffic.pcap den Netzwerkverkehr von 1 (eth0) sichern mit:
1 |
tshark -i 1 -a duration:10 -w traffic.pcap |
Kommt es zu dieser Fehlermeldung:
1 2 3 |
Capturing on 'eth0' tshark: The capture session could not be initiated on interface 'eth0' (You don't have permission to capture on that device). Please check to make sure you have sufficient permissions, and that you have the proper interface or pipe specified. |
dann nicht aus Sicherheitsgründen mit sudo starten. TShark sollte nicht als root ausgeführt werden und der aktuelle User hat nicht die Rechte auf die Schnittstellen zuzugreifen.
Den aktuellen User (hier pi) für den Zugriff reconfigurieren mit:
1 |
sudo dpkg-reconfigure wireshark-common |
Es erscheint so ein Dialog:
Dort mit Ja antworten.
Damit die Berechigung für den User (pi) gesetzt wird, und es nicht zu dieser Fehlermeldung kommt:
1 |
tshark: Couldn't run /usr/bin/dumpcap in child process: Keine Berechtigung |
Einmal:
1 |
sudo usermod -a -G wireshark pi |
Dann einmal abmelden:
1 |
exit |
und wieder anmelden.
Schon können Dateien im PCAP Format auf dem Raspberry Pi erzeugt werden und auf einem anderen Rechner mit Wireshark ausgewertet werden.
Wie können aus den von Kismet generierten *.netxml Logdateien lesbare HTML oder CSV Dateien bzw. Reports erstellt werden?
Mit diesem Log-Viewer.
Das Archive klv-2.01.tar.gz laden und auspacken.
1 |
tar -xpzvf klv-2.01.tar.gz |
Das Verzeichnis klv-2.01
in das /home/pi/kismet
kopieren und in das Verzeichnis wechseln mit
1 |
cd /home/pi/kismet/klv-2.02 |
Python Script starten mit aufruf des Verzeichnisses, wo die Logdateien (*.netxml) liegen, also ein Verzeichnis höher
1 |
/klv.py .. |
es wird in dem Verzeichnis eine kismet-log-summary.html
generiert, hier ein Beispiel Report.
Oder für die CSV Generierung
1 |
./klv.py -o csv .. |
erzeugt kismet-log-summary.csv
.
Wie wird Kismet auf dem Raspberry Pi installiert? Zuerst mal eine Mindmap als Überblick zu Kismet:
Kismet wird wie folgt installiert, nachdem das System upgedated wurde:
sudo apt-get update
sudo apt-get upgrade
sudo apt-get install kismet
„Raspberry Pi: Kismet ( قسمة ) installieren unter Debian (jessie)“ weiterlesen
Wenn es beim hochfahren von Fhem zu folgenden Abbruch im Log kommt:
1 2 3 |
2014.10.06 18:41:43 1: reload: Error:Modul 02_RSS deactivated: Can't locate GD.pm in @INC (@INC contains: /etc/perl /usr/local/lib/perl/5.14.2 /usr/local/share/perl/5.14.2 /usr/lib/perl5 /usr/share/perl5 /usr/lib/perl/5.14 /usr/share/perl/5.14 /usr/local/lib/site_perl . ./FHEM ./FHEM/lib) at ./FHEM/02_RSS.pm line 13, <> line 1. BEGIN failed--compilation aborted at ./FHEM/02_RSS.pm line 13, <> line 1. |
hilft der RSS Workshop weiter.
Es fehlen einige Perl Package, die in der default wheezy Installation nicht installiert sind. Die können wir wie folgt installiert:
1 |
sudo apt-get install libgd2-xpm-dev libgd-graph-perl libgd-text-perl libimage-librsvg-perl libxml-simple-perl |
Nach einem Restart von Fhem, ist im Logfile alles wieder ok.
Wie kann eine Benachrichtigung mit dem Namen und der Telefonnummer an ein iPhone mit Fhem versendet werden. So weiss man immer wer zu Hause anruft und wann. So kann man evl. gleich zurückrufen.
In der Fritzbox 7490 gibt es jetzt keine Funktion mehr um das Telefonbuch in XML zu exportieren, wenn die Kontakte mit Google syncronisiert werden.
Wie kommt man nun an das passende XML Telefonbuch?
Über die kostenlose Fon App der Fritzbox, die es für iOS und Android gib. Oder mit diesem Tool selbst transformieren.
„Wie kann eine Pushover Benachrichtigung an ein iPhone mit Namen und Telefonnummer mit Fhem auf einem Raspberry Pi versendet werden?“ weiterlesen
In diesem Blog Beitrag habe ich beschrieben, wie OpenHab auf den rPi eingerichtet wird. Nun wollen wir analog zur Demo-Anwendung eine eigene Haus-Anwendung schreiben bzw. erstellen und sie nach und nach erweitern.
So sieht die Demo-Anwendung aus:
Die Demo-Anwendung wird wesentlich in zwei Dateien bearbeitet die man sich mal anschauen sollte:
1. /configuration/items/demo.items
2. /configuration/sitemap/demo.sitemap
„Wie kann die Demo-Anwendung von OpenHab auf dem Raspberry Pi erweitert und von einem iPad bzw. iPhone aufgerufen werden?“ weiterlesen