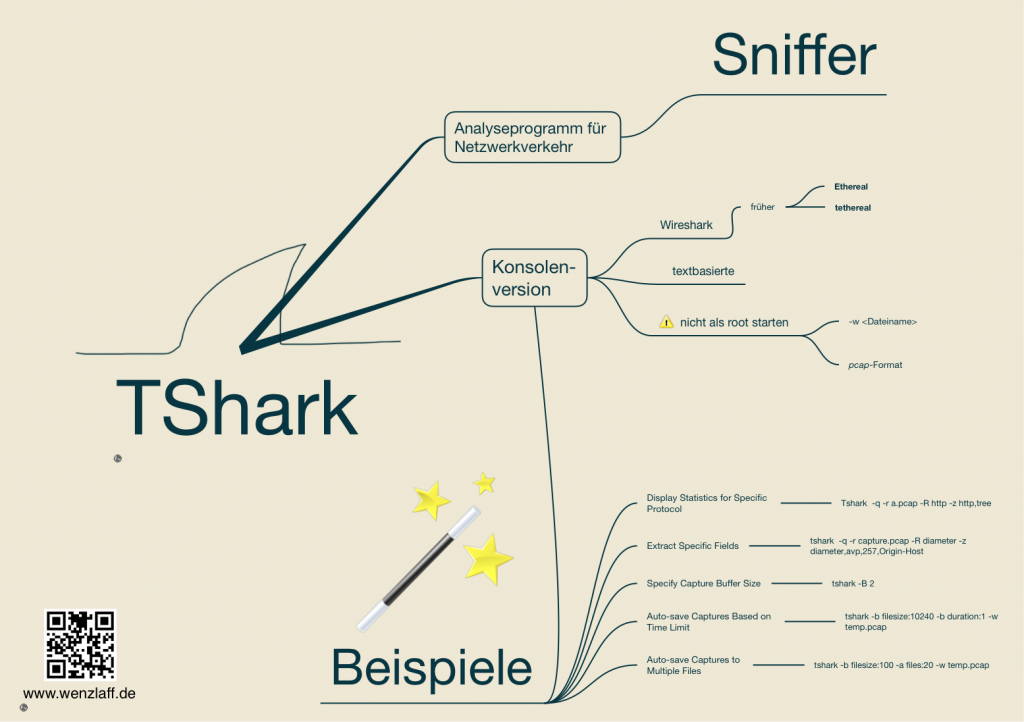
Zuerst mal eine Mindmap zu TShark, dem Kommandline-Tool von Wireshark (frühe Ethereal).

Installation
Zuerste den rPi aktualisieren und das Packet installieren mit:
|
1 2 3 |
sudo apt-get update sudo apt-get upgrade sudo apt-get install tshark |
Zuerst einmal die Befehle und die Version für die Komandozeile mit
|
1 |
tshark -h |
ausgeben:
|
1 2 3 4 5 6 7 8 9 10 11 12 13 14 15 16 17 18 19 20 21 22 23 24 25 26 27 28 29 30 31 32 33 34 35 36 37 38 39 40 41 42 43 44 45 46 47 48 49 50 51 52 53 54 55 56 57 58 59 60 61 62 63 64 65 66 67 68 69 70 71 72 73 74 75 76 77 78 79 80 81 82 83 84 85 86 87 88 89 90 91 92 93 94 95 |
TShark 1.12.1 (Git Rev Unknown from unknown) Dump and analyze network traffic. See http://www.wireshark.org for more information. Copyright 1998-2014 Gerald Combs <gerald@wireshark.org> and contributors. This is free software; see the source for copying conditions. There is NO warranty; not even for MERCHANTABILITY or FITNESS FOR A PARTICULAR PURPOSE. Usage: tshark [options] ... Capture interface: -i <interface> name or idx of interface (def: first non-loopback) -f <capture filter> packet filter in libpcap filter syntax -s <snaplen> packet snapshot length (def: 65535) -p don't capture in promiscuous mode -I capture in monitor mode, if available -B <buffer size> size of kernel buffer (def: 2MB) -y <link type> link layer type (def: first appropriate) -D print list of interfaces and exit -L print list of link-layer types of iface and exit Capture stop conditions: -c <packet count> stop after n packets (def: infinite) -a <autostop cond.> ... duration:NUM - stop after NUM seconds filesize:NUM - stop this file after NUM KB files:NUM - stop after NUM files Capture output: -b <ringbuffer opt.> ... duration:NUM - switch to next file after NUM secs filesize:NUM - switch to next file after NUM KB files:NUM - ringbuffer: replace after NUM files Input file: -r <infile> set the filename to read from (- to read from stdin) Processing: -2 perform a two-pass analysis -R <read filter> packet Read filter in Wireshark display filter syntax -Y <display filter> packet displaY filter in Wireshark display filter syntax -n disable all name resolutions (def: all enabled) -N <name resolve flags> enable specific name resolution(s): "mntC" -d <layer_type>==<selector>,<decode_as_protocol> ... "Decode As", see the man page for details Example: tcp.port==8888,http -H <hosts file> read a list of entries from a hosts file, which will then be written to a capture file. (Implies -W n) Output: -w <outfile|-> write packets to a pcap-format file named "outfile" (or to the standard output for "-") -C <config profile> start with specified configuration profile -F <output file type> set the output file type, default is pcapng an empty "-F" option will list the file types -V add output of packet tree (Packet Details) -O <protocols> Only show packet details of these protocols, comma separated -P print packet summary even when writing to a file -S <separator> the line separator to print between packets -x add output of hex and ASCII dump (Packet Bytes) -T pdml|ps|psml|text|fields format of text output (def: text) -e <field> field to print if -Tfields selected (e.g. tcp.port, _ws.col.Info) this option can be repeated to print multiple fields -E<fieldsoption>=<value> set options for output when -Tfields selected: header=y|n switch headers on and off separator=/t|/s|<char> select tab, space, printable character as separator occurrence=f|l|a print first, last or all occurrences of each field aggregator=,|/s|<char> select comma, space, printable character as aggregator quote=d|s|n select double, single, no quotes for values -t a|ad|d|dd|e|r|u|ud output format of time stamps (def: r: rel. to first) -u s|hms output format of seconds (def: s: seconds) -l flush standard output after each packet -q be more quiet on stdout (e.g. when using statistics) -Q only log true errors to stderr (quieter than -q) -g enable group read access on the output file(s) -W n Save extra information in the file, if supported. n = write network address resolution information -X <key>:<value> eXtension options, see the man page for details -z <statistics> various statistics, see the man page for details --capture-comment <comment> add a capture comment to the newly created output file (only for pcapng) Miscellaneous: -h display this help and exit -v display version info and exit -o <name>:<value> ... override preference setting -K <keytab> keytab file to use for kerberos decryption -G [report] dump one of several available reports and exit default report="fields" use "-G ?" for more help WARNING: dumpcap will enable kernel BPF JIT compiler if available. You might want to reset it By doing "echo 0 > /proc/sys/net/core/bpf_jit_enable" |
Erst wollen wir uns die vorhandenen Interfaces anschauen und die Nummer merken.
|
1 |
sudo tshark -D |
Liefert die folgende Liste der verfügbaren Interfaces:
1. eth0

2. wlan0

3. wlan0mon

4. any

5. lo (Loopback)

6. nflog

7. nfqueue

8. usbmon1
Dann mal 10 Sekunden in die Datei traffic.pcap den Netzwerkverkehr von 1 (eth0) sichern mit:
|
1 |
tshark -i 1 -a duration:10 -w traffic.pcap |
Kommt es zu dieser Fehlermeldung:
|
1 2 3 |
Capturing on 'eth0' tshark: The capture session could not be initiated on interface 'eth0' (You don't have permission to capture on that device). Please check to make sure you have sufficient permissions, and that you have the proper interface or pipe specified. |
dann nicht aus Sicherheitsgründen mit sudo starten. TShark sollte nicht als root ausgeführt werden und der aktuelle User hat nicht die Rechte auf die Schnittstellen zuzugreifen.
Abhilfe
Den aktuellen User (hier pi) für den Zugriff reconfigurieren mit:
|
1 |
sudo dpkg-reconfigure wireshark-common |
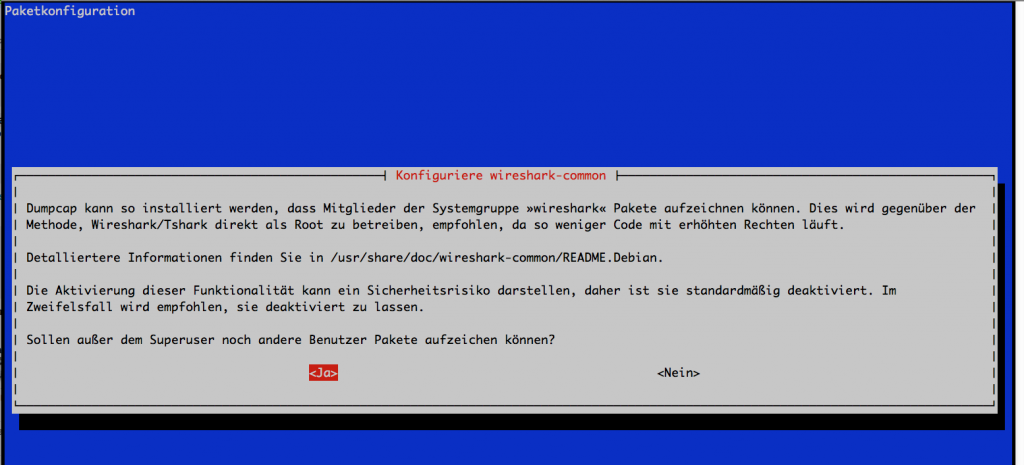
Es erscheint so ein Dialog:

Dort mit Ja antworten.
Damit die Berechigung für den User (pi) gesetzt wird, und es nicht zu dieser Fehlermeldung kommt:
|
1 |
tshark: Couldn't run /usr/bin/dumpcap in child process: Keine Berechtigung |
Einmal:
|
1 |
sudo usermod -a -G wireshark pi |
Dann einmal abmelden:
|
1 |
exit |
und wieder anmelden.
Schon können Dateien im PCAP Format auf dem Raspberry Pi erzeugt werden und auf einem anderen Rechner mit Wireshark ausgewertet werden.
