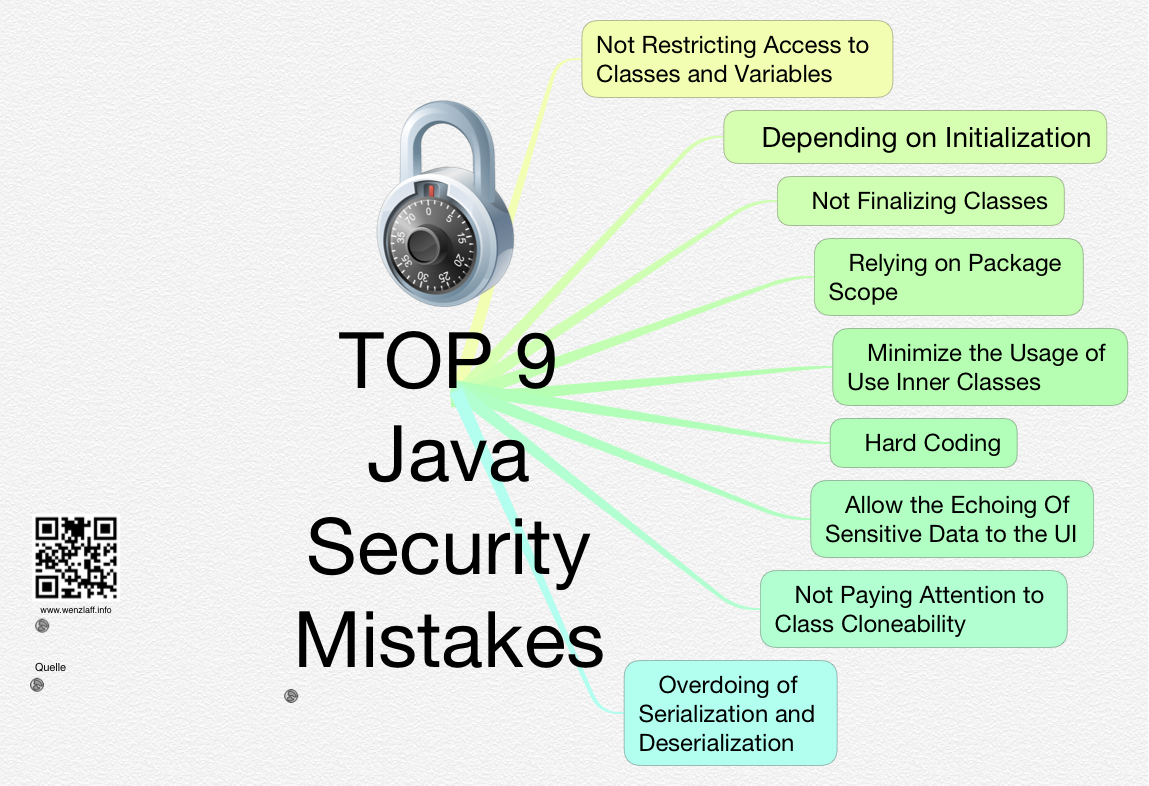
- Not Restricting Access to Classes and Variables
- Depending on Initialization
- Not Finalizing Classes
- Relying on Package Scope
- Minimize the Usage of Use Inner Classes
- Hard Coding
- Allow the Echoing Of Sensitive Data to the UI
- Not Paying Attention to Class Cloneability
- Overdoing of Serialization and Deserialization
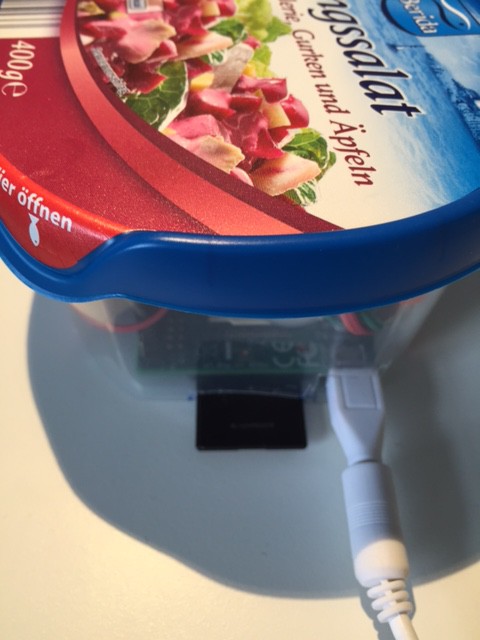
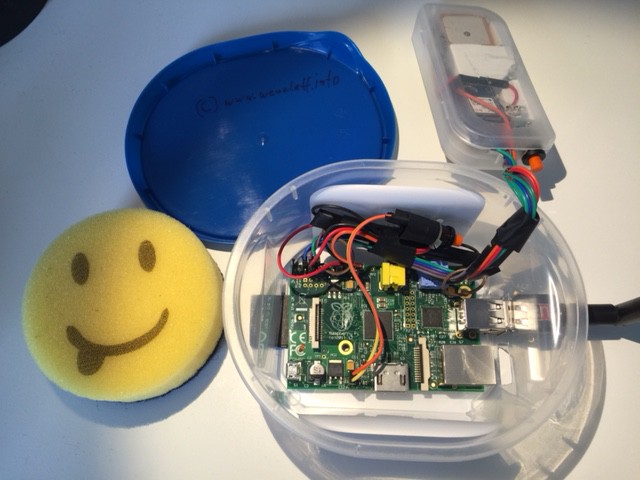
Raspberry Pi Rezept: Neues 400g Heringssalat Gehäuse – Lecker – Gut – Billig – Kismet – GPS
Es muss nicht immer ein teures Fertig-Gehäuse für den Raspberry Pi sein. Es gibt auch viele biologische Alternativen. Hier das Oster Rezept. Man nehme einen Heringssalat mit Rote Bete, Sellerie, Gurken und Äpfeln. Dann alles auf essen. Lecker. Das war der angenehme Teil der Arbeit.
Nun das Gehäuse sauber machen (lassen). Glaube nicht das das Gehäuse Spülmaschinen geeignet ist. Was meint Ihr?
Dann die Aussparungen für die SD-Karte, USB, Etherneth und Stromversorgung anzeichnen und mit einem scharfen Cuttermesser ausschneiden. Achtung! Das Cuttermesser nicht in Kinderhände geben, sonst gibt es Fleischsalat 😉
Schon hat die Kismet-Drohne mit GPS ein neues Zuhause. Viel Spaß bei der Bilderstrecke:


Raspberry Pi: Kismet WLAN Auswertung in Hannover und Langenhagen in 2015
Wie hier beschrieben, können die Kismet Dateien auch ausgewertet werden, da sie in einer DB vorliegen. Also erst einmal die Anzahl der vorhandenen WLANs die in 2015 mit einem Raspberry Pi und Kismet inkl. GPS Modul in Langenhagen und Hannover empfangen wurden.
|
1 |
sqlite3 wireless.dbl "select count(*) from wireless" |
Ausgabe: 4416
Nun wollen wir mal sehen, wie so die jeweiligen Verschlüsselungsmodus sind.
|
1 |
sqlite3 wireless.dbl "select Encryption, count(Encryption) from wireless group by Encryption" |
Ausgabe:
None |645
WEP |77
WPA Migration Mode WEP40 WPA+TKIP WPA+PSK |1
WPA+AES-CCM |143
WPA+PSK WPA+AES-CCM |1630
WPA+TKIP |12
WPA+TKIP WPA+AES-CCM |32
WPA+TKIP WPA+PSK |124
WPA+TKIP WPA+PSK WPA+AES-CCM |1752
Diese Daten in einer Grafik:

UPDATE 5.4.15: Neue Auswertung mit Basis 10012 Einträge aus Hannover und Langenhagen. Die wireless.dbl hat jetzt eine Größe von 5,5 MB.
|
1 2 3 4 5 6 7 8 9 10 |
None|1368 WEP|179 WEP40 WPA+TKIP WPA+PSK|1 WPA Migration Mode WEP40 WPA+TKIP WPA+PSK|1 WPA+AES-CCM|249 WPA+PSK WPA+AES-CCM|3634 WPA+TKIP|23 WPA+TKIP WPA+AES-CCM|70 WPA+TKIP WPA+PSK|341 WPA+TKIP WPA+PSK WPA+AES-CCM|4146 |
Die nicht verschlüsselten WLANs sind meistens kostenpflichtige Zugänge von Kabel-Deutschland und auch von der Telekom. Hotels und Geschäfte haben auch oft öffentliche WLAN Zugänge. Ein paar private User sind aber auch dabei 😉
Raspberry Pi: Wie kann der Kismet-Server sauber rauf und runter gefahren werden zum WarWalking (WarDriving)?
Wenn ein Kismet-Server auf dem Raspberry Pi läuft, muss der Server sauber rauf und runter gefahren werden, sonst werden die *NETXML Dateien wegen einem fehlenden sync nicht vollständig auf die SD-Karte geschrieben. Das Problem ist aber, wie kann der Raspberry Pi eingerichtet werden, so das der gpsd und Kismet automatisch hoch und auch sauber wieder runter fahren, ohne das ein Bildschirm bzw. Konsole angeschlossen wird? Und wie kann vom GPS Empfänger die Systemzeit gesetzt werden, da der Raspberry Pi ja keine Systemuhr hat und es beim WarWalking kein Internet mit NTP gibt ?
Die Lösung des Problems wird in dieser Anleitung beschrieben.
Wir brauchen ein Script zum automatischen hochfahren und ein Script das auf einen Tastendruck wartet. „Raspberry Pi: Wie kann der Kismet-Server sauber rauf und runter gefahren werden zum WarWalking (WarDriving)?“ weiterlesen
Raspberry Pi: Wie kann ein Hardware-Reset-Taster eingebaut werden?
Der Lötkolben war gerade noch heiß, deshalb noch mal eben zwei Kontakte an dem Raspberry Pi (Model B Revision 2.0, ältere Rev. haben diese Reset Logik nicht, meiner hat Rev. 7, siehe cat /proc/cpuinfo) angelötet. In der 2 Rev. des rPi kann an P6 eine Steckerleiste angelötet werden. Wenn diese beiden Kontakte über einen Taster geschlossen werden, wird ein Hardware-Reset ausgelöst. Ist evl. mal ganz hilfreich.
Hier findet Ihr die zwei P6 Lötpunkte, an denen ich die Steckerleiste angelötet haben:

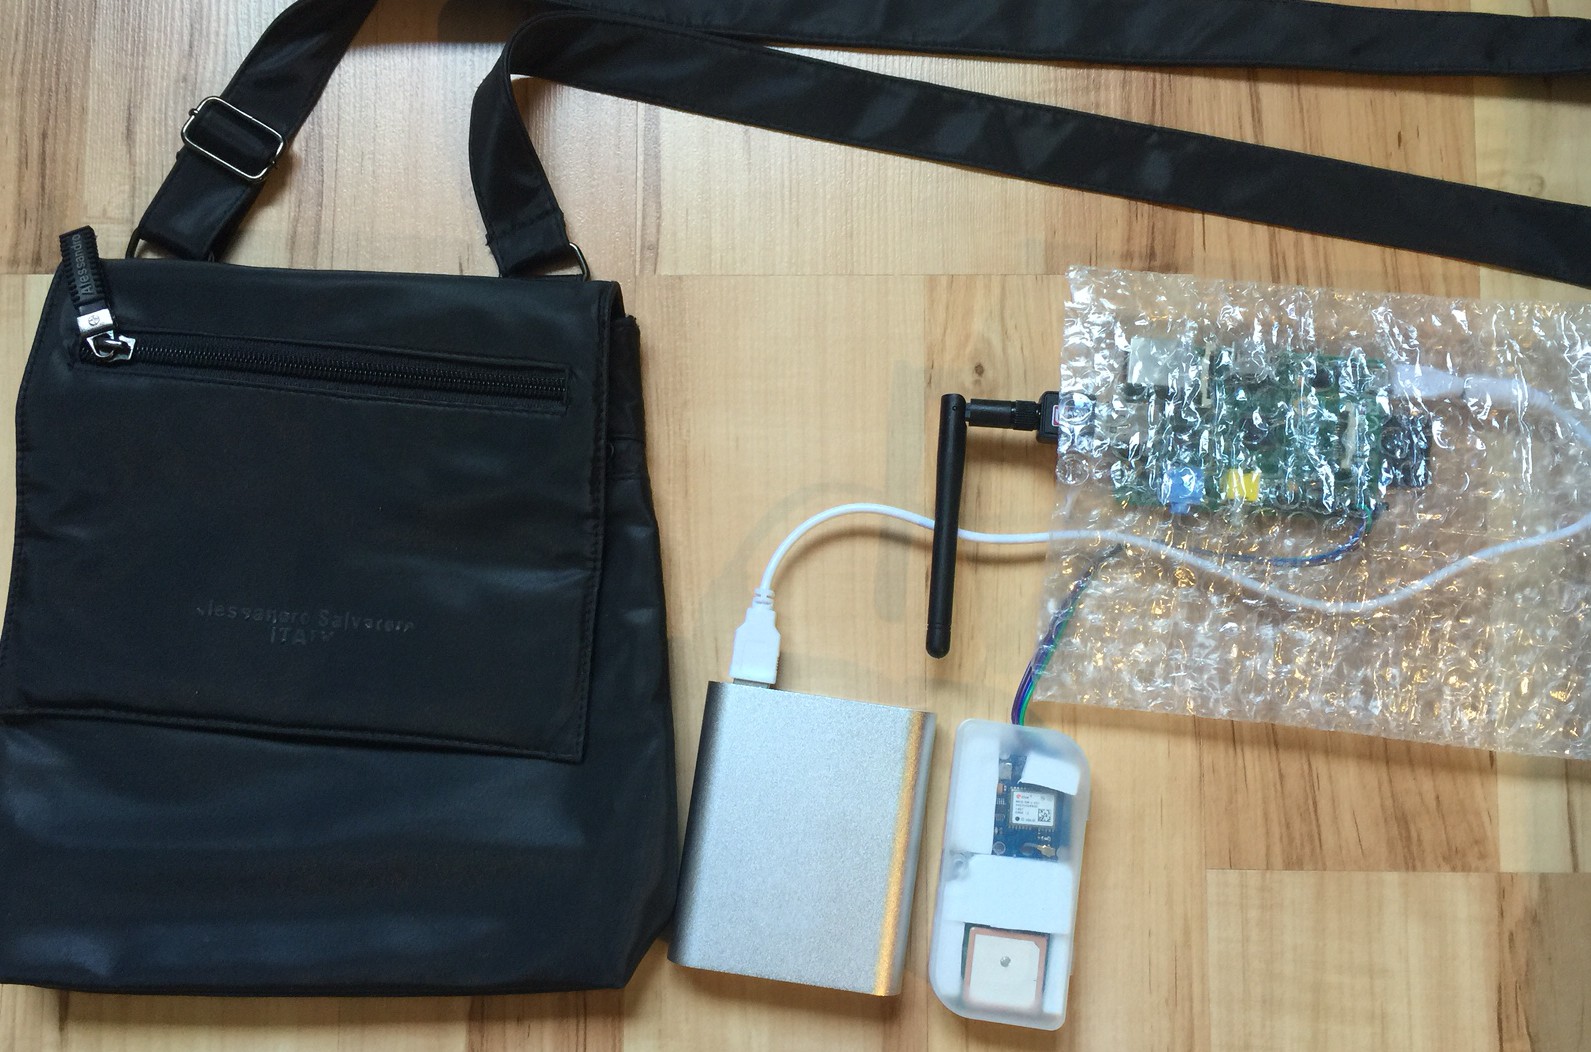
Raspberry Pi: Wardriving (Warwalking) Ausrüstung (Hardware)
Raspberry Pi: Wie kann die Bandbreite pro Prozess mit NetHogs angezeigt werden?
Mit dem Kommandozeilenwerkzeug nethogs, das die Bandbreitennutzung nach Prozessen und Sub-Netzen gruppieren kann, bekommt man schnell einen Überblick.
Es listet die PID, den Prozessnamen, Send Bytes, Received Bytes und den ausführenden Benutzer auf.
Die Installation ist auf dem Raspberry Pi mit:
|
1 |
apt-get nethogs |
schnell erledigt. Das Programm hat nur die folgenden Abhängigkeiten:
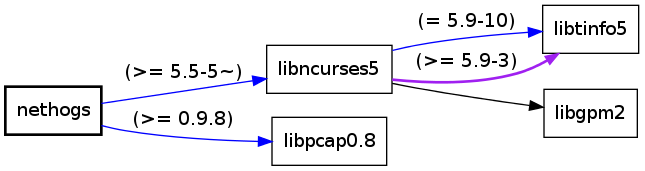
„Raspberry Pi: Wie kann die Bandbreite pro Prozess mit NetHogs angezeigt werden?“ weiterlesen
Raspberry Pi: Was ist bei Kali Linux anders als im Debian?
Wer den Raspberry Pi bisher unter Debian laufen hat, wundert sich evl. über einige Unterschiede zu Kali Linux. Welche fallen zuerst auf?
Es gibt default kein raspi-config. Der Speicher der SD-Karte kann aber mit raspi-config sehr einfach expandiert werden. Deshalb ausnahmsweise ein paar Packages, die nicht von Kali stammen, wie folgt installieren mit dem root User:
|
1 2 3 4 5 6 7 8 9 |
apt-get update apt-get upgrade wget http://archive.raspberrypi.org/debian/pool/main/r/raspi-config/raspi-config_20150706_all.deb # lua5.1 da lua5.2 nicht läuft wget http://http.us.debian.org/debian/pool/main/l/lua5.1/lua5.1_5.1.5-7.1_armel.deb wget http://http.us.debian.org/debian/pool/main/t/triggerhappy/triggerhappy_0.3.4-2_armel.deb dpkg -i triggerhappy_0.3.4-2_armel.deb dpkg -i lua5.1_5.1.5-7.1_armel.deb dpkg -i raspi-config_20150706_all.deb |
Dann gibt es unter Kali kein /boot Verzeichnis mit den Boot Dateien. Das /boot Verzeichnis ist dort leer. Das /boot Verzeichnis liegt auf einer anderen Partition und zwar auf mmcblk0p1. Deshalb ein Verzeichnis z.B. /boot-bereich anlegen und mounten. Dann können diese Dateien bearbeitet werden.
Wenn die Dateien bearbeitet wurden, einfach das Verzeichnis wieder umounten.
|
1 2 3 4 |
mkdir /boot-bereich mount /dev/mmcblk0p1 /boot-bereich/ nano /boot-bereich/config.txt umount /boot-bereich |
Welche Unterschiede fallen Euch auf? Gern als Kommentar.
Raspberry Pi Wardrive: Kismet compilieren und WLANs auf Google anzeigen
Da es auf Debian wheezy noch nicht das aktuelle Kismet Package gibt, hier die Anleitung wie es compiliert und installiert werden kann.
|
1 2 3 4 5 6 7 8 9 10 |
# System aktualisieren sudo apt-get update sudo apt-get upgrade # nötige Programme laden sudo apt-get install screen gpsd libncurses5-dev libpcap-dev tcpdump libnl-dev wget http://www.kismetwireless.net/code/kismet-2013-03-R1b.tar.gz tar xfvz kismet-2013-03-R1b.tar.gz cd kismet-2013-03-R1b/ ./configure sudo make install |
Wenn der GPS Empfänger über gpsd läuft und wie bei mir nicht an dem USB Port hängt, müssen in /usr/local/etc/kismet.conf noch folgende Einstellungen gemacht werden.
|
1 2 3 4 5 6 7 |
# (Optional) Verzeichnis wo die Logeinträge hingeschrieben werden, sonst start Verzeichnis logprefix=/home/pi/kismet # das WLAN Interface und den WLAN-Stick Type ncsource=wlan0:type=rt2800usb gps=true gpstype=gpsd gpshost=localhost:2947 |
Gestartet wird Kismet bei mir über ein kleines bash Script start-wardrive.sh:
|
1 2 3 4 5 6 |
#!/bin/bash cd kismet-2013-03-R1b sudo pkill wpa_cli sudo pkill ifplugd sudo pkill wpa_supplicant sudo kismet |
Für die Auswertung kann man das Python Script zum umwandeln einer NETXML Datei in das KML Format verwenden, es geht wie folgt
„Raspberry Pi Wardrive: Kismet compilieren und WLANs auf Google anzeigen“ weiterlesen
Raspberry Pi: Wardriving (Warwalking) Kismet netxml Dateien visualisieren mit Google Earth
Auswertung der netxml Daten geht auch sehr gut mit giskismet, das die netxml Dateien in eine SQLite Datenbank (default: wireless.dbl ) kopiert und auch GoogleEarth / KML Dateien für die Visualisierung via SQL erzeugen kann.
Installiert wird es auf dem Raspberry Pi mit: „Raspberry Pi: Wardriving (Warwalking) Kismet netxml Dateien visualisieren mit Google Earth“ weiterlesen
Raspberry Pi: GPS-Module GY-GPS6MV2 einrichten
Haben nun auch einen GPS-Empfänger (Datenblatt (pdf)) bekommen. Hier ein paar Highlights:
- Model: GY-GPS6MV2
- Power Supply Range: 3 V to 5 V
- Ceramic antenna
- EEPROM for saving the configuration data when powered off
- Backup battery
- LED signal indicator
- Antenna Size: 25 x 25 mm
- Module Size: 25 x 35 mm
- Default Baud Rate: 9600 bps
Klein und billig: „Raspberry Pi: GPS-Module GY-GPS6MV2 einrichten“ weiterlesen
iPhone 6 plus: VPN on Demand mit IPSec unter iOS 8 mit “shared secret” möglich
Wie kann mit einem iPhone automatisch eine VPN Verbindung hergestellt werden, ohne das man es immer manuell vorher anschalten muss? Also VPN on Demand mit IPSec und „schared secret“. Das ist hilfreich, wenn man in öffentlichen WLANs unterwegs ist, so wird dann immer autom. eine VPN Verbindung aufgebaut, wenn sie benötigt wird. Es wird also nicht einmal vergessen. Und schon cool, wenn Anrufe auf dem Handy per VPN geführt werden können und Push-Benachrichtigungen autom. per VPN kommen.
Und wie kann automatisch das VPN im eigenen bekannten WLAN und Hotspots deaktivert werden? Das alles mit einem orginal iPhone, es ist kein Jailbreak nötig.
Hatte vor einiger Zeit schon mal versucht, mit einem iPhone eine automatische VPN Verbindung (VPN on Demand) aufzubauen. Das hatte nicht geklappt, wie hier beschrieben, weil diese Möglichkeit im Apple Konfigurationsprogramm nicht angeboten wird.
Habe jetzt aber einen Hinweis auf diese Quelle von Thomas Witt erhalten (Danke). Damit klappt es super. Wie muss man vorgehen?
1. Die VPN_FritzBox_OnDemand.mobileconfig laden.
2. Alle stellen die mit REPLACE gekennzeichnet sind, mit eigenen Werten ersetzen.
3. Die Profile Datei per E-Mail an das iPhone senden und das Profile installieren.
4. Manuell testen ob Verbindung läuft.
Habe es mit iPhone 6 Plus und iPadMini unter iOS 8.1.2 mit einer FritzBox 7490 (Version 06.23) getestet.
Hier die nötige Profile Datei von oben, mit Kommentaren von mir aus der Apple Referenz, so kann man auf einem Blick sehen, was man anpassen kann bzw. muss:
|
1 2 3 4 5 6 7 8 9 10 11 12 13 14 15 16 17 18 19 20 21 22 23 24 25 26 27 28 29 30 31 32 33 34 35 36 37 38 39 40 41 42 43 44 45 46 47 48 49 50 51 52 53 54 55 56 57 58 59 60 61 62 63 64 65 66 67 68 69 70 71 72 73 74 75 76 77 78 79 80 81 82 83 84 85 86 87 88 89 90 91 92 93 94 95 96 97 98 99 100 101 102 103 104 105 106 107 108 109 110 111 112 113 114 115 116 117 118 119 120 121 122 123 124 125 126 127 128 129 130 131 132 133 134 135 136 137 138 139 140 141 142 143 144 145 146 147 148 149 150 151 152 153 154 155 156 157 158 159 160 161 162 163 164 165 166 167 168 169 170 171 172 173 174 175 176 177 178 179 180 181 182 183 184 185 186 187 188 189 190 191 192 193 194 195 196 197 198 199 200 201 202 203 204 205 206 207 |
<?xml version="1.0" encoding="UTF-8"?> <!DOCTYPE plist PUBLIC "-//Apple//DTD PLIST 1.0//EN" "http://www.apple.com/DTDs/PropertyList-1.0.dtd"> <!-- https://developer.apple.com/library/ios/featuredarticles/iPhoneConfigurationProfileRef/Introduction/Introduction.html#//apple_ref/doc/uid/TP40010206-CH1-SW7 --> <plist version="1.0"> <dict> <!-- VPN Payload The VPN payload is used for traditional systemwide VPNs based on L2TP, PPTP, and IPSec. This payload should not be confused with the Per-App VPN, described in Per-App VPN Payload. The VPN payload is designated by specifying com.apple.vpn.managed as the PayloadType value. In addition to the settings common to all payload types, the VPN payload defines the following keys --> <key>PayloadContent</key> <array> <dict> <!-- Determines the settings available in the payload for this type of VPN connection. IPSec (Cisco) --> <key>IPSec</key> <dict> <!-- Either SharedSecret or Certificate. Used for L2TP and Cisco IPSec. --> <key>AuthenticationMethod</key> <!-- The shared secret for this VPN account. Only present if AuthenticationMethod is SharedSecret. Used for L2TP and Cisco IPSec. --> <string>SharedSecret</string> <!-- 1 if the VPN connection should be brought up on demand, else 0. --> <key>OnDemandEnabled</key> <integer>1</integer> <!-- Determines when and how an on-demand VPN should be used. --> <key>OnDemandRules</key> <array> <dict> <!-- The action to take if this dictionary matches the current network. --> <key>Action</key> <!-- Disconnect—Tear down the VPN connection and do not reconnect on demand as long as this dictionary matches. --> <string>Disconnect</string> <!-- An interface type. If specified, this rule matches only if the primary network interface hardware matches the specified type. Supported values are Ethernet, WiFi, and Cellular. --> <key>InterfaceTypeMatch</key> <string>WiFi</string> <!-- An array of SSIDs to match against the current network. If the network is not a Wi-Fi network or if the SSID does not appear in this array, the match fails. Omit this key and the corresponding array to match against any SSID. --> <key>SSIDMatch</key> <array> <!-- TODO: eine oder mehree Netzwerk SSID einfügen --> <string>REPLACE_secure_wpa2_network_ssid</string> <string>REPLACE_my_private_wpa_network_ssid</string> </array> </dict> <dict> <!-- The action to take if this dictionary matches the current network. --> <key>Action</key> <!-- Connect — Unconditionally initiate a VPN connection on the next network attempt. --> <string>Connect</string> <!-- An interface type. If specified, this rule matches only if the primary network interface hardware matches the specified type. Supported values are Ethernet, WiFi, and Cellular. --> <key>InterfaceTypeMatch</key> <string>WiFi</string> <!-- An array of SSIDs to match against the current network. If the network is not a Wi-Fi network or if the SSID does not appear in this array, the match fails. Omit this key and the corresponding array to match against any SSID. --> <key>SSIDMatch</key> <array> <!-- TODO: evl. SSID für Hotspots oder Firma ergaenzen --> <string>REPLACE_UNSECURE_PUBLIC_SSID</string> <string>REPLACE_Public</string> <string>REPLACE_Telekom</string> </array> </dict> <dict> <key>Action</key> <string>Connect</string> <key>InterfaceTypeMatch</key> <string>WiFi</string> </dict> <dict> <key>Action</key> <!-- Ignore — Leave any existing VPN connection up, but do not reconnect on demand as long as this dictionary matches. --> <string>Connect</string> <key>InterfaceTypeMatch</key> <string>Cellular</string> </dict> <dict> <key>Action</key> <string>Ignore</string> </dict> </array> <!-- Present only if AuthenticationMethod is SharedSecret. The name of the group to use. If Hybrid Authentication is used, the string must end with [hybrid]. Used for Cisco IPSec. --> <key>LocalIdentifier</key> <!-- TODO: VPN Login eingeben --> <string>REPLACE_VPN_LOGIN</string> <!-- Present only if AuthenticationMethod is SharedSecret. The value is KeyID. Used for L2TP and Cisco IPSec. --> <key>LocalIdentifierType</key> <string>KeyID</string> <!-- IP address or host name of the VPN server. Used for Cisco IPSec. --> <key>RemoteAddress</key> <!-- TODO: VPN Server eintragen z.B. xxxxxxxxxxxxxxxxx.myfritz.net oder DynDNS der Fritzbox --> <string>REPLACE_VPN_SERVER</string> <!-- The shared secret for this VPN account. Only present if AuthenticationMethod is SharedSecret. Used for L2TP and Cisco IPSec. --> <key>SharedSecret</key> <!-- TODO: shared secret für den VPN Account eingeben. z.B. Shared-Secret-Fritzbox-VPN-User-Config --> <string>REPLACE_SHARED_SECRET</string> <!-- 1 if Xauth is on, 0 if it is off. Used for Cisco IPSec. --> <key>XAuthEnabled</key> <integer>1</integer> <!-- User name for VPN account. Used for Cisco IPSec. --> <key>XAuthName</key> <!-- TODO VPN Login Name (Gruppenname) eingeben --> <string>REPLACE_VPN_LOGIN</string> <!-- Keine Doku zu den Parameter, evl. Xauth auf 0 setzen --> <key>XAuthPassword</key> <!-- TODO: VPN Passwort eingeben --> <string>REPLACE_VPN_PASSWORD</string> </dict> <key>IPv4</key> <dict> <!-- Specifies whether to send all traffic through the VPN interface. If true, all network traffic is sent over VPN. --> <key>OverridePrimary</key> <integer>1</integer> </dict> <!-- Optional. A description of the profile, shown on the Detail screen for the profile. This should be descriptive enough to help the user decide whether to install the profile. --> <key>PayloadDescription</key> <!-- TODO: Beschreibung eingeben --> <string>Configures VPN settings</string> <!-- Optional. A human-readable name for the profile. This value is displayed on the Detail screen. It does not have to be unique. --> <key>PayloadDisplayName</key> <!-- TODO: Beschreibung eingeben --> <string>VPN</string> <!-- A reverse-DNS style identifier (com.example.myprofile, for example) that identifies the profile. This string is used to determine whether a new profile should replace an existing one or should be added. --> <key>PayloadIdentifier</key> <!-- TODO: Eingeben --> <string>REPLACE_UUID1.com.apple.vpn.managed.REPLACE_UUID2</string> <!-- The VPN payload is designated by specifying com.apple.vpn.managed as the PayloadType value. --> <key>PayloadType</key> <string>com.apple.vpn.managed</string> <!-- A globally unique identifier for the payload. The actual content is unimportant, but it must be globally unique. In OS X, you can use uuidgen to generate reasonable UUIDs. --> <key>PayloadUUID</key> <!-- TODO: UUID eingeben --> <string>REPLACE_UUID2</string> <!-- The version number of the individual payload. A profile can consist of payloads with different version numbers. For example, changes to the VPN software in iOS might introduce a new payload version to support additional features, but Mail payload versions would not necessarily change in the same release. --> <key>PayloadVersion</key> <real>1</real> <key>Proxies</key> <dict /> <!-- Description of the VPN connection displayed on the device. --> <key>UserDefinedName</key> <!-- TODO: Anpassen --> <string>VPN OnDemand</string> <!-- Determines the settings available in the payload for this type of VPN connection. IPSec (Cisco)... --> <key>VPNType</key> <string>IPSec</string> </dict> </array> <!-- Payload Dictionary Keys Common to All Payloads If a PayloadContent value is provided in a payload, each entry in the array is a dictionary representing a configuration payload. The following keys are common to all payloads: --> <!-- Optional. A human-readable name for the profile payload. This name is displayed on the Detail screen. It does not have to be unique. --> <key>PayloadDisplayName</key> <!-- TODO: Anpassen --> <string>VPN OnDemand</string> <!-- A reverse-DNS-style identifier for the specific payload. It is usually the same identifier as the root-level PayloadIdentifier value with an additional component appended. --> <key>PayloadIdentifier</key> <!-- TODO: UUID eingeben --> <string>REPLACE_UUID1</string> <!-- Optional. If present and set to true, the user cannot delete the profile (unless the profile has a removal password and the user provides it). --> <key>PayloadRemovalDisallowed</key> <false /> <!-- The only supported value is Configuration. --> <key>PayloadType</key> <string>Configuration</string> <!-- A globally unique identifier for the payload. The actual content is unimportant, but it must be globally unique. In OS X, you can use uuidgen to generate reasonable UUIDs. --> <key>PayloadUUID</key> <!-- TODO: UUID einfügen --> <string>REPLACE_UUID3</string> <!-- The version number of the individual payload. A profile can consist of payloads with different version numbers. For example, changes to the VPN software in iOS might introduce a new payload version to support additional features, but Mail payload versions would not necessarily change in the same release. --> <key>PayloadVersion</key> <integer>1</integer> </dict> </plist> |
In welcher Umbebung läuft es bei Euch? Oder einfach nur einen like hinterlassen.
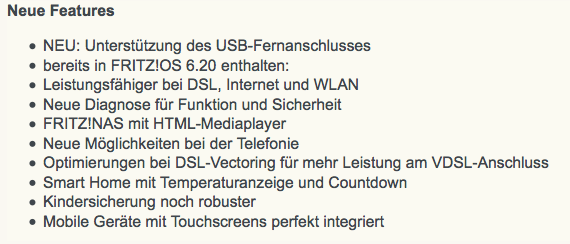
FRITZ!Box 7490 update FRITZ!OS 6.23 veröffentlicht
Das Update war ja schon letztes Jahr, ist aber bei mir irgendwie vorbeigelaufen 😉
So werden die Features auch mehr, einfach die „alten“ in der Liste mit aufnehmen. Neue Möglichkeiten bei der Telefonie, welche? 😉
php Sicherheitsupdate für Raspberry Pi veröffentlicht (CVE-2014-8142, Debian, 5.4.36-0+deb7u1)
Für die aktuelle php5 Version gibt es ein Sicherheitsupdate.
Bei diesen Abhängikeiten (siehe Mindmap) kein Wunder:

Also wie gewohnt ein:
|
1 2 |
sudo update sudo upgrade |
und checken ob die neue Version vorhanden ist:
|
1 |
apt-show-versions php5 |
Es muss die Version: php5/wheezy uptodate 5.4.36-0+deb7u1 ausgegeben werden.
Wenn nicht, siehe hier.
Raspberry Pi: „Es ist später als Du denkst!“ oder Network Time Protocol (ntp) Sicherheitsupdate für Debian und Mac OS X veröffentlicht
Wie auf Heise berichtet wird, gibt es ein ntp Sicherheitsupdate das sehr schnell eingespielt werden sollte. Das gilt auch für die aktuellen Debian wheezy Distribution für den Raspberry Pi.
Erst mal eine Mindmap zu ntp:
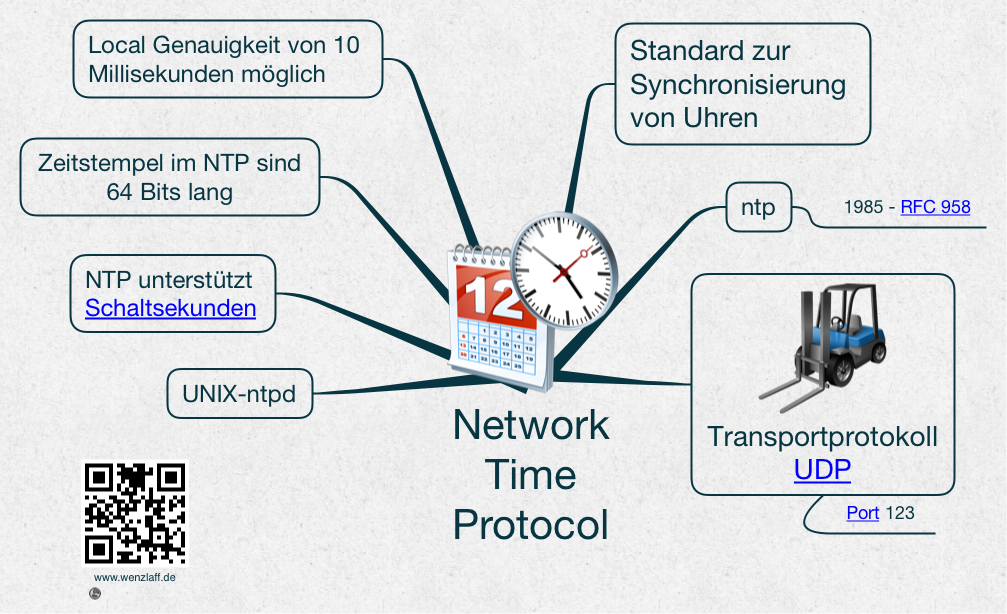
Mit Pufferüberläufe, die sich durch passend erstellte NTP-Pakete ausnutzen lassen, erhält der Angreifer root Recht auf dem System.
Auf dem Raspberry Pi hat das ntp Package folgende Abhängigkeiten:

Was muss auf dem Raspberry Pi getan werden?
|
1 2 |
sudo apt-get update sudo apt-get upgrade |
Dann ist das System auf den aktuellen Stand.
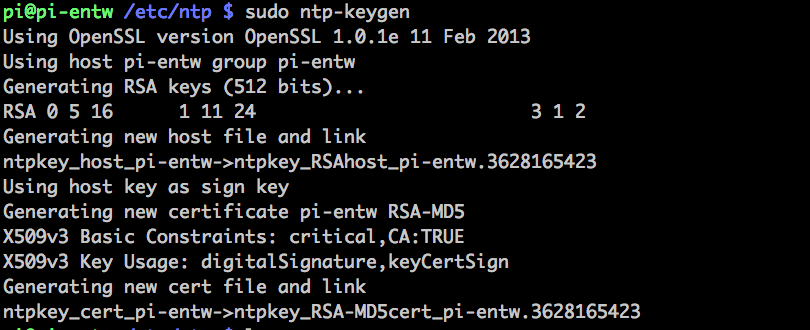
Dann können die ntp Keys neu generiert werden. Dazu einmal
|
1 2 |
sudo mkdir /etc/ntp sudo ntp-keygen |
ausführen. Es erfolgt folgende Ausgabe:
Wer noch schauen möchte, ob die gefixte Version installiert ist, gibt einmal apt-show-versions -p ntp ein und erhält die gefixt Version angezeigt: version 1:4.2.6.p5+dfsg-2+deb7u1

Auf für Mac OS X gibt es ein Update, das wie gewohnt eingespielt werden sollte:

Wie kann ein automatisches backup für den Raspberry Pi auf ein USB-Stick mit raspibackup eingerichtet werden?
Um schnell ein Raspberry Pi System was aufwendig erstellt wurde, jederzeit wiederherzustellen ist ein Backup oder eine Sicherungskopie nötig.
So hat man seine wichtigsten Daten und Einstellungen jederzeit vorhanden. Manuell ein Backup zu erstellen vergisst man doch immer, so musste eine automatisch Lösung her.
Es gibt da ein gutes Script, welches automatisch Backups anlegt und das mit guter Anleitung.
Hier mal die Installation des Scriptes und weitere Hinweise, die dort nicht erwähnt werden und bei mir nötig waren.
Installation des raspibackup Scriptes:
|
1 2 3 4 5 6 |
# Script downloaden wget http://www.linux-tips-and-tricks.de/de/downloads/raspibackup-sh/download -O raspiBackup.sh # und nach /usr/local/bin verschieben mv raspiBackup.sh /usr/local/bin # Ausführungs Rechte vergeben sudo chmod 755 /usr/local/bin/raspiBackup.sh |
Für das formatieren und mounten des USB-Sticks kann man hier schauen.
Kurz:
|
1 2 3 4 5 6 7 8 9 10 11 12 13 14 15 16 17 18 19 20 21 22 23 24 |
# Schauen wo der USB-Stick ist cat /var/log/messages # oder ls -l /dev/sd* # Mount Verzeichnis anlegen mkdir /media/usbstick # Usb-Stick mit ext4 formatieren mkfs.ext4 /dev/sda1 # Mounten sudo mount /dev/sda1 /media/usbstick # das Mounten überprüfen cat /etc/mtab # UUID ermitteln ls -l /dev/disk/by-uuid/ # umount sudo umount /dev/sda1 # für das autom. Booten eintragen sudo nano /etc/fstab # in /etc/fstab ergänzen UUID=ermittelte uuid /media/usbdisk ext4 defaults 0 0 # reboot sudo reboot # check ob autom. gemountet cat /etc/mtab |
Das Backup soll nun automatisch ausgeführt werden. Dazu wird die cron verwendet.
Die crontab muss mit einer Leerzeile enden.
Um das Script automatisch zu starten, und eine E-Mail Benachrichtigung zu versenden in der Crontab die folgenden Befehle ergänzen.
Öffnen der Crontab Datei:
|
1 |
sudo crontab -e |
Folgende Zeilen ergänzen (leer Zeile am Ende nicht vergessen):
|
1 2 3 4 5 6 |
# Jeden Sonntag um 22 Uhr ein Backup nach usbstick im tar Format der ganzen SD-Karte und 4 Versionen vorhalten und e-mail versenden 00 22 * * 0 /bin/bash --login /usr/local/bin/raspiBackup.sh -p /media/usbstick -t tar -k 4 -s ssmtp -e email@kein-spam.de # Jeden Samstag um 5 Uhr ein dd backup auf den usbstick der ganzen SD-Karte und 4 Versionen behalten und e-mail versenden 00 5 * * 6 /bin/bash --login /usr/local/bin/raspiBackup.sh -p /media/usbstick -t dd -k 4 -s ssmtp -e email@kein-spam.de # Jeden Mittwoch um 23 Uhr ein tar backup auf den usbstick der ganzen SD-Karte und 4 Versionen behalten und e-mail versenden 00 23 * * 3 /bin/bash --login /usr/local/bin/raspiBackup.sh -p /media/usbstick -t tar -k 4 -s ssmtp -e email@kein-spam.de |
Restarten der crontab mit:
|
1 |
sudo /etc/init.d/cron restart |
Um E-Mails zu versenden, muss wie hier beschrieben ssmtp installiert und eingerichtet sein.
Wenn es Fehler gibt kann man im Log unter /var/log/syslog nachschauen. Z.b. mit
|
1 |
cat /var/log/syslog |
Was nun noch fehlt, ist eine ausführliche Beschreibung für die Wiederherstellun im Fehlerfall oder das Clonen des Systems mit den erstellen Sicherungskopien. Das kommt dann in einen eigenen Blogeintrag.
Oder die Datensicherung mit zwei oder mehr USB-Sticks nach dem Türme von Hanoi Prinzip.
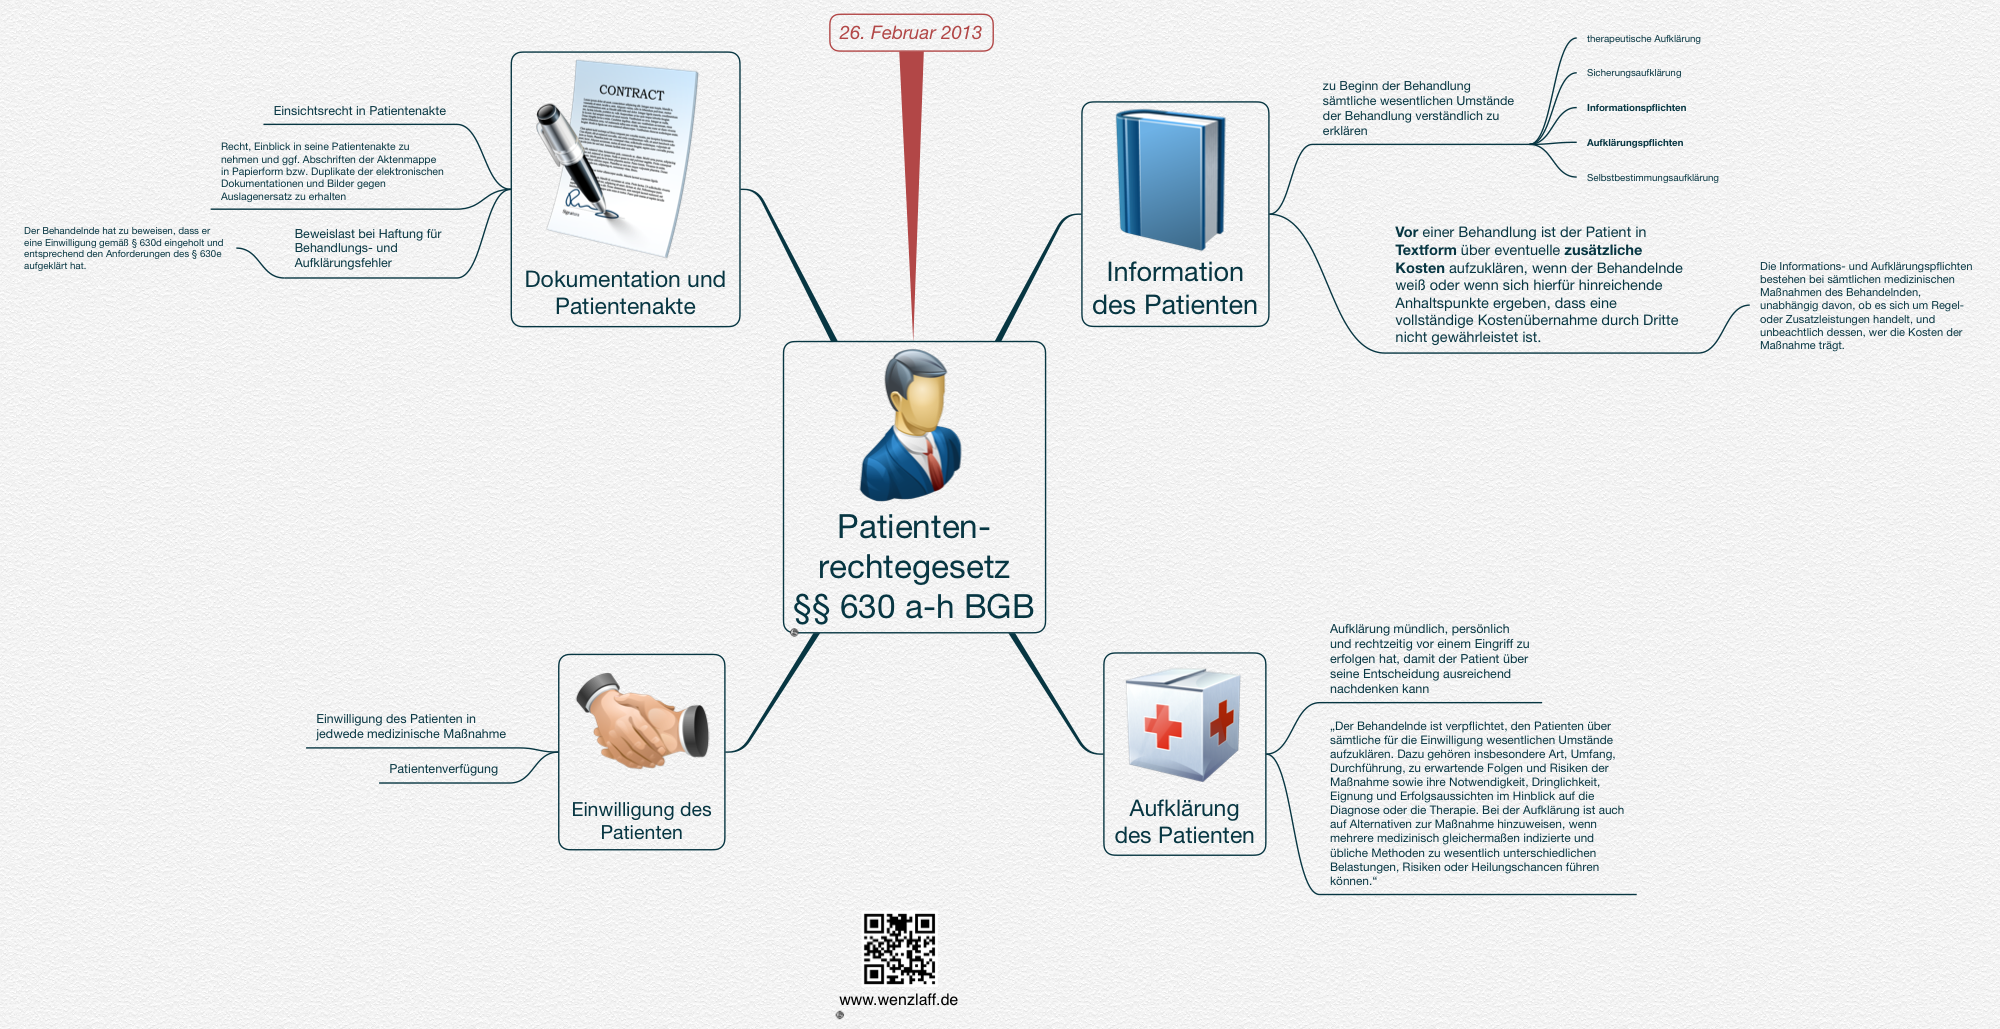
Der Raspberry PI kam Anfang 2012 auf den Markt und das neue Patientenrechtegesetzt im BGB (§ 630) erst 26.02.2013
Bankenstresstest 2014 statt Raspberry Pi

Wie wird Truecrypt 7.1auf einem Raspberry Pi installiert?
Truecrypt 7.1 kann gut wie in dieser Anleitung beschrieben installiert werden.
Hier in Kurzform wie die nötigen Packages geladen, ausgepackt und selbst compiliert werden können, da es für den rPi keine fertigen Packages gibt. Der compile Vorgang dauert ca. 1 Stunde, dabei darf das Terminal Fenster nicht geschlossen werden.
|
1 2 3 4 5 6 7 8 9 10 11 12 13 14 15 16 17 18 19 20 21 22 23 |
sudo apt-get update sudo apt-get upgrade sudo apt-get install libfuse-dev screen wget "https://github.com/AuditProject/truecrypt-verified-mirror/raw/master/Source/TrueCrypt%207.1a%20Source.tar.gz" tar xfz "TrueCrypt 7.1a Source.tar.gz" cd truecrypt-7.1a-source wget ftp://ftp.rsasecurity.com/pub/pkcs/pkcs-11/v2-20/*.h wget http://prdownloads.sourceforge.net/wxwindows/wxWidgets-2.8.12.tar.gz tar xfz wxWidgets-2.8.12.tar.gz make NOGUI=1 WX_ROOT=~/truecrypt-7.1a-source/wxWidgets-2.8.12 wxbuild make NOGUI=1 WXSTATIC=1 cp Main/truecrypt /usr/local/bin/ sudo chmod +x /usr/local/bin/truecrypt rm -rf truecrypt-7.1a-source/ rm TrueCrypt\ 7.1a\ Source.tar.gz truecrypt --version |
Ergebnis: TrueCrypt 7.1a
Nun alle Befehle ausgeben mit:
|
1 |
truecrypt --help |
liefert die Anleitung:
|
1 2 3 4 5 6 7 8 9 10 11 12 13 14 15 16 17 18 19 20 21 22 23 24 25 26 27 28 29 30 31 32 33 34 35 36 37 38 39 40 41 42 43 44 45 46 47 48 49 50 51 52 53 54 55 56 57 58 59 60 61 62 63 64 65 66 67 68 69 70 71 72 73 74 75 76 77 78 79 80 81 82 83 84 85 86 87 88 89 90 91 92 93 94 95 96 97 98 99 100 101 102 103 104 105 106 107 108 109 110 111 112 113 114 115 116 117 118 119 120 121 122 123 124 125 126 127 128 129 130 131 132 133 134 135 136 137 138 139 140 141 142 143 144 145 146 147 148 149 150 151 152 153 154 155 156 157 158 159 160 161 162 163 164 165 166 167 168 169 170 171 172 173 174 175 176 177 178 179 180 181 182 183 184 185 186 187 188 189 190 191 192 193 194 195 196 197 198 199 200 201 202 203 204 205 206 207 208 209 210 211 212 213 214 215 216 217 218 219 220 221 222 223 224 225 226 227 228 229 230 231 232 233 234 235 236 237 238 |
Synopsis: truecrypt [OPTIONS] COMMAND truecrypt [OPTIONS] VOLUME_PATH [MOUNT_DIRECTORY] Commands: --auto-mount=devices|favorites Auto mount device-hosted or favorite volumes. --backup-headers[=VOLUME_PATH] Backup volume headers to a file. All required options are requested from the user. -c, --create[=VOLUME_PATH] Create a new volume. Most options are requested from the user if not specified on command line. See also options --encryption, -k, --filesystem, --hash, -p, --random-source, --quick, --size, --volume-type. Note that passing some of the options may affect security of the volume (see option -p for more information). Inexperienced users should use the graphical user interface to create a hidden volume. When using the text user interface, the following procedure must be followed to create a hidden volume: 1) Create an outer volume with no filesystem. 2) Create a hidden volume within the outer volume. 3) Mount the outer volume using hidden volume protection. 4) Create a filesystem on the virtual device of the outer volume. 5) Mount the new filesystem and fill it with data. 6) Dismount the outer volume. If at any step the hidden volume protection is triggered, start again from 1). --create-keyfile[=FILE_PATH] Create a new keyfile containing pseudo-random data. -C, --change[=VOLUME_PATH] Change a password and/or keyfile(s) of a volume. Most options are requested from the user if not specified on command line. PKCS-5 PRF HMAC hash algorithm can be changed with option --hash. See also options -k, --new-keyfiles, --new-password, -p, --random-source. -d, --dismount[=MOUNTED_VOLUME] Dismount a mounted volume. If MOUNTED_VOLUME is not specified, all volumes are dismounted. See below for description of MOUNTED_VOLUME. --delete-token-keyfiles Delete keyfiles from security tokens. See also command --list-token-keyfiles. --export-token-keyfile Export a keyfile from a security token. See also command --list-token-keyfiles. --import-token-keyfiles Import keyfiles to a security token. See also option --token-lib. -l, --list[=MOUNTED_VOLUME] Display a list of mounted volumes. If MOUNTED_VOLUME is not specified, all volumes are listed. By default, the list contains only volume path, virtual device, and mount point. A more detailed list can be enabled by verbose output option (-v). See below for description of MOUNTED_VOLUME. --list-token-keyfiles Display a list of all available security token keyfiles. See also command --import-token-keyfiles. --mount[=VOLUME_PATH] Mount a volume. Volume path and other options are requested from the user if not specified on command line. --restore-headers[=VOLUME_PATH] Restore volume headers from the embedded or an external backup. All required options are requested from the user. --save-preferences Save user preferences. --test Test internal algorithms used in the process of encryption and decryption. --version Display program version. --volume-properties[=MOUNTED_VOLUME] Display properties of a mounted volume. See below for description of MOUNTED_VOLUME. MOUNTED_VOLUME: Specifies a mounted volume. One of the following forms can be used: 1) Path to the encrypted TrueCrypt volume. 2) Mount directory of the volume's filesystem (if mounted). 3) Slot number of the mounted volume (requires --slot). Options: --display-password Display password characters while typing. --encryption=ENCRYPTION_ALGORITHM Use specified encryption algorithm when creating a new volume. --filesystem=TYPE Filesystem type to mount. The TYPE argument is passed to mount(8) command with option -t. Default type is 'auto'. When creating a new volume, this option specifies the filesystem to be created on the new volume (only 'FAT' and 'none' TYPE is allowed). Filesystem type 'none' disables mounting or creating a filesystem. --force Force mounting of a volume in use, dismounting of a volume in use, or overwriting a file. Note that this option has no effect on some platforms. --fs-options=OPTIONS Filesystem mount options. The OPTIONS argument is passed to mount(8) command with option -o when a filesystem on a TrueCrypt volume is mounted. This option is not available on some platforms. --hash=HASH Use specified hash algorithm when creating a new volume or changing password and/or keyfiles. This option also specifies the mixing PRF of the random number generator. -k, --keyfiles=KEYFILE1[,KEYFILE2,KEYFILE3,...] Use specified keyfiles when mounting a volume or when changing password and/or keyfiles. When a directory is specified, all files inside it will be used (non-recursively). Multiple keyfiles must be separated by comma. Use double comma (,,) to specify a comma contained in keyfile's name. Keyfile stored on a security token must be specified as token://slot/SLOT_NUMBER/file/FILENAME. An empty keyfile (-k "") disables interactive requests for keyfiles. See also options --import-token-keyfiles, --list-token-keyfiles, --new-keyfiles, --protection-keyfiles. --load-preferences Load user preferences. -m, --mount-options=OPTION1[,OPTION2,OPTION3,...] Specifies comma-separated mount options for a TrueCrypt volume: headerbak: Use backup headers when mounting a volume. nokernelcrypto: Do not use kernel cryptographic services. readonly|ro: Mount volume as read-only. system: Mount partition using system encryption. timestamp|ts: Do not restore host-file modification timestamp when a volume is dismounted (note that the operating system under certain circumstances does not alter host-file timestamps, which may be mistakenly interpreted to mean that this option does not work). See also option --fs-options. --new-keyfiles=KEYFILE1[,KEYFILE2,KEYFILE3,...] Add specified keyfiles to a volume. This option can only be used with command -C. --new-password=PASSWORD Specifies a new password. This option can only be used with command -C. -p, --password=PASSWORD Use specified password to mount/open a volume. An empty password can also be specified (-p ""). Note that passing a password on the command line is potentially insecure as the password may be visible in the process list (see ps(1)) and/or stored in a command history file or system logs. --protect-hidden=yes|no Write-protect a hidden volume when mounting an outer volume. Before mounting the outer volume, the user will be prompted for a password to open the hidden volume. The size and position of the hidden volume is then determined and the outer volume is mounted with all sectors belonging to the hidden volume protected against write operations. When a write to the protected area is prevented, the whole volume is switched to read-only mode. Verbose list (-v -l) can be used to query the state of the hidden volume protection. Warning message is displayed when a volume switched to read-only is being dismounted. --protection-keyfiles=KEYFILE1[,KEYFILE2,KEYFILE3,...] Use specified keyfiles to open a hidden volume to be protected. This option may be used only when mounting an outer volume with hidden volume protected. See also options -k and --protect-hidden. --protection-password=PASSWORD Use specified password to open a hidden volume to be protected. This option may be used only when mounting an outer volume with hidden volume protected. See also options -p and --protect-hidden. --quick Do not encrypt free space when creating a device-hosted volume. This option must not be used when creating an outer volume. --random-source=FILE Use FILE as a source of random data (e.g., when creating a volume) instead of requiring the user to type random characters. --slot=SLOT Use specified slot number when mounting, dismounting, or listing a volume. --size=SIZE Use specified size in bytes when creating a new volume. -t, --text Use text user interface. Graphical user interface is used by default if available. This option must be specified as the first argument. --token-lib=LIB_PATH Use specified PKCS #11 security token library. --volume-type=TYPE Use specified volume type when creating a new volume. TYPE can be 'normal' or 'hidden'. See option -c for more information on creating hidden volumes. -v, --verbose Enable verbose output. IMPORTANT: If you want to use TrueCrypt, you must follow the security requirements and security precautions listed in chapter 'Security Requirements and Precautions' in the TrueCrypt documentation (file 'TrueCrypt User Guide.pdf'). Examples: Create a new volume: truecrypt -t -c Mount a volume: truecrypt volume.tc /media/truecrypt1 Mount a volume as read-only, using keyfiles: truecrypt -m ro -k keyfile1,keyfile2 volume.tc Mount a volume without mounting its filesystem: truecrypt --filesystem=none volume.tc Mount a volume prompting only for its password: truecrypt -t -k "" --protect-hidden=no volume.tc /media/truecrypt1 Dismount a volume: truecrypt -d volume.tc Dismount all mounted volumes: truecrypt -d |
Raspberry Pi: Sniffen mit TShark, aber nicht als root User
Zuerst mal eine Mindmap zu TShark, dem Kommandline-Tool von Wireshark (frühe Ethereal).

Installation
Zuerste den rPi aktualisieren und das Packet installieren mit:
|
1 2 3 |
sudo apt-get update sudo apt-get upgrade sudo apt-get install tshark |
Zuerst einmal die Befehle und die Version für die Komandozeile mit
|
1 |
tshark -h |
ausgeben:
|
1 2 3 4 5 6 7 8 9 10 11 12 13 14 15 16 17 18 19 20 21 22 23 24 25 26 27 28 29 30 31 32 33 34 35 36 37 38 39 40 41 42 43 44 45 46 47 48 49 50 51 52 53 54 55 56 57 58 59 60 61 62 63 64 65 66 67 68 69 70 71 72 73 74 75 76 77 78 79 80 81 82 83 84 85 86 87 88 89 90 91 92 93 94 95 |
TShark 1.12.1 (Git Rev Unknown from unknown) Dump and analyze network traffic. See http://www.wireshark.org for more information. Copyright 1998-2014 Gerald Combs <gerald@wireshark.org> and contributors. This is free software; see the source for copying conditions. There is NO warranty; not even for MERCHANTABILITY or FITNESS FOR A PARTICULAR PURPOSE. Usage: tshark [options] ... Capture interface: -i <interface> name or idx of interface (def: first non-loopback) -f <capture filter> packet filter in libpcap filter syntax -s <snaplen> packet snapshot length (def: 65535) -p don't capture in promiscuous mode -I capture in monitor mode, if available -B <buffer size> size of kernel buffer (def: 2MB) -y <link type> link layer type (def: first appropriate) -D print list of interfaces and exit -L print list of link-layer types of iface and exit Capture stop conditions: -c <packet count> stop after n packets (def: infinite) -a <autostop cond.> ... duration:NUM - stop after NUM seconds filesize:NUM - stop this file after NUM KB files:NUM - stop after NUM files Capture output: -b <ringbuffer opt.> ... duration:NUM - switch to next file after NUM secs filesize:NUM - switch to next file after NUM KB files:NUM - ringbuffer: replace after NUM files Input file: -r <infile> set the filename to read from (- to read from stdin) Processing: -2 perform a two-pass analysis -R <read filter> packet Read filter in Wireshark display filter syntax -Y <display filter> packet displaY filter in Wireshark display filter syntax -n disable all name resolutions (def: all enabled) -N <name resolve flags> enable specific name resolution(s): "mntC" -d <layer_type>==<selector>,<decode_as_protocol> ... "Decode As", see the man page for details Example: tcp.port==8888,http -H <hosts file> read a list of entries from a hosts file, which will then be written to a capture file. (Implies -W n) Output: -w <outfile|-> write packets to a pcap-format file named "outfile" (or to the standard output for "-") -C <config profile> start with specified configuration profile -F <output file type> set the output file type, default is pcapng an empty "-F" option will list the file types -V add output of packet tree (Packet Details) -O <protocols> Only show packet details of these protocols, comma separated -P print packet summary even when writing to a file -S <separator> the line separator to print between packets -x add output of hex and ASCII dump (Packet Bytes) -T pdml|ps|psml|text|fields format of text output (def: text) -e <field> field to print if -Tfields selected (e.g. tcp.port, _ws.col.Info) this option can be repeated to print multiple fields -E<fieldsoption>=<value> set options for output when -Tfields selected: header=y|n switch headers on and off separator=/t|/s|<char> select tab, space, printable character as separator occurrence=f|l|a print first, last or all occurrences of each field aggregator=,|/s|<char> select comma, space, printable character as aggregator quote=d|s|n select double, single, no quotes for values -t a|ad|d|dd|e|r|u|ud output format of time stamps (def: r: rel. to first) -u s|hms output format of seconds (def: s: seconds) -l flush standard output after each packet -q be more quiet on stdout (e.g. when using statistics) -Q only log true errors to stderr (quieter than -q) -g enable group read access on the output file(s) -W n Save extra information in the file, if supported. n = write network address resolution information -X <key>:<value> eXtension options, see the man page for details -z <statistics> various statistics, see the man page for details --capture-comment <comment> add a capture comment to the newly created output file (only for pcapng) Miscellaneous: -h display this help and exit -v display version info and exit -o <name>:<value> ... override preference setting -K <keytab> keytab file to use for kerberos decryption -G [report] dump one of several available reports and exit default report="fields" use "-G ?" for more help WARNING: dumpcap will enable kernel BPF JIT compiler if available. You might want to reset it By doing "echo 0 > /proc/sys/net/core/bpf_jit_enable" |
Erst wollen wir uns die vorhandenen Interfaces anschauen und die Nummer merken.
|
1 |
sudo tshark -D |
Liefert die folgende Liste der verfügbaren Interfaces:
1. eth0

2. wlan0

3. wlan0mon

4. any

5. lo (Loopback)

6. nflog

7. nfqueue

8. usbmon1
Dann mal 10 Sekunden in die Datei traffic.pcap den Netzwerkverkehr von 1 (eth0) sichern mit:
|
1 |
tshark -i 1 -a duration:10 -w traffic.pcap |
Kommt es zu dieser Fehlermeldung:
|
1 2 3 |
Capturing on 'eth0' tshark: The capture session could not be initiated on interface 'eth0' (You don't have permission to capture on that device). Please check to make sure you have sufficient permissions, and that you have the proper interface or pipe specified. |
dann nicht aus Sicherheitsgründen mit sudo starten. TShark sollte nicht als root ausgeführt werden und der aktuelle User hat nicht die Rechte auf die Schnittstellen zuzugreifen.
Abhilfe
Den aktuellen User (hier pi) für den Zugriff reconfigurieren mit:
|
1 |
sudo dpkg-reconfigure wireshark-common |
Es erscheint so ein Dialog:
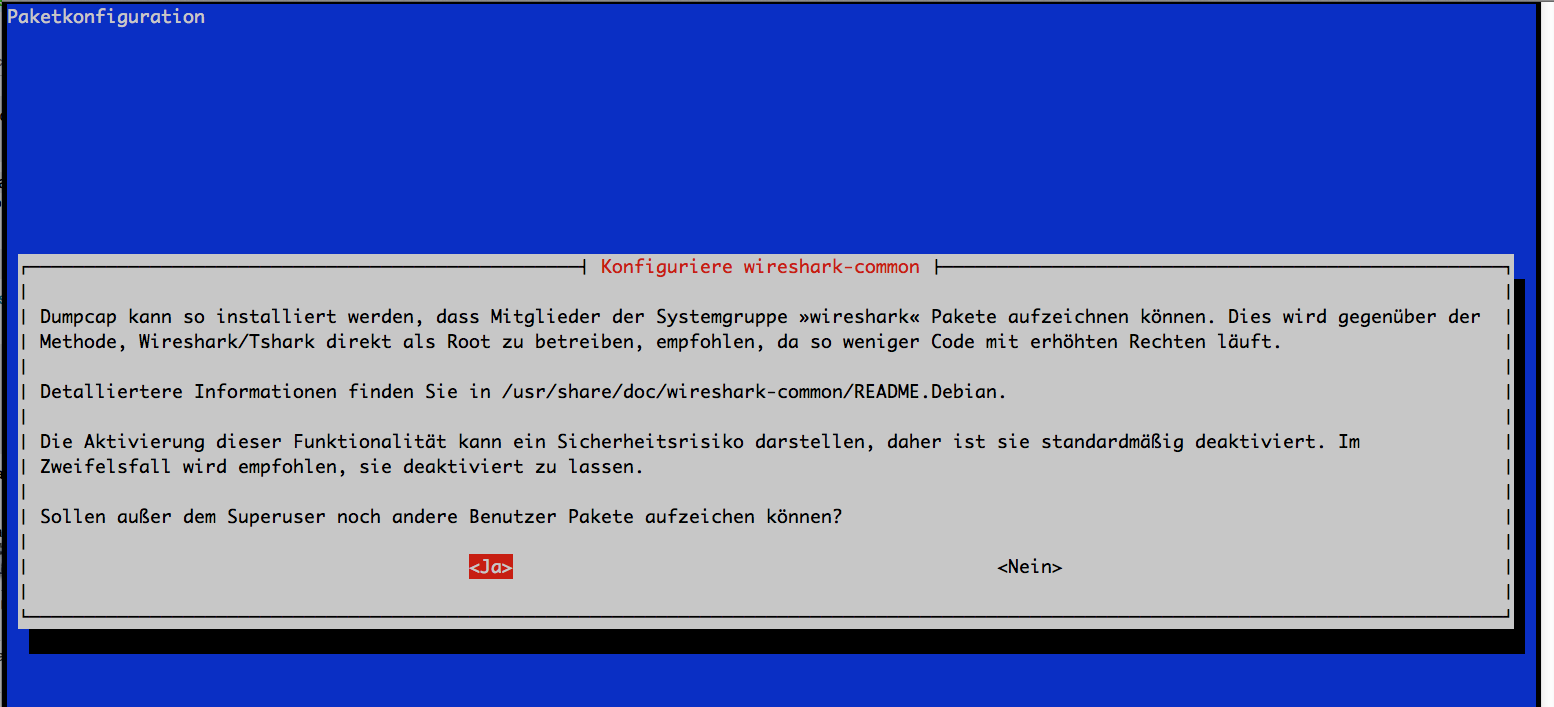
Dort mit Ja antworten.
Damit die Berechigung für den User (pi) gesetzt wird, und es nicht zu dieser Fehlermeldung kommt:
|
1 |
tshark: Couldn't run /usr/bin/dumpcap in child process: Keine Berechtigung |
Einmal:
|
1 |
sudo usermod -a -G wireshark pi |
Dann einmal abmelden:
|
1 |
exit |
und wieder anmelden.
Schon können Dateien im PCAP Format auf dem Raspberry Pi erzeugt werden und auf einem anderen Rechner mit Wireshark ausgewertet werden.
Raspberry Pi: Kismet ( قسمة ) installieren unter Debian (jessie)
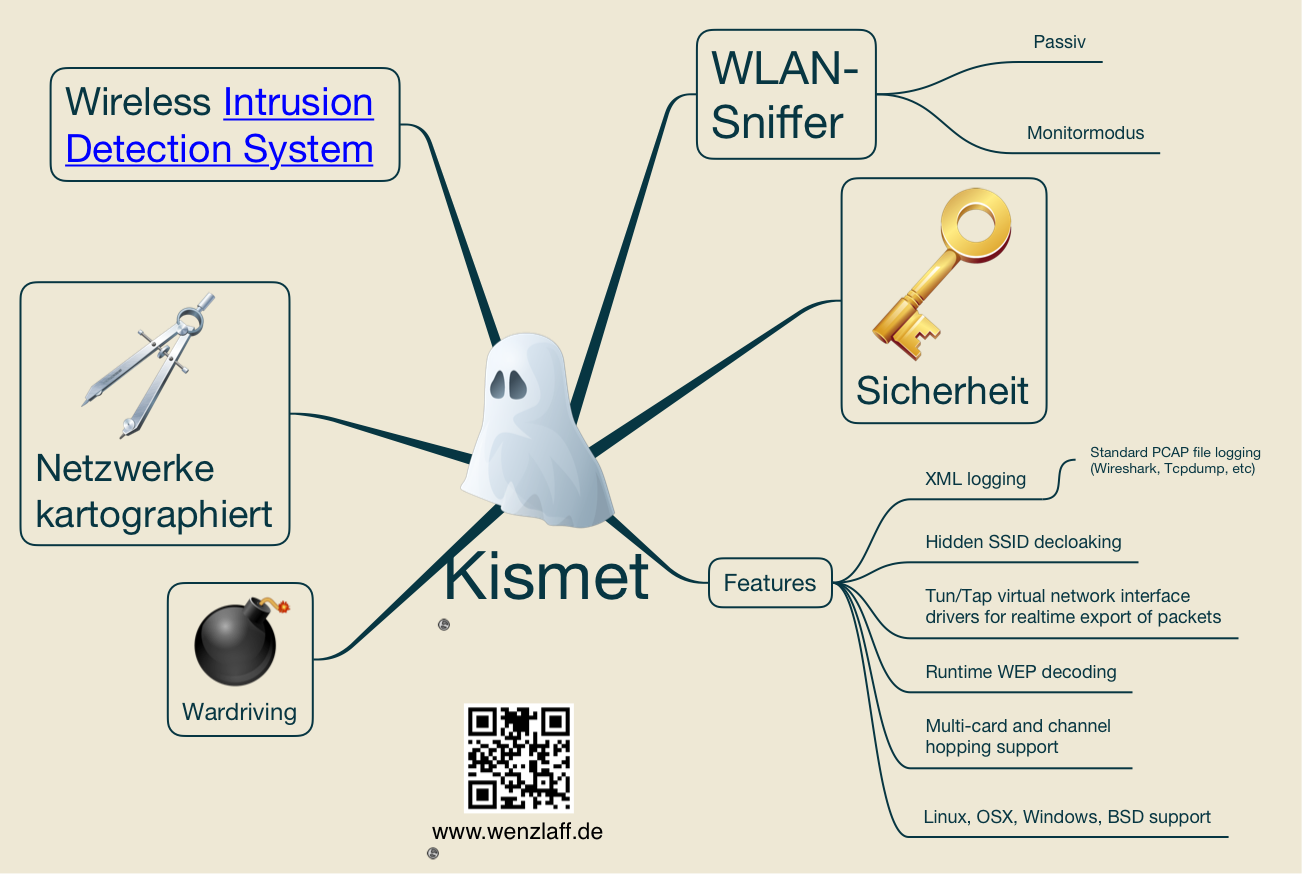
Wie wird Kismet auf dem Raspberry Pi installiert? Zuerst mal eine Mindmap als Überblick zu Kismet:
Kismet wird wie folgt installiert, nachdem das System upgedated wurde:
sudo apt-get update

sudo apt-get upgrade

sudo apt-get install kismet
„Raspberry Pi: Kismet ( قسمة ) installieren unter Debian (jessie)“ weiterlesen
Raspberry Pi: Sicherheitsupdate CVE-2014-3634 für das Package rsyslog (version 5.8.11-3+deb7u1) vorhanden
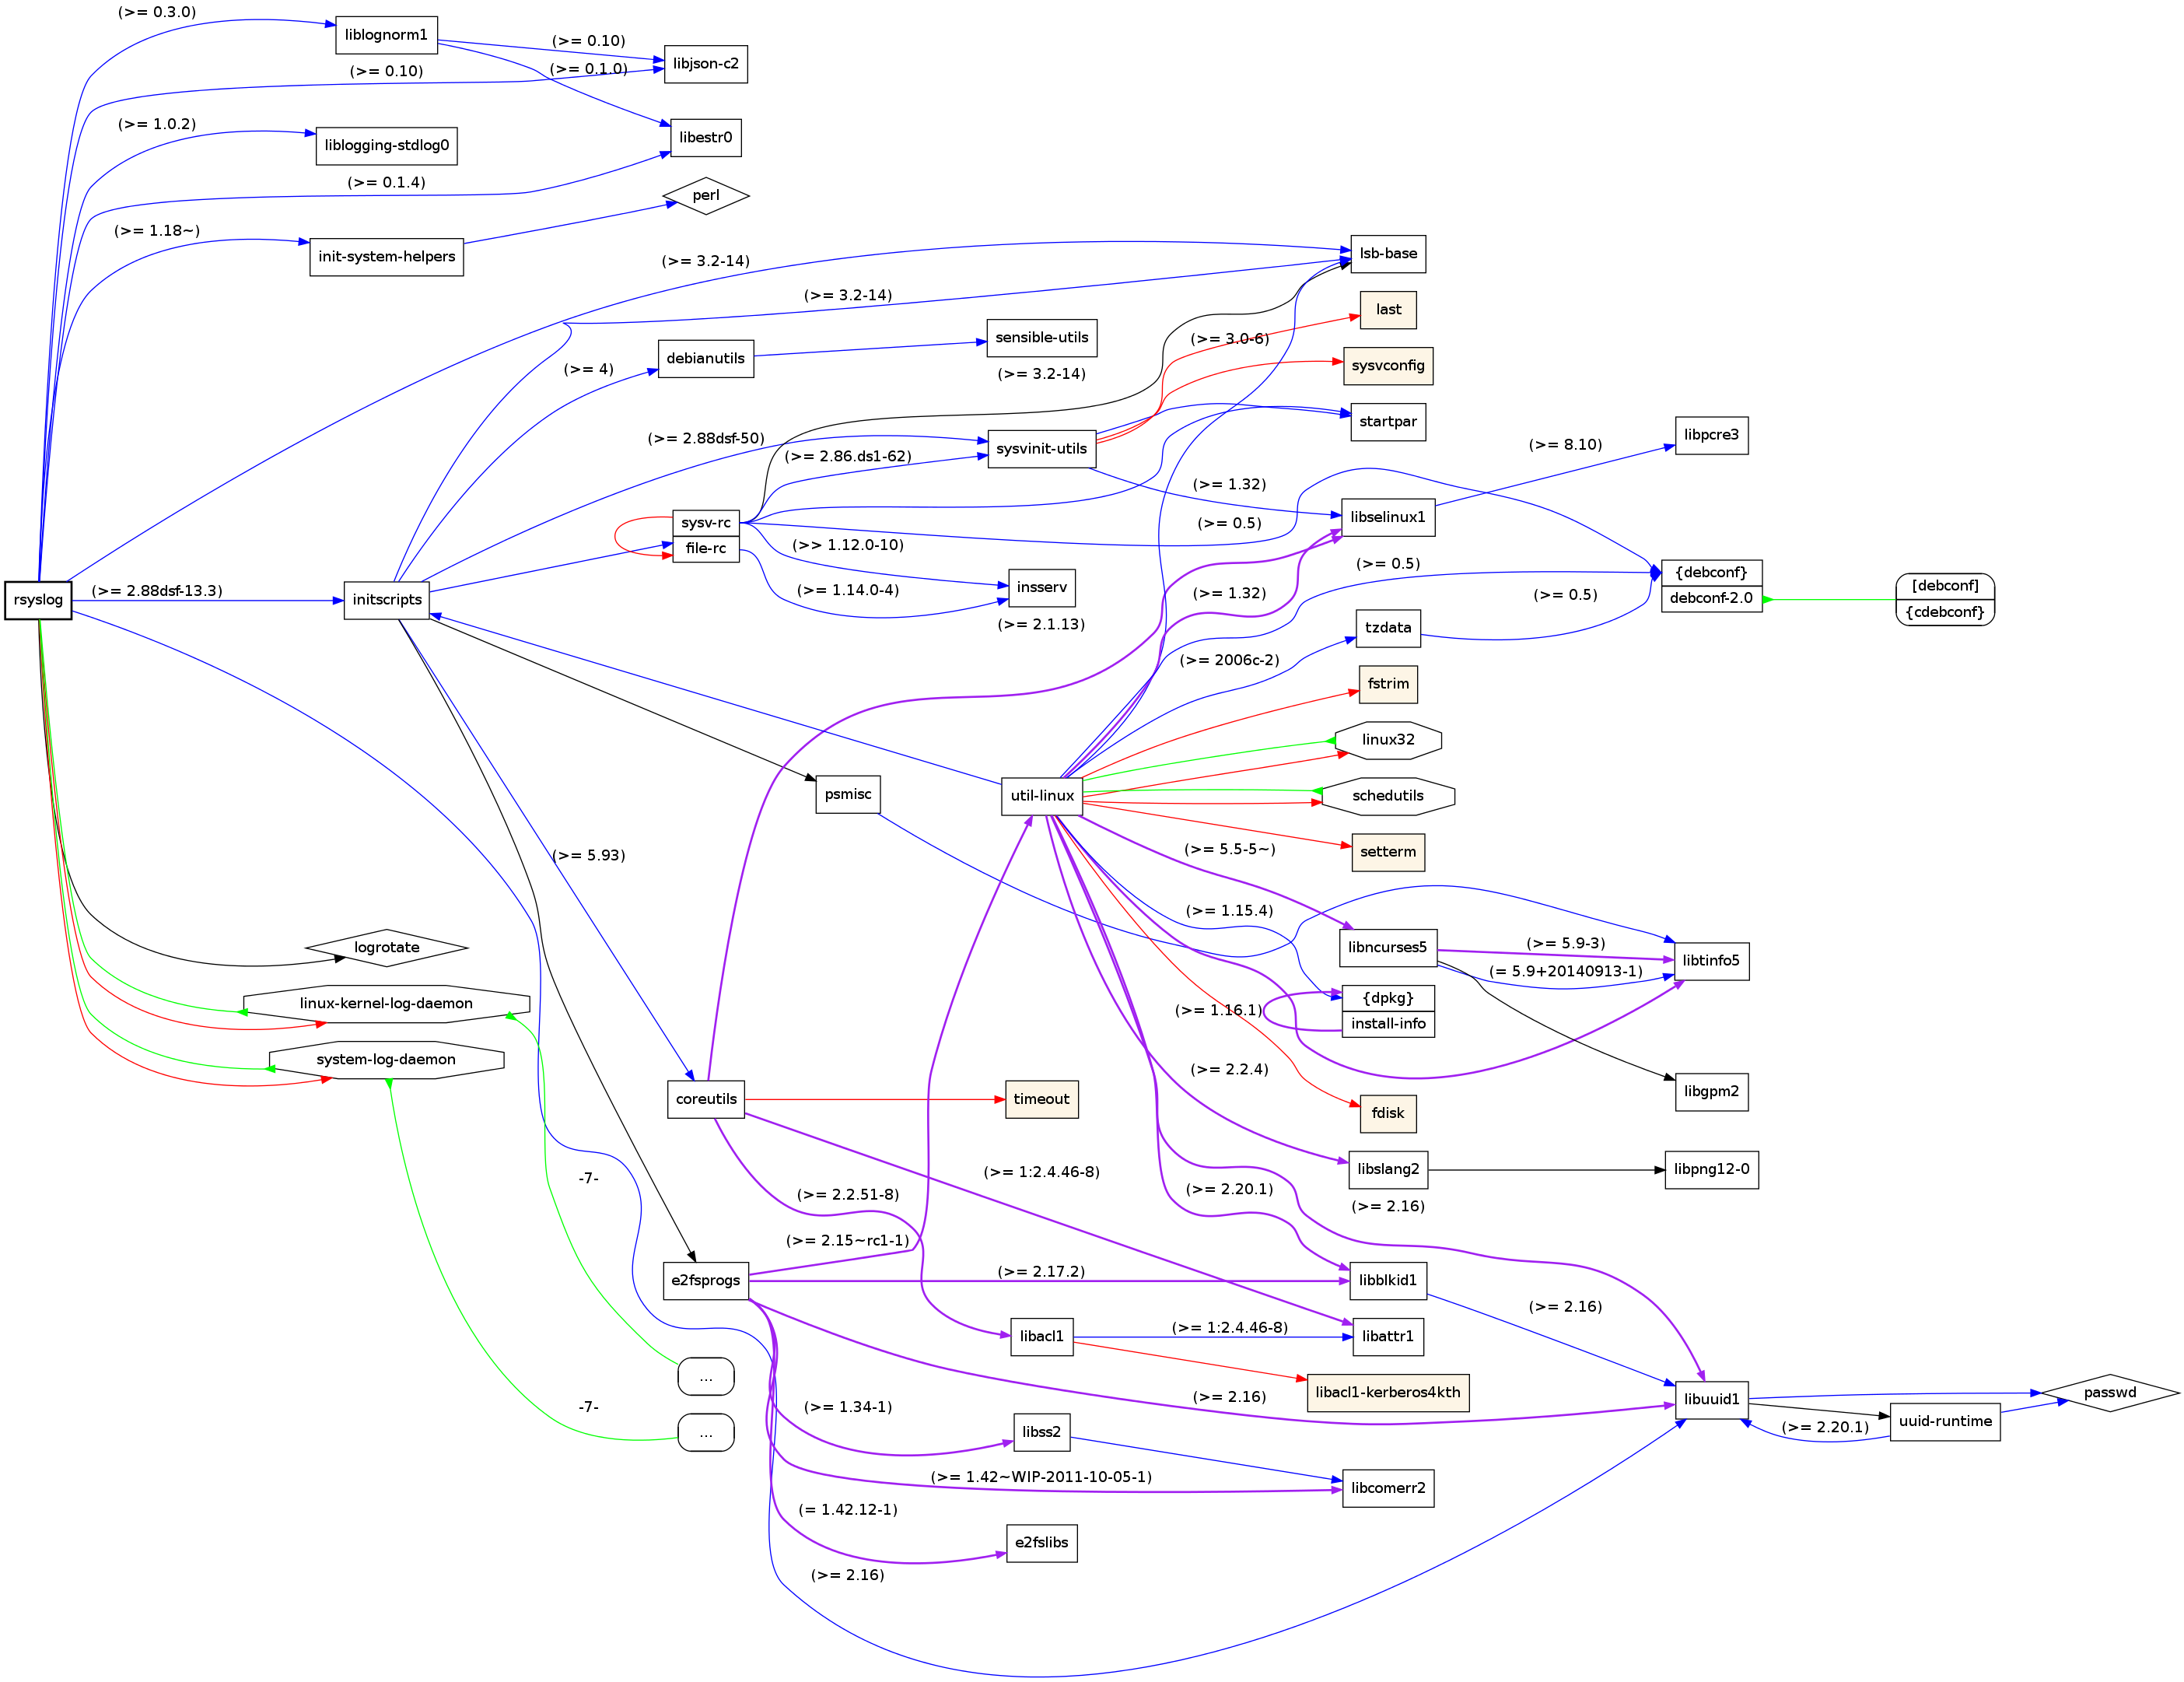
Für Rsyslog gibt es für den Raspberry Pi (Debian, wheezy) ein Sicherheitsupdate.
Als Folge von dieser Schwachstelle kann ein Angreifer fehlerhafte Nachrichten an einen Server senden, wenn dieser Daten aus nicht vertrauenswürdigen Quellen annimmt. Damit könnte dann ein Denial-of-Service-Angriff gestartet werden. Das rsyslog hat diese Abhängigkeiten als Mindmap auf einem Raspberry Pi (jessie):
Update auf der Konsole wie gewohnt:
|
1 2 3 4 5 6 7 8 |
sudo apt-get update sudo apt-get upgrade # Optional: Version checken mit: apt-show-versions rsyslog # Ausgabe: # rsyslog/wheezy uptodate 5.8.11-3+deb7u1 |
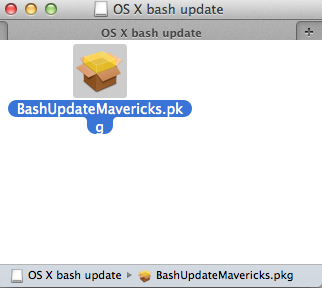
Wie kann das Update für ShellShock auf den Mac installiert werden?
Der ShellShock zieht Kreise, nun gibt es auch ein update für Macs, wie bei Heise beschrieben.
Das Update muss aber manuell von Apple geladen und installiert werden.
Hier runter laden:
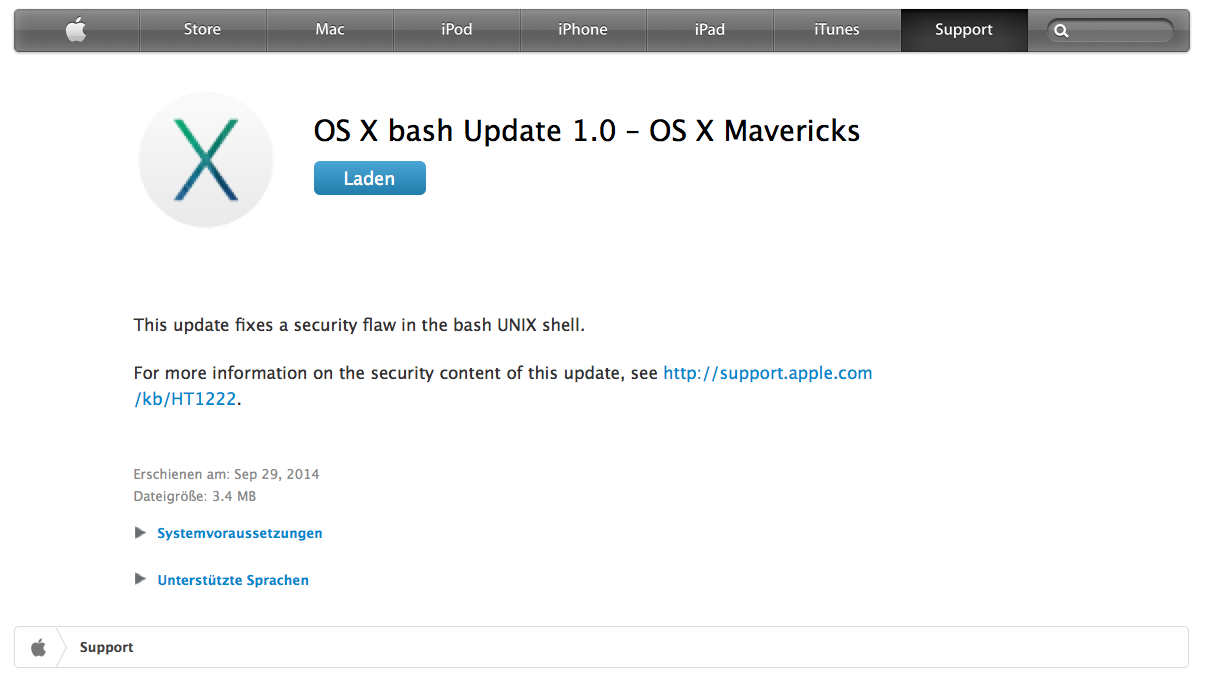
Dann doppelklick und folgende Dialoge bestätigen.
Nach der installation im Terminal checken ob der update geklappt hat:
|
1 |
bash --version |
Ausgabe:

Für den Raspberry Pi gibt es hier im Blog ein paar Links.
Wie kann das Sicherheitsupdate für die Linux-Bash (CVE-2014-6271) des Raspberry Pi gescheckt und installiert werden?
Wie in dem Heise Artikel beschrieben, gibt es in der bash eine Sicherheitslücke CVE-2014-6271.
Das sind die Abhängigkeiten der bash, auf meinem Raspberry Pi (Debian, Jessie)
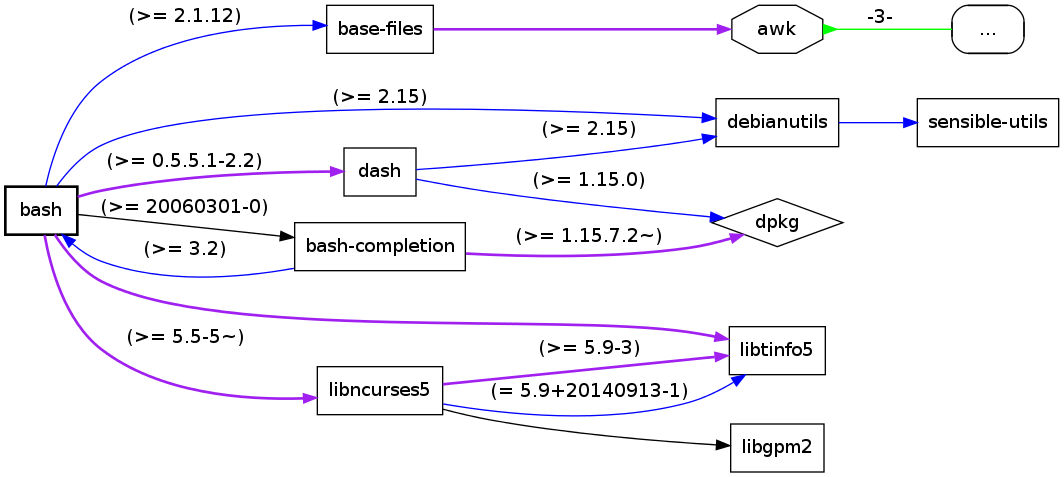
Für den Raspberry Pi gibt es schon ein Update. Ob das System verletzbar ist kann wie folgt in der Konsole getestet werden:
|
1 |
env x='() { :;}; echo verwundbar' bash -c "echo Test ob die bash verwundbar ist." |
Wenn das System verletzbar ist, wird „verwundbar“ ausgegeben:

Auch mit:
|
1 |
apt-show-versions bash |

bekommt man den Hinweis, das ein Update möglich ist.
Also den rPi updaten mit:
|
1 2 |
sudo apt-get update sudo apt-get upgrade |
Dann noch checken, mit dem Test:

Ok.
Und noch mal die Version checken:

Ok, wir sind nun wieder auch der sicheren Seite oder doch nicht (ShellShock) (CVE-2014-7169).
Sicherheitsupdate für das Raspberry Pi wheezy Package APT erschienen
Mittels APT (Advanced Packaging Tool) ist es sehr einfach, Programmpakete zu suchen, zu installieren oder auch das ganze System auf den neuesten Stand zu bringen. Für dieses Tool gibt es nun ein Sicherheitspatch der installiert werden sollte.

Zitat: „It was discovered that APT, the high level package manager, does not
properly invalidate unauthenticated data (CVE-2014-0488), performs
incorrect verification of 304 replies (CVE-2014-0487), does not perform
the checksum check when the Acquire::GzipIndexes option is used
(CVE-2014-0489) and does not properly perform validation for binary
packages downloaded by the apt-get download command (CVE-2014-0490).
For the stable distribution (wheezy), these problems have been fixed in
version 0.9.7.9+deb7u3.
For the unstable distribution (sid), these problems have been fixed in
version 1.0.9.“
Bei der Gelegenheit gleich alles updaten mit: „Sicherheitsupdate für das Raspberry Pi wheezy Package APT erschienen“ weiterlesen
FRITZ!Box 7490 erhält neues FRITZ!OS 6.20 vs. TR-069
Es gibt für die Fritz!Box ein neues Update. Heise berichtet darüber.
Jetzt mit der neuen Auto-Update Funktion. Wichtige Sicherheitsupdates werden nun automatisch installiert. Diese Option ist standardmäßig aktiviert.
Abschalten kann man die bei Bedarf über Systeme – Update – Auto update.
In diesem Zusammenhang kann man sich auch mal mit TR-069 beschäftigen und evl. die default Einstellungen anpassen. Sehr gut, das die Fritz!Box die Wahlmöglichkeit bietet. Hier mal eine Mindmap als Startpunkt:

Wie kann aircrack-ng 1.2 Beta 3 auf einem Raspberry Pi B+ installiert werden?
Um Schwachstellen im WLAN zu finden, kann ldt. Wikipedia das Tool aircrack-ng.org verwendet werden. Dazu für den Überblick mal eine Mindmap: 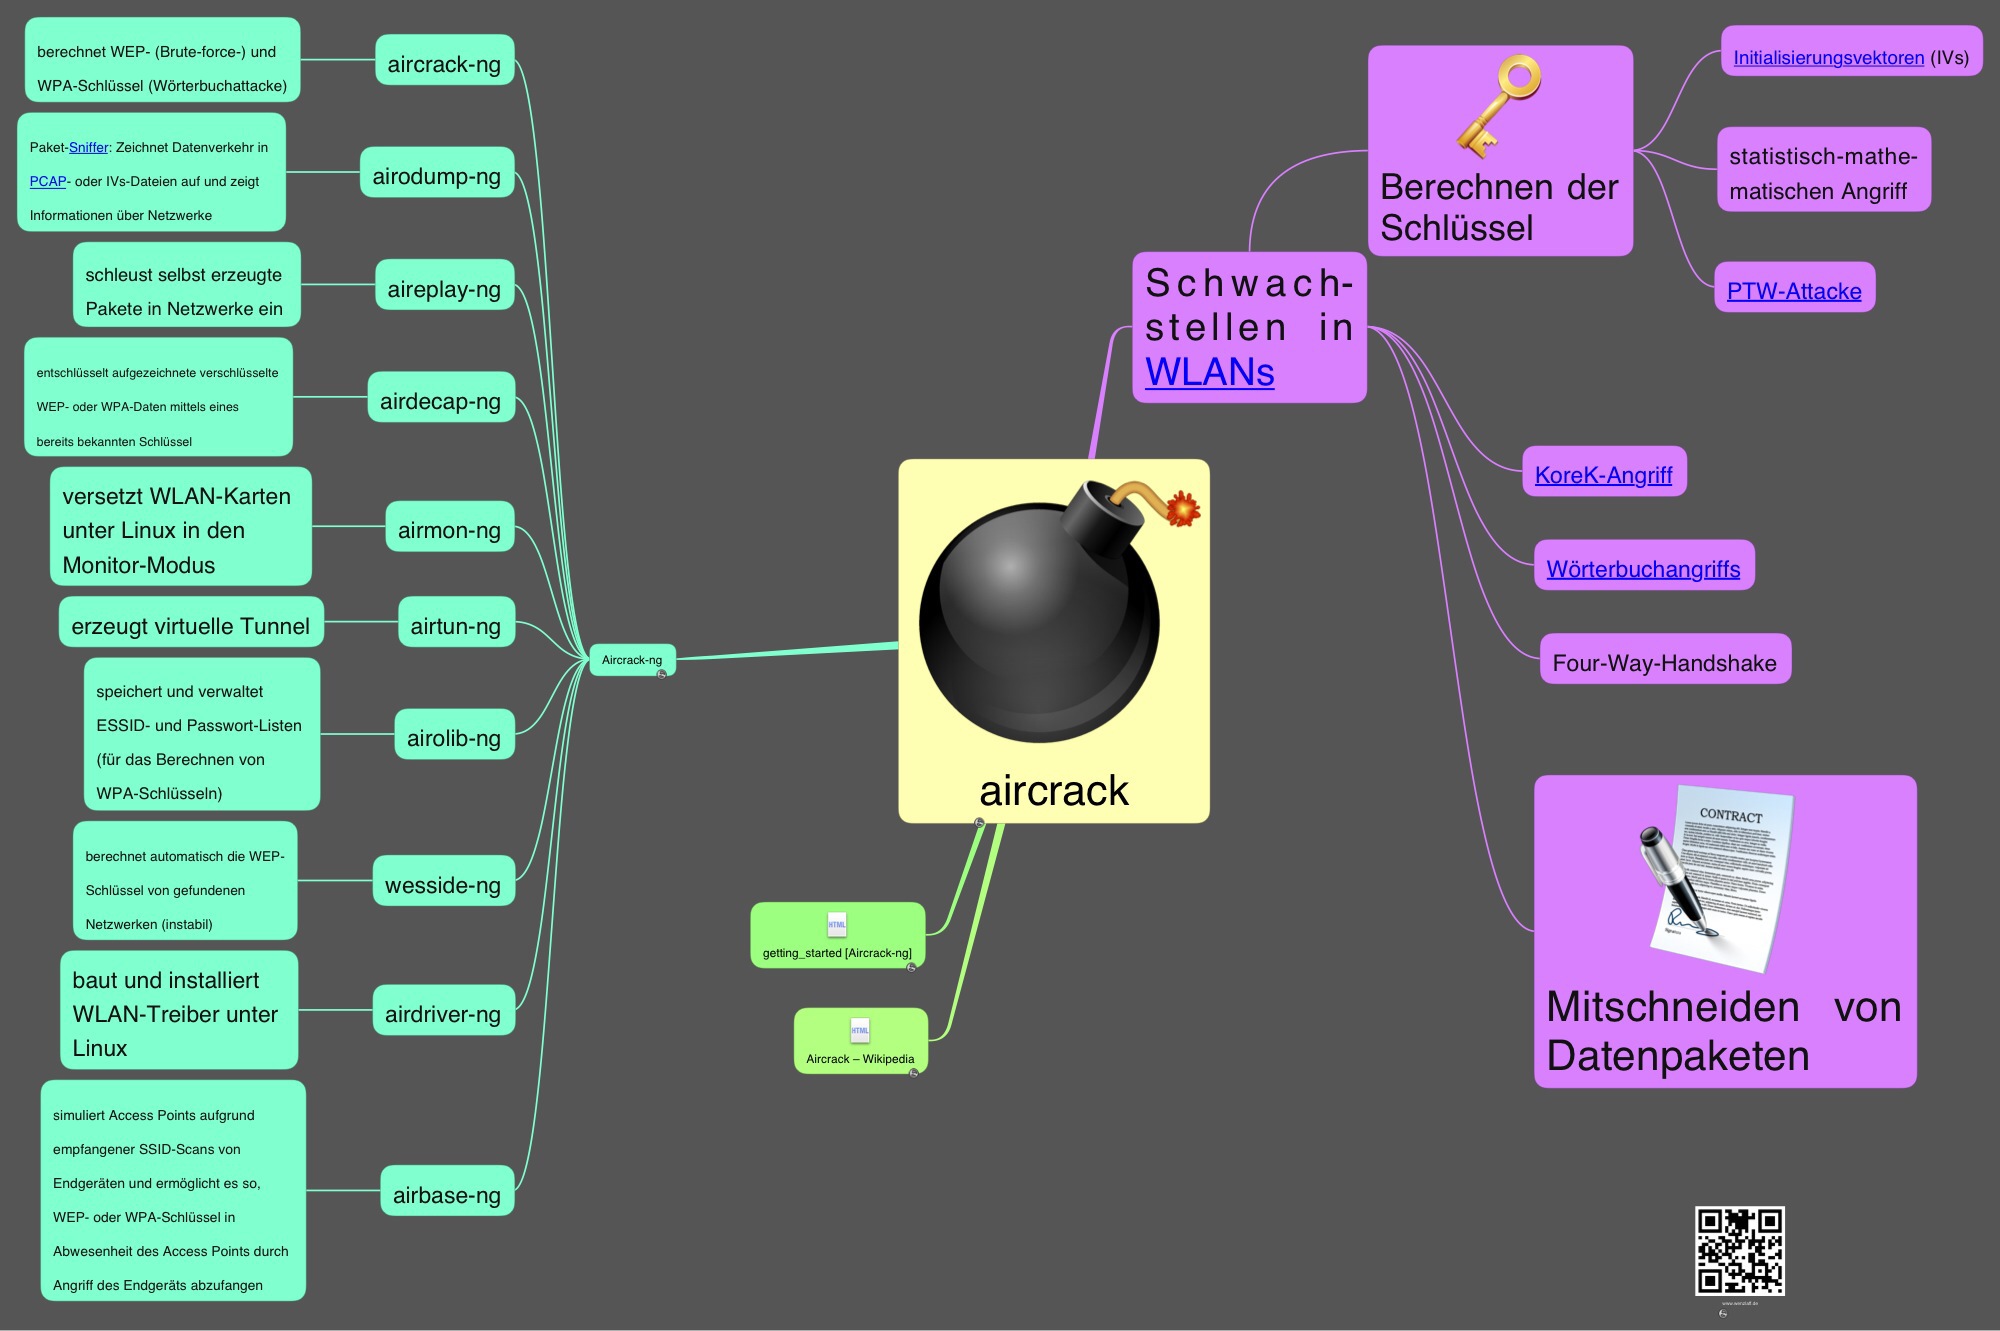 Wie kann aircrack nun auf dem rPi installiert und an eigenen System getestet werden? „Wie kann aircrack-ng 1.2 Beta 3 auf einem Raspberry Pi B+ installiert werden?“ weiterlesen
Wie kann mit dem Raspberry Pi eine grafische Netzwerk Protokollanalyse mit ntop v.5.0.1 erstellt werden?
Network top ist ein Tool welches Netzwerkverkehr mitschneiden und analysieren kann. Ntop bringt einen eigenen Webserver mit und erzeugt schöne Grafiken.
Auf einem Raspberry Pi kann es schnell installiert werden mit:
sudo apt-get install ntop rrdtool

chmod 755 /var/lib/ntop

chown -R nobody:nogroup /var/lib/ntop/rrd
Während der Installation kommt dieser Dialog wo man die Schnittstelle eth0 angeben kann: „Wie kann mit dem Raspberry Pi eine grafische Netzwerk Protokollanalyse mit ntop v.5.0.1 erstellt werden?“ weiterlesen
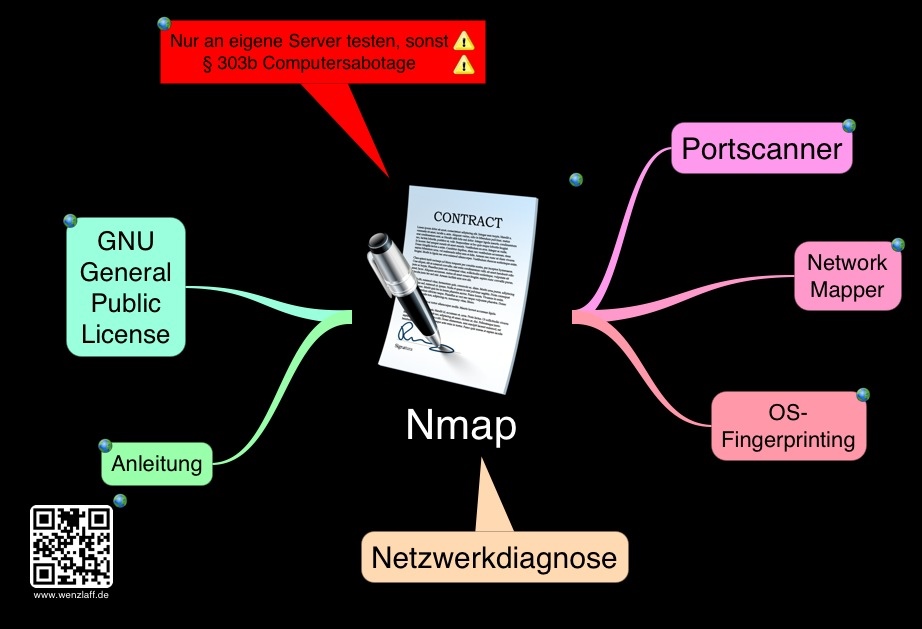
Wie kann das klassische Tool, nmap Version 6.46 zum Analysieren eines LANs (und auch WLANs) auf einem Raspberry Pi installiert werden?
Habe schon in einigen Beiträgen von nmap berichtet. Heute wird die Installation und erste Befehle für den Raspberry Pi beschrieben.
Die Aktuelle nmap Version 6.46 braucht nicht aus den Sourcen compiliert werden, da es für den rPi fertige Packages gibt (Update: 26.07.2018: aktuell 7.4. obwohl es schon eine 7.7. gibt, aber noch nicht für den PI)
Also erst das System auf den aktuellen Stand bringen und nmap installieren:
sudo apt-get update

sudo apt-get upgrade

sudo apt-get install nmap
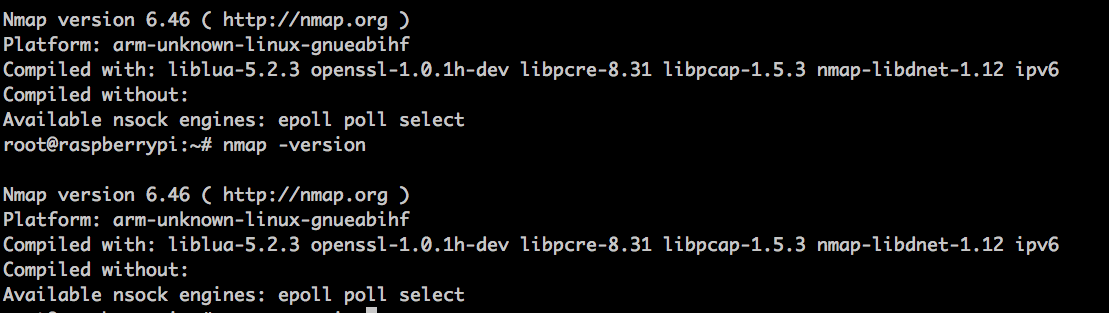
Nach ein paar Minuten ist nmap installiert. Erster Test, ausgabe der nmap Version:
nmap -version
Das Ergebnis:
So, jetzt den ersten Scann aller vorhandenen Adressen, aber nur auf eigene Netzwerke wie hier beschrieben:
nmap -sP 192.168.2.0/24
Schon werden alle 256 IP Adressen in 8 Sekunden gescannt:
Host is up.

nmap done: 256 IP addresses (15 hosts up) scanned in 8.41 seconds
Oder alle offenen Ports anzeigen mit:
nmap localhost
Oder wenn man das Ziel Betriebssystem ermitteln will, das dauert aber etwas:
nmap -O -v localhost
Manchmal braucht man eine Liste aller Hosts im Netzwerk, das geht so:
nmap -sn 192.168.2.0/24
Und eine Mindmap zu nmap
Eine sehr ausführliche deutsche Beschreibung gibt es unter
man nmap
Welche Befehle findet ihr noch nützlich?
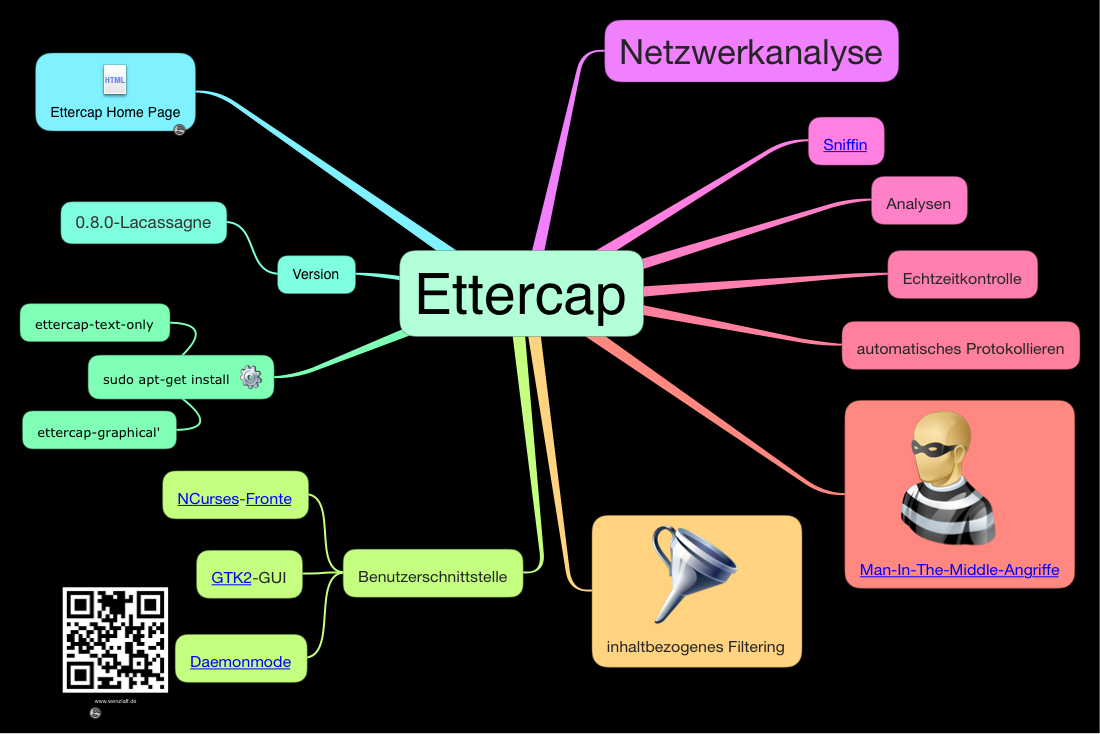
Wie kann das Netzwerkanalyse Programm Ettercap für eine MITM-Attacke (ARP-Spoofing) auf dem Raspberry Pi installiert werden?
Das Netzwerkanalyse Programm Ettercap kann als Text-Version oder auch als grafische Version auf dem rPi ziemlich schnell wie folgt installiert werden:
sudo apt-get update

sudo apt-get upgrade

sudo apt-get install ettercap-text-only
Auch die grafische Version, die bei der Installation etwas länger dauert, kann mit dem folgenden Aufruf installiert werden:
sudo apt-get update

sudo apt-get upgrade

sudo apt-get install ettercap-graphical
Nach der Installation die Version checken mit:
ettercap -v
Es wird die aktuelle Version vom 21. Sep 2013 ausgegeben: 0.0.8
Hilfe gibt es mit
ettercap -h
Hier ein kleiner Überblick zu Ettercap als Mindmap:
Starten im Text Modus mit
ettercap -T
oder mit einer Text-GUI:
ettercap -C
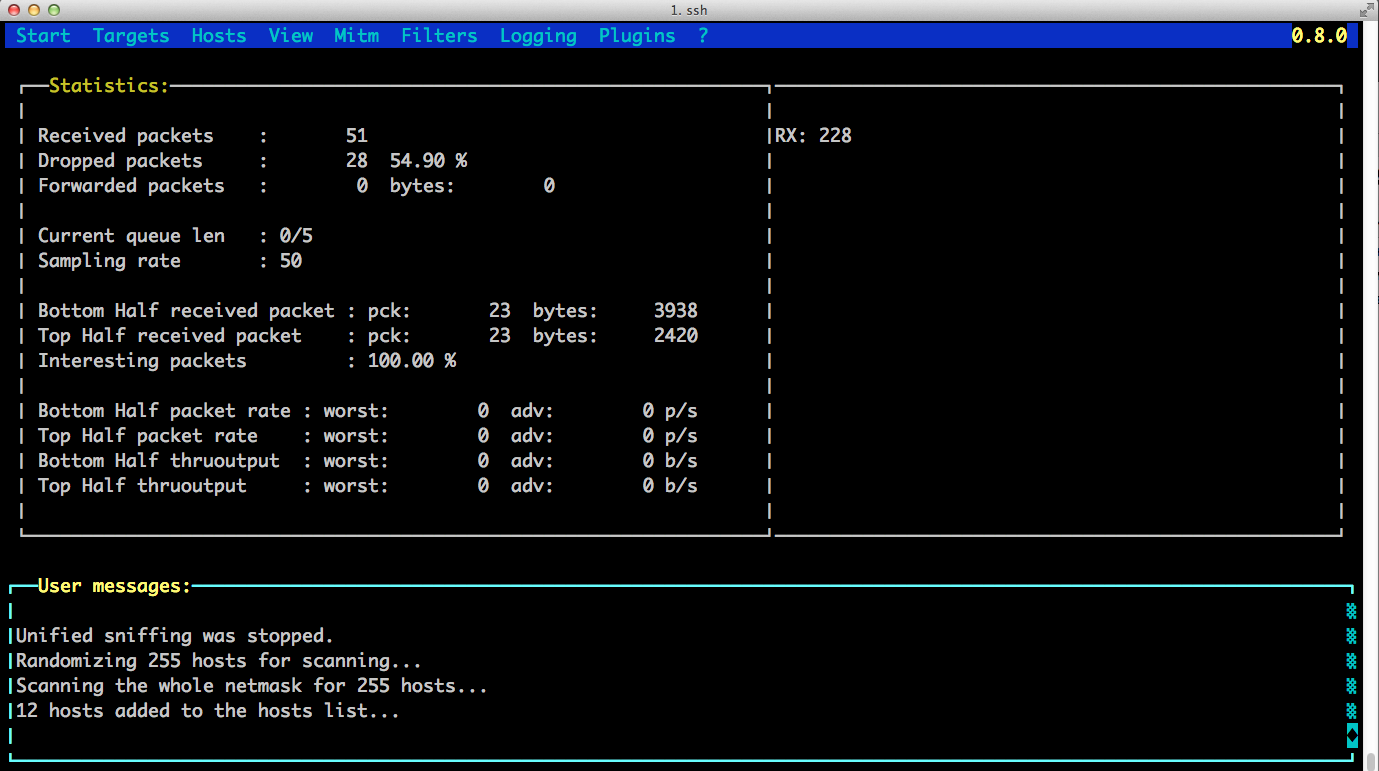
Quickstart MITM-Attacke
MITM-Attacke könnten wie hier beschrieben ausgeführt werden. Kurz die Text Variante:
ettercap -C
Menü: Sniff - Unified sniffing...
Eingabe: eth0
Menü: Hosts - Scan for hosts
Menü: Hosts - Hosts list
Router in Hosts list markieren und Taste 1 (für Target 1) klicken
Ziel (Opfer) in Hosts list markieren und Taste 2 (für Target 2) klicken
Hilfe mit SPACE
Menü: Targets - Current Targets
Menü: Mitm - ARP poisoning ... (ohne Parameters)
Menü: View - Statistics
Menü: Start - Start sniffing
Menü: View - Statistics
Opfer PC sieht nun "falsche" MAC vom Router, siehe arp -a auf Opfer PC
Hier mal ein paar Statistics eines kurzen test Laufs:

Zum Stoppen wieder:

Menü: Mitm - Stop mitm attack(s) (MAC wieder orginal vom Router)

Menü: Start - Stop sniffing
Es kann nun alles leicht auch geloggt und gefiltert werden. Alles nur im eigenen Netzt mit eigenen Rechnern evl. mit 2 rPi oder eine rPi und einem WR703 ausprobieren.