Den update bzw. die Neuinstallation ausführen mit:
1
sudo dpkg-ipiaware_1.19-3_armhf.deb
Optional bei Neuinstallation:
1
sudo apt-get install-fy
Nun den Server neu starten bzw. restarten mit:
1
sudo/etc/init.d/piaware restart
Woran kann man nun erkennen das alles wieder läuft? Auf der User-Seite ist nun die folgende Warnung entfernt:
Und nach ein paar Minuten gibt es die Info:
Und natürliche werden auch die Fluginformationen aktualisiert, ok 723 Flugzeuge für den letzten Tag im Jahr ist nicht viel aber es sind ja auch noch ein paar Stunden bis 2015:
Es kann aber auch die Version angezeigt werden mit dem neuen Feature:
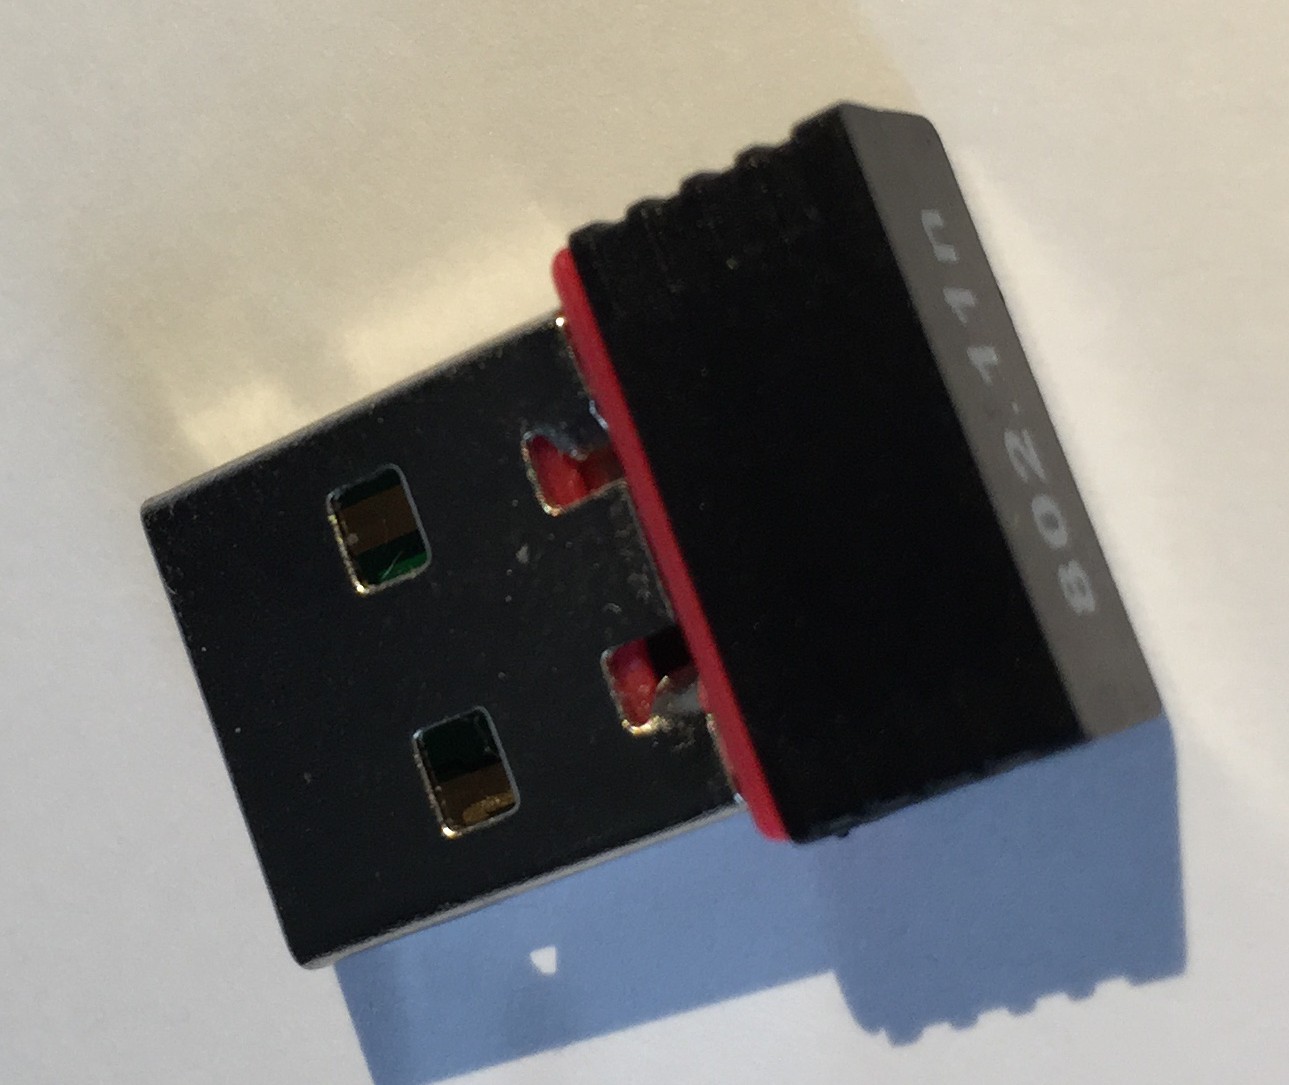
Habe nun mal eine Anleitung für den günstigen (1,86 Euro inkl. Versand!) USB Wifi Adapter erstellt. Das sind die Angaben vom Hersteller:
Newest Mini 802.11N 150Mbps Wireless USB Adapter
150Mbps Mini Wireless-N USB Adapter connects a laptop or desktop computer to a Wireless-N network at up to 6x the speed and 3x the coverage of a Wireless-G connection. Enjoy proven Wireless-N speed and reliability in an ultra compact design that is slightly larger than a US penny. Setup is a breeze with one-touch Wi-Fi Protected Setup (WPS) technology. Advanced wireless encryption protects your valuable data. Wi-Fi Multimedia (WMM) Quality of Service (QoS) prioritizes important video, audio and gaming traffic. Seamlessly stream video, download files, play games and talk online with the 150Mbps Mini Wireless-N USB Adapter.
Features & Specs
Chipset RT8188
Complies with IEEE 801.11n IEEE 802.11g, IEEE 802.11b standards
20MHz/40MHz bandwidth
Reverse Direction Data Flow and Frame Aggregation
WEP 64/128, WPA, WPA2 Support
Multiple BSSID Support
Provides USB 2.0 Hi-Speed interface
Cisco CCX V1.0 V2.0 V3.0 Compliance
Low Power with Advanced Power Management
Drivers for XP, Vista, Win7, Linus, & Mac
Works With Windows 7,Windows XP, Windows Vista , Mac OSX 10.6 ~ 10.8 And Linux 2.6.18~2.6.38
Internal Antenna
Transmission Distance: Indoor: Up to 100m, Outdoor up to 300m (depending on surrounding environment)
Interface: USB2.0
Frequency Range:2.4GHz-2.4835GHz
Data Security: WPA; 64/128-bit WEP; TKIP/AES
So sieht er im Detail aus: WLAN Dongel ID 148f:760b Ralink Technology
Es gibt aber auch einen Treiber für den Raspberry Pi mit der aktuellen wheezy 3.12.35+.
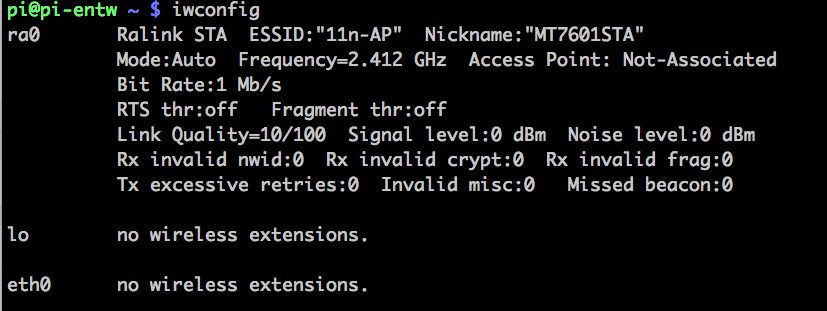
Wie wird der Treiber für den WLAN Stick von Ralink installiert?
Zuerst mit lsusb schauen ob er schon erkannt wird, Ausgabe:
Bus 001 Device 004: ID 148f:760b Ralink Technology, Corp.
Nach dem Motto „Man merkt oft erst, was man hatte, wenn man es verliert“, mal die Package entfernen die nach einer Neuinstallation von mir meistens nicht benötigt werden, und nur Platz verschwenden, da der Raspberry Pi bei mir immer über die Kommandozeile per SSH bedient wird.
Es werden also keine X-Server usw. benötigt. Für Packages die nicht installiert sind, braucht es auch keine Sicherheitsupdates und wenn man doch mal ein Package braucht kann man es ja auch leicht wieder installieren.
Habe gerade den Index aller Mindmaps 2014 erstellt. Auch die Cloud für 2014 ist generiert worden. Es sind doch nicht so viele wie im letzten Jahr. Und der rPi ist auch dabei.
Hier findet ihr das ganze Mindmap -Verzeichnis aller Jahre.
Welche gefällt Euch am Besten? Zu welchen Begriff soll 2015 eine Mindmap erzeugt werden? Gerne als Kommentar.
Habe soeben die 1. Version von dem DUMP1090 Client TWFlug kostenlos
veröffentlicht.
TWFlug liest die Daten von einem DUMP1090 Server und zeigt sie (optional) in einem Tacho an oder/und schreibt die Daten in eine Logdatei für die Auswertung mit z.B. Fhem. Es kann die Logdatei auch per sFTP an einen entfernten Rechner kopieren.
Das TWFlug Programm ist ein Java Programm und läuft somit auf allen Betriebssystem. Es können mit Fhem dann solche schönen Grafiken in Echtzeit angezeigt werden:
Fhem Flugdaten in Langenhagen zu Weihnachten
Installation:
Download der twflug-0.1.0.zip.
Dann das Archive auspacken.
Für das Starten gibt es zwei Möglichkeiten mit oder ohne GUI.
Ohne GUI mit Eingabe in der Konsole in dem TWFlug Verzeichnis mit:
1
java-jar twflug.jar-n--ip IP-VOM-DUMP1090-Server
also z.B. java -jar twflug.jar -n --ip 192.198.1.2
oder mit GUI
1
java-jar twflug.jar--ip IP-VOM-DUMP1090-Server
also z.B. java -jar twflug.jar --ip 192.198.1.2
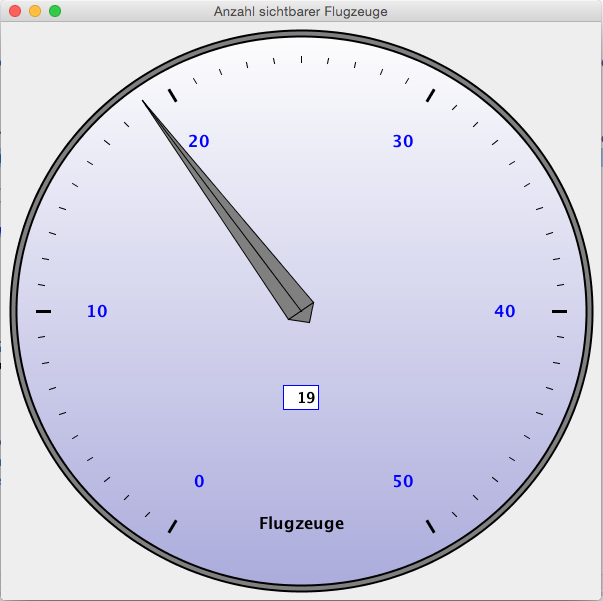
Dann startet nach einigen Sekunden, die folgenden Anzeige von TWFlug:
TWFlug Tacho
Weiter Infos zu den Parametern erhält man durch Eingabe von
Wer Homematic Geräte hat und diese mit dem Homeserver Fhem betreibt, will hin und wieder mal wissen wie es um den Status der Geräte bestellt ist. Die Anleitung zu HMinfo gibt den Überblick.
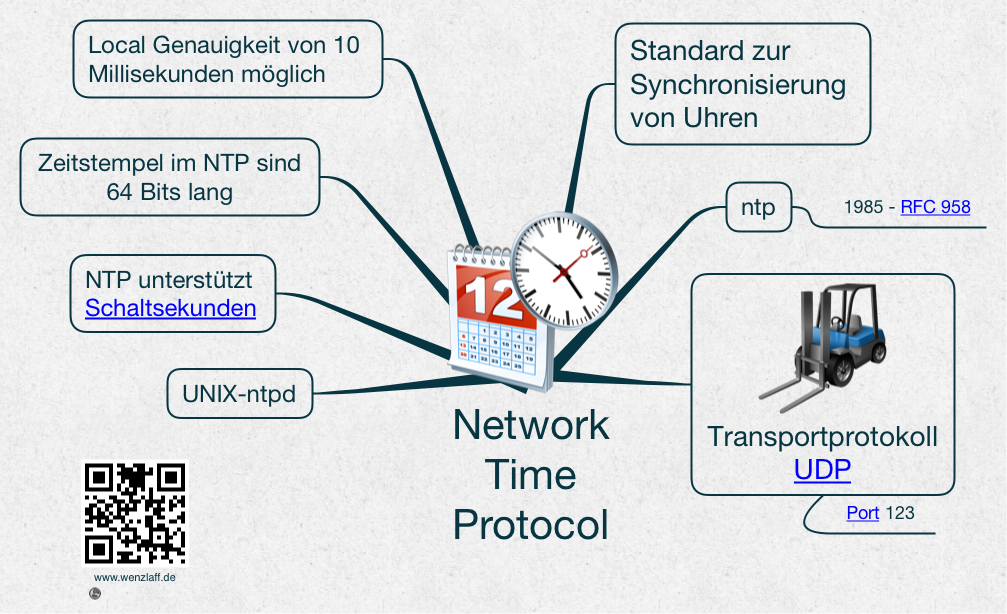
Wie auf Heise berichtet wird, gibt es ein ntp Sicherheitsupdate das sehr schnell eingespielt werden sollte. Das gilt auch für die aktuellen Debian wheezy Distribution für den Raspberry Pi.
Erst mal eine Mindmap zu ntp: Network-Time-Protocol Mindmap
Mit Pufferüberläufe, die sich durch passend erstellte NTP-Pakete ausnutzen lassen, erhält der Angreifer root Recht auf dem System.
Auf dem Raspberry Pi hat das ntp Package folgende Abhängigkeiten:
Was muss auf dem Raspberry Pi getan werden?
1
2
sudo apt-get update
sudo apt-get upgrade
Dann ist das System auf den aktuellen Stand.
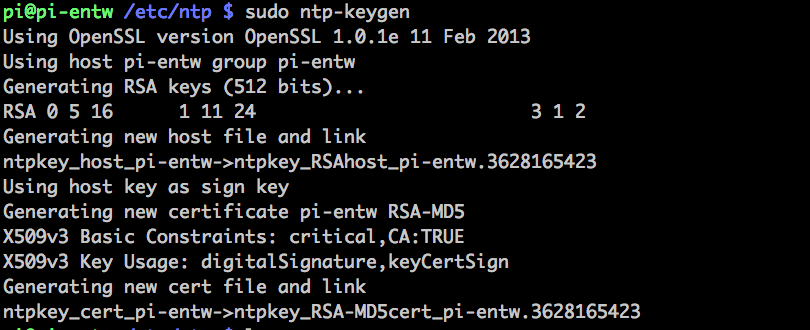
Dann können die ntp Keys neu generiert werden. Dazu einmal
1
2
sudo mkdir/etc/ntp
sudo ntp-keygen
ausführen. Es erfolgt folgende Ausgabe:
Wer noch schauen möchte, ob die gefixte Version installiert ist, gibt einmal apt-show-versions -p ntp ein und erhält die gefixt Version angezeigt: version 1:4.2.6.p5+dfsg-2+deb7u1
Auf für Mac OS X gibt es ein Update, das wie gewohnt eingespielt werden sollte:
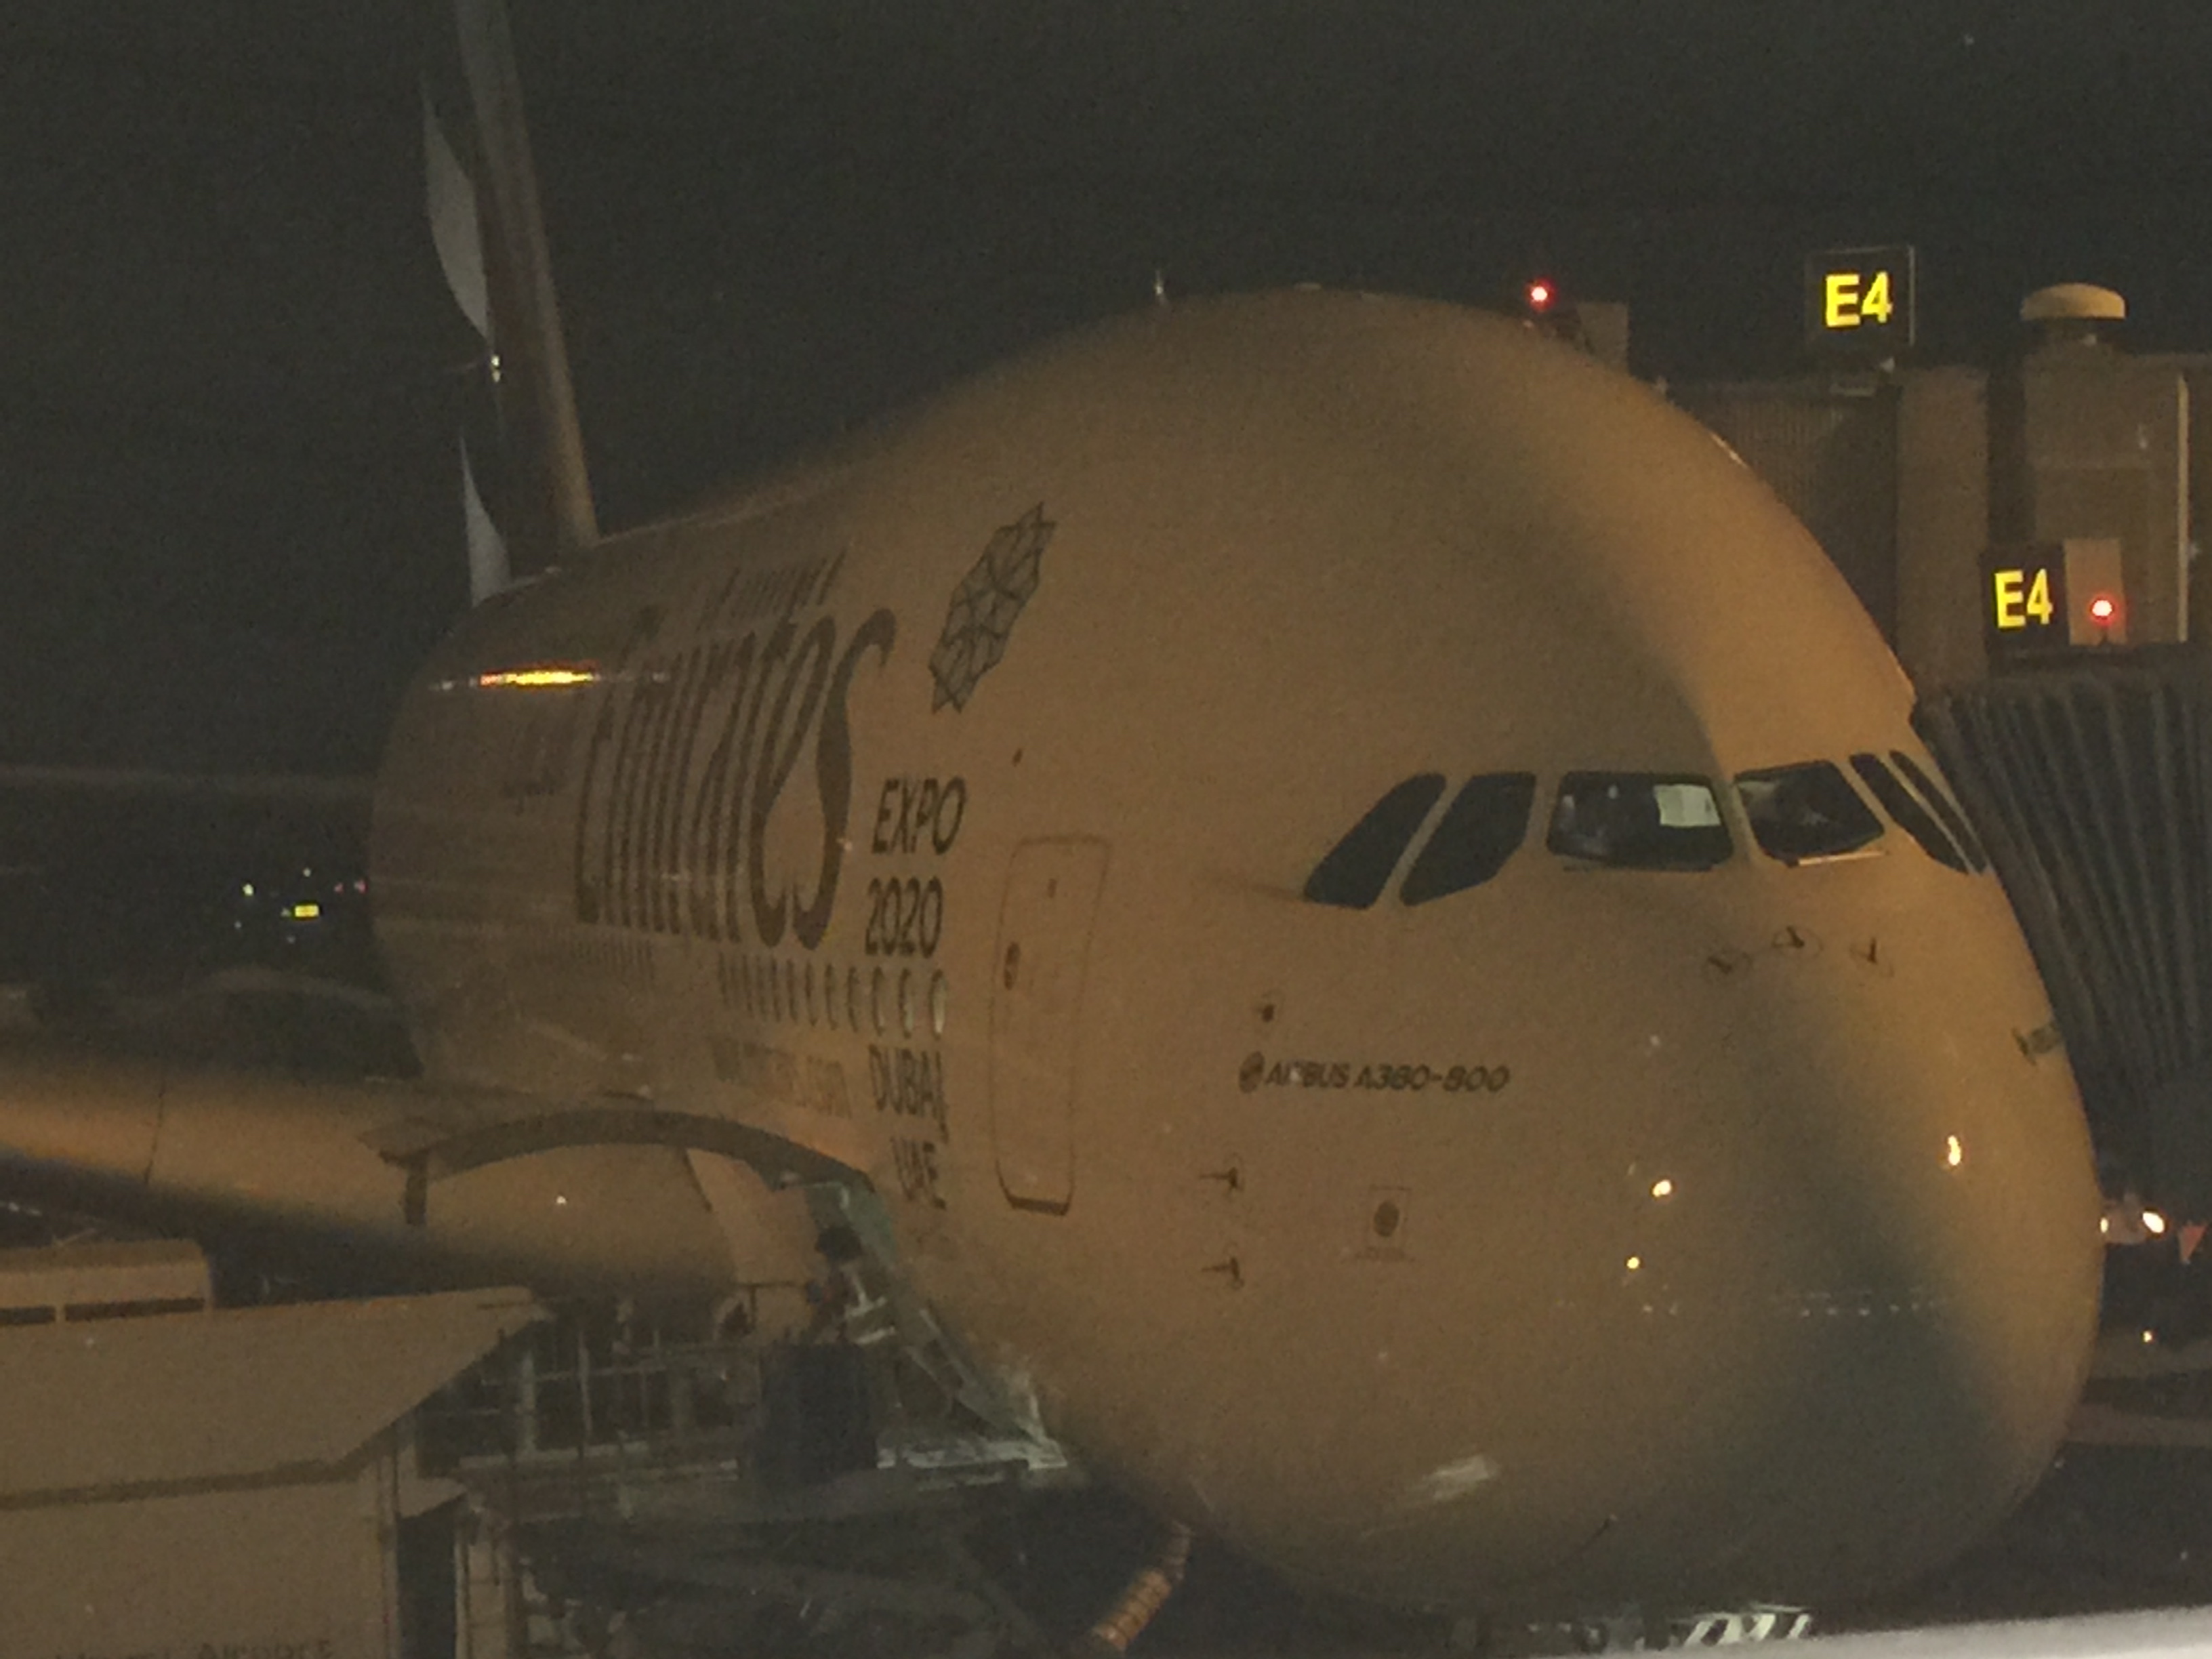
Im letzen Jahr, hatte ich schon mal eine Mindmap zum A380veröffentlicht, die ich heute ganz anders machen würde. Nach dem ich nun mal mit einem A380-800 (von Bangkok nach Dubai) geflogen bin, musste ein kleines Andenken her (1:200). Das ist genau der, mit dem wir geflogen sind. Die Winglets (Bionik) kann man sehr gut erkennen.
Den A380 kann man auch mit dem Raspberry Pi empfangen. Über Hannover konnte ich schon einige tracken. Landen tuen sie ja leider nicht in Hannover.
Hier mal ein Orginal Foto (A6-EEJ, und in diesem Video wird der Übergeben (in 26:49 min) von mir aus der Wartehalle:
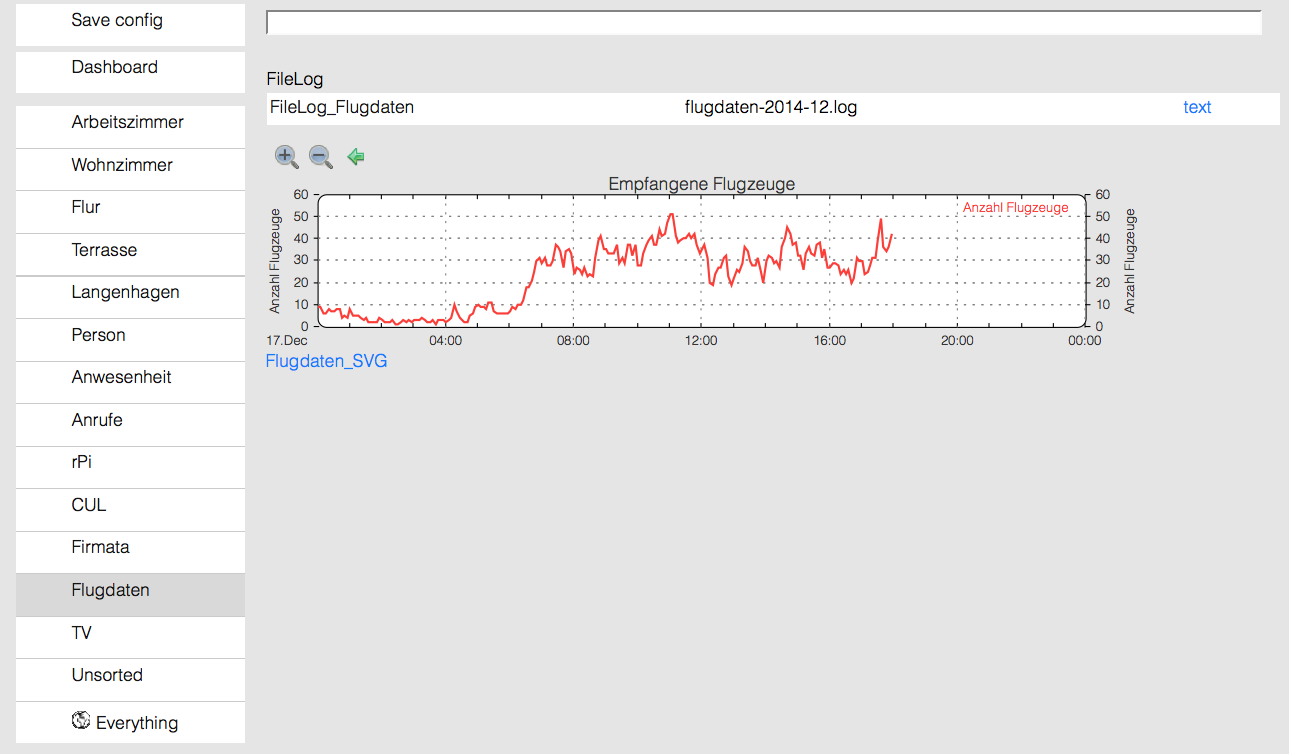
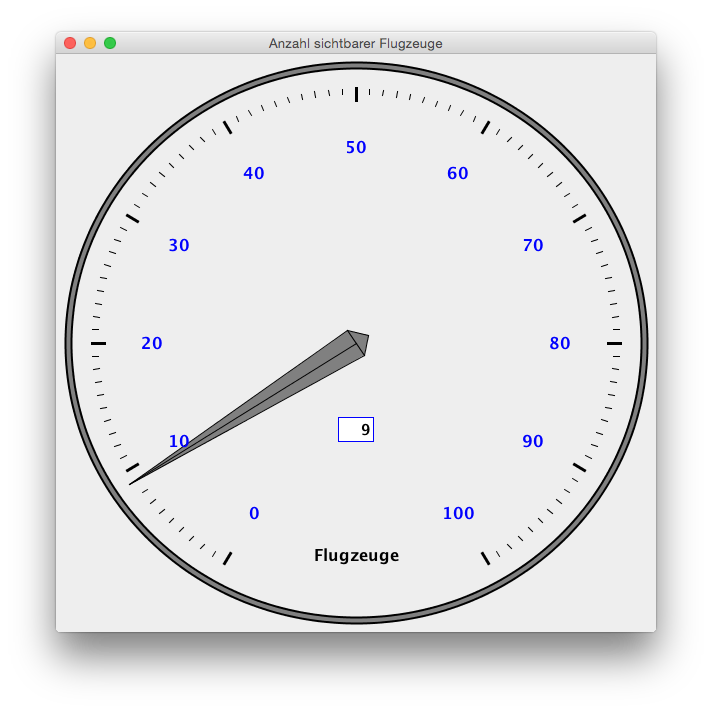
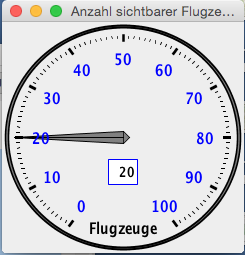
Da bei mir ein Fhem Home-Server läuft, hatte ich die Idee, dort doch gleich die Flugdaten die von den Flugzeugtranspondern ausgesendet werden schön graphisch in Echtzeit anzuzeigen.
Also wie kann eine Grafik in Fhem erstellt werden, die die aktuelle Anzahl der gerade empfangenen Flugzeuge anzeigt.
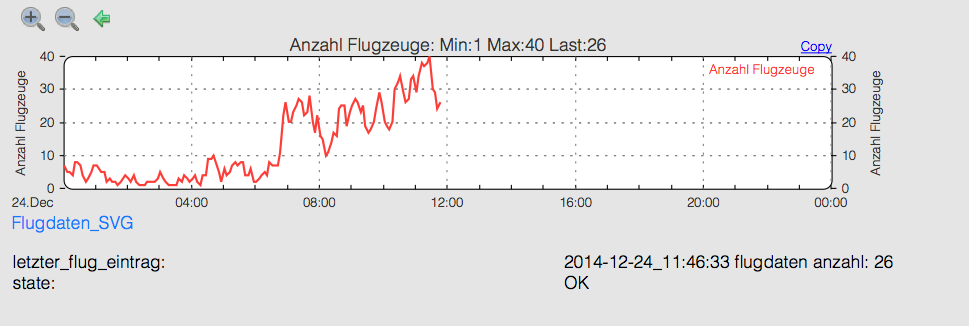
Hier das Ergebniss, wo man deutlich sehen kann, das heute bis ca. 6 Uhr nur ca. 10 Flugzeuge flogen. Dann steigt der Flugverkehr rapide an:
Wie kann nun so eine Grafik, die sich automatisch aktualisiert erstellt werden.
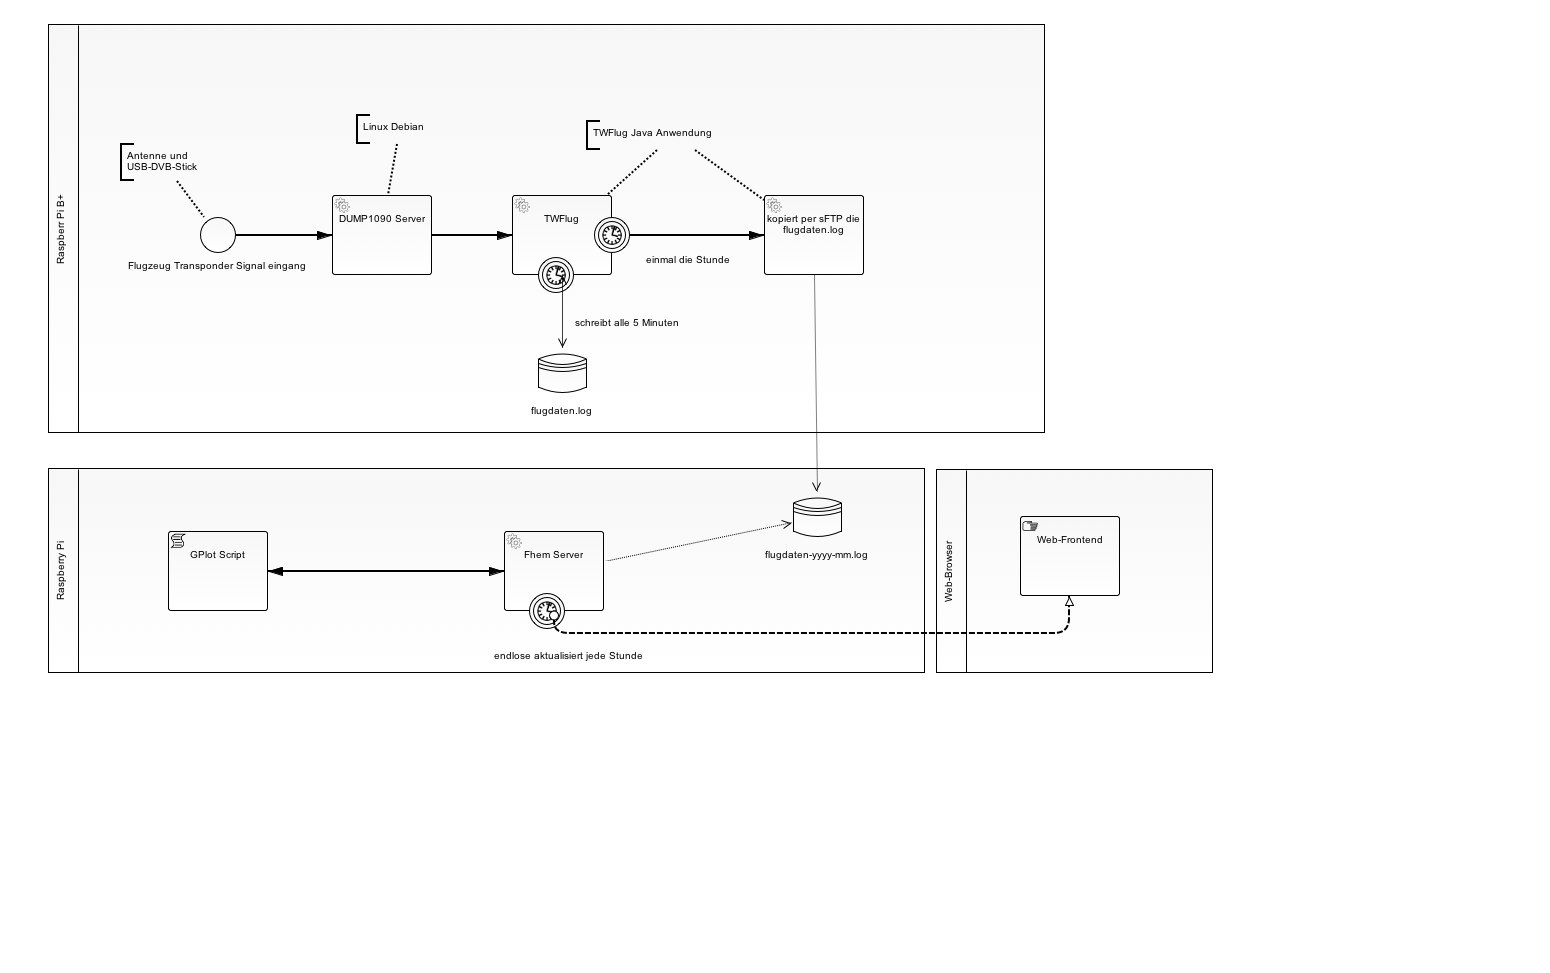
Zuerst einmal die Architektur als BPMN 2.0 Diagramm: Architektur TWFlug BPMN 2.0
Es werden zwei Raspberry Pi benötigt. Auf dem einen läuft der DUMP1090 Server mit der TWFlug Anwendung unter Java 1.8. Die TWFlug Anwendung läuft ohne Gui, und schreibt alle 5 Minuten die Anzahl der empfangenen Flugzeuge in eine Datei. Diese Datei wird dann jede halbe Stunde per sFTP an den anderen Raspberry Pi gesendet und von Fhem eingelesen und als Grafik ausgegeben.
TWFlug kann auch mit Gui auf einen Rechner gestartet werden und gibt dann als Tacho die Anzahl der Flugzeuge aus. TWFlug Tacho
Das nötige GPlot Script:
1
2
3
4
5
6
7
8
9
10
11
12
13
14
15
16
17
18
19
20
21
22
23
24
25
26
27
28
29
30
31
32
33
34
35
36
37
38
39
40
41
/*
myFlug.gplot Version 1.0 vom 17.12.2014
Dieses GNU-Plot Script zeigt die Flugdaten von den empfangenen Transpondern an.
Copyright (C) 2014 Thomas Wenzlaff http://www.wenzlaff.de
This program is free software: you can redistribute it and/or modify
it under the terms of the GNU General Public License as published by
the Free Software Foundation, either version 3 of the License, or
(at your option) any later version.
This program is distributed in the hope that it will be useful,
but WITHOUT ANY WARRANTY; without even the implied warranty of
MERCHANTABILITY or FITNESS FOR A PARTICULAR PURPOSE. See the
GNU General Public License for more details.
You should have received a copy of the GNU General Public License
along with this program. If not, see {http://www.gnu.org/licenses/}.
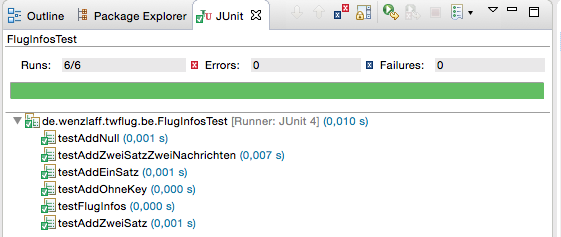
Nach über 2 Jahren ist nun eine neue Version von JUnit veröffentlicht worden. Die Releasenotes sind auf Github zu finden. In folgenden Bereichen gab es Ergänzungen:
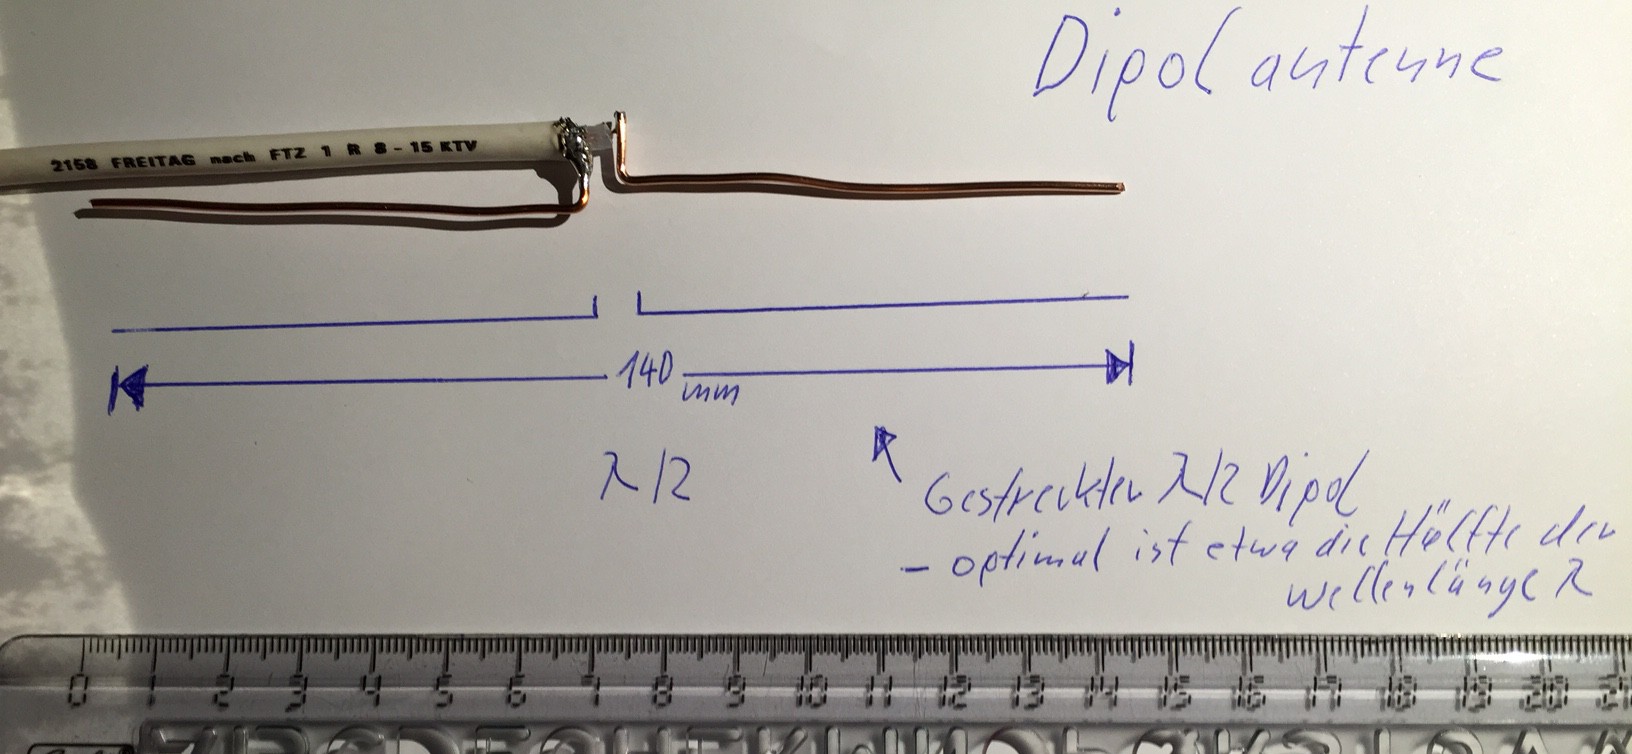
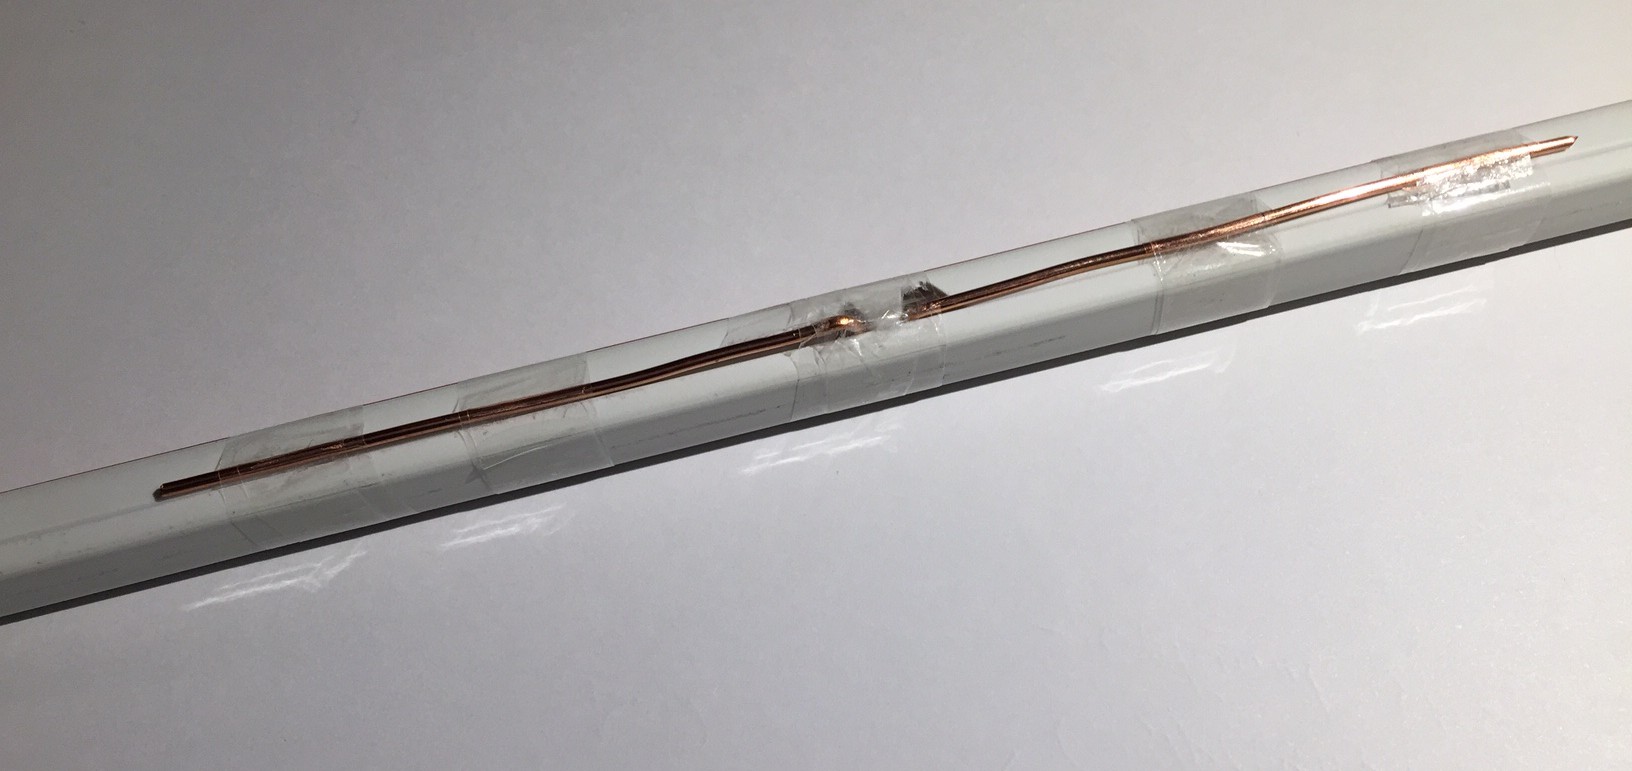
Heute am Basteltag wollte ich mal sehen, was so erreicht werden kann mit einer anderen Antenne und einer optimalen Antennen Position. Also mal einen Dipol für 1090 Mhz berechnet und gebaut. Ok, hier die 1. Version:
Und eine Nahaufnahme. Ok, das geht auch schöner:
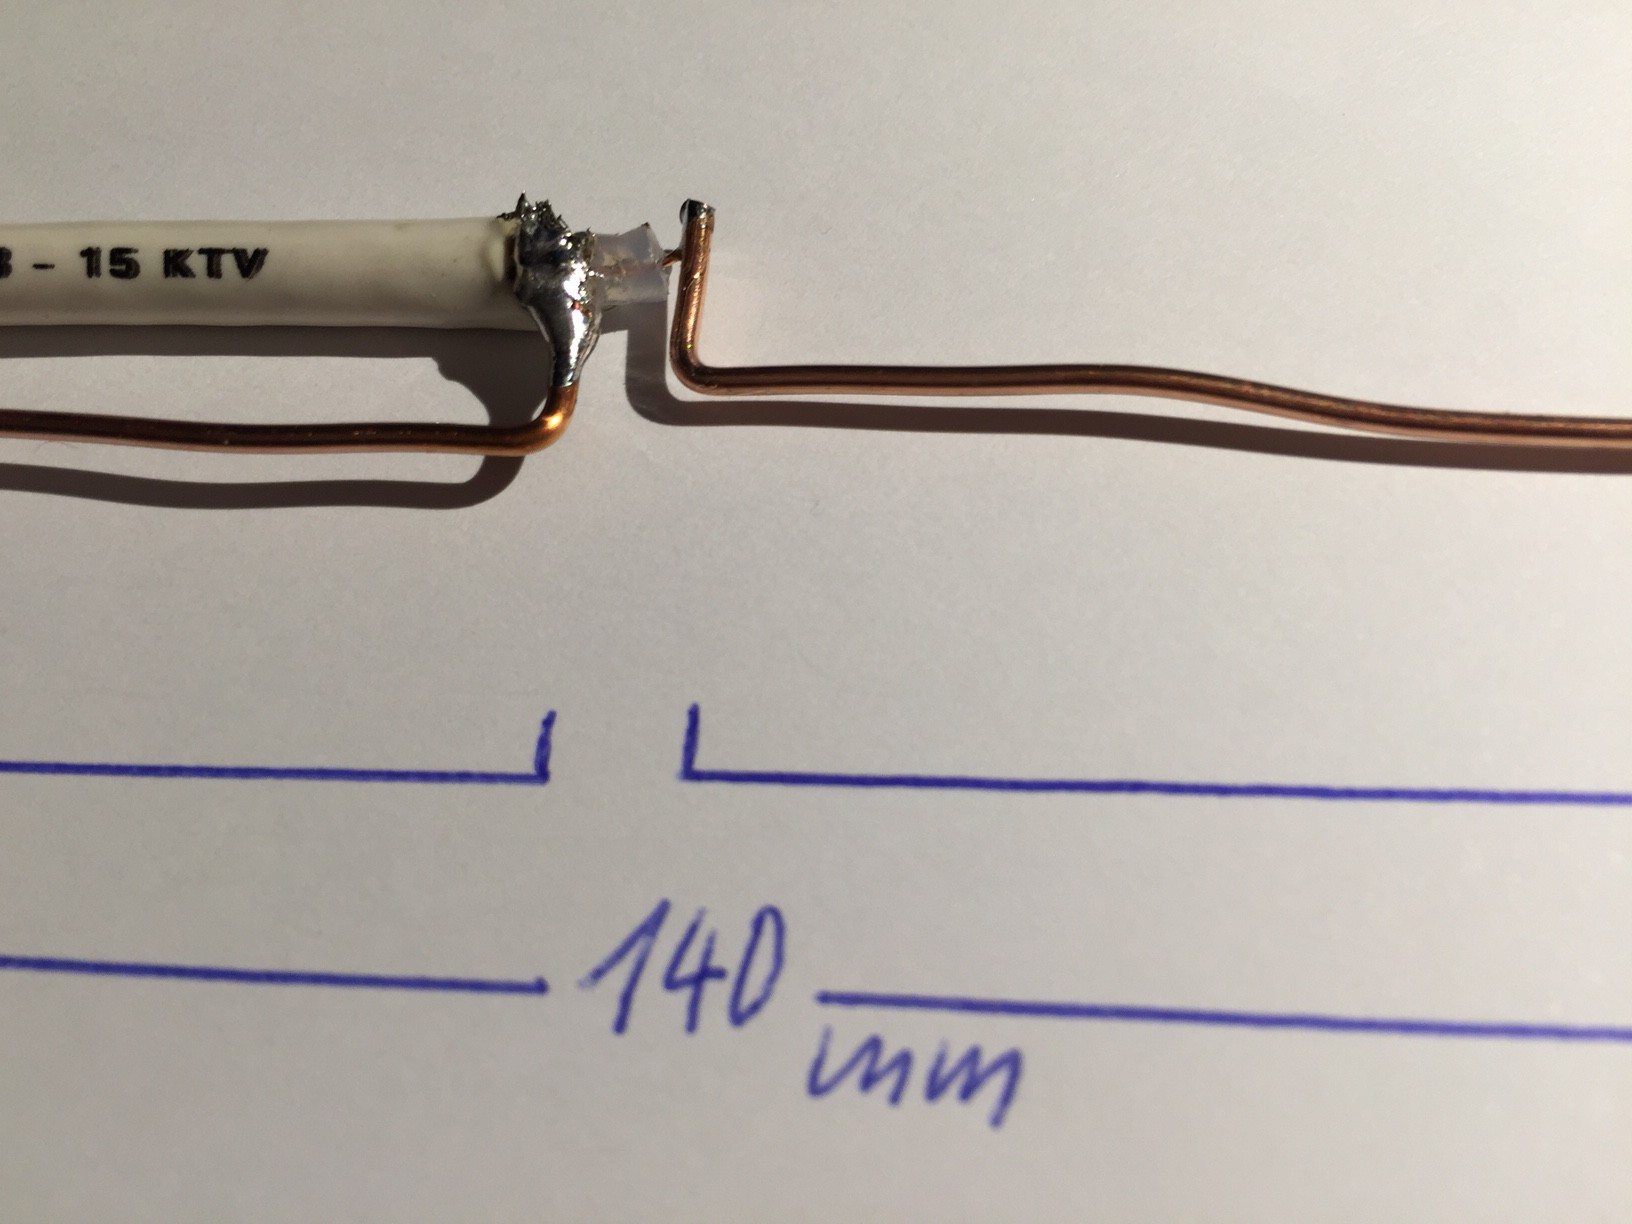
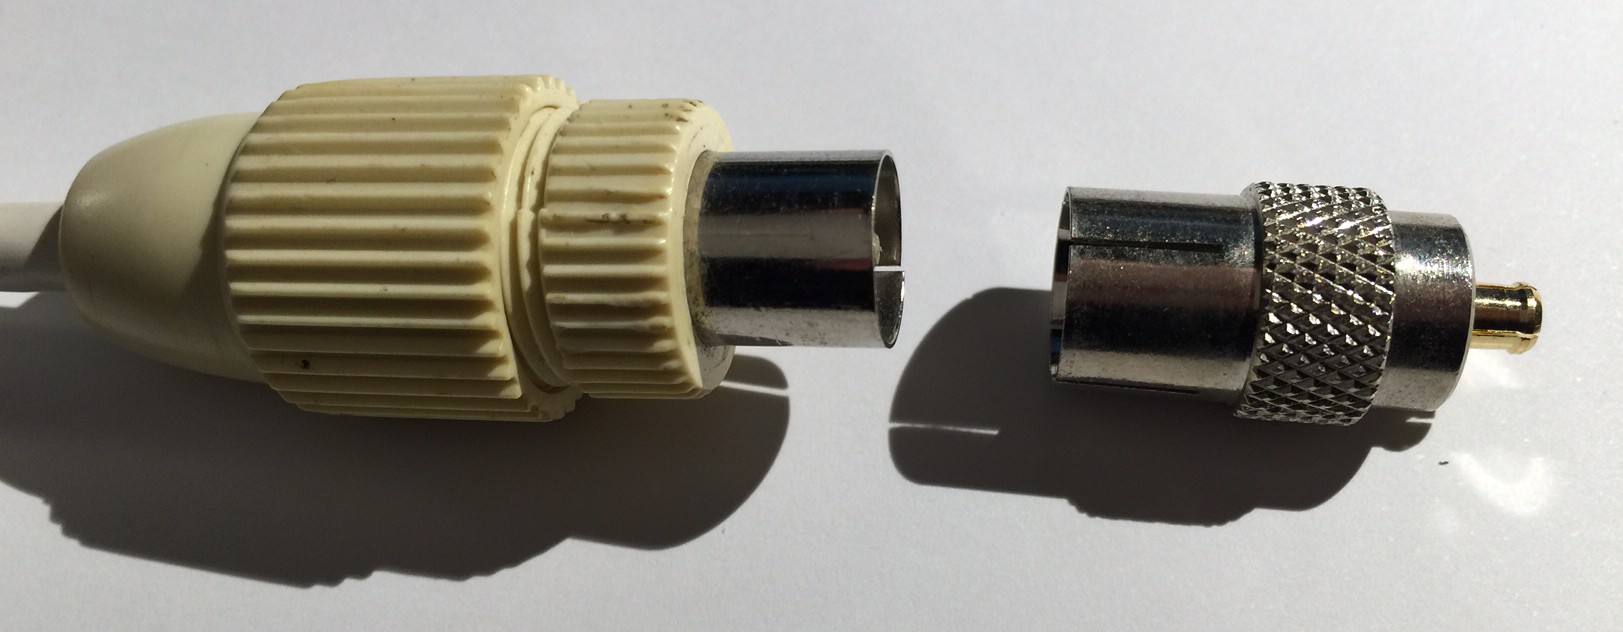
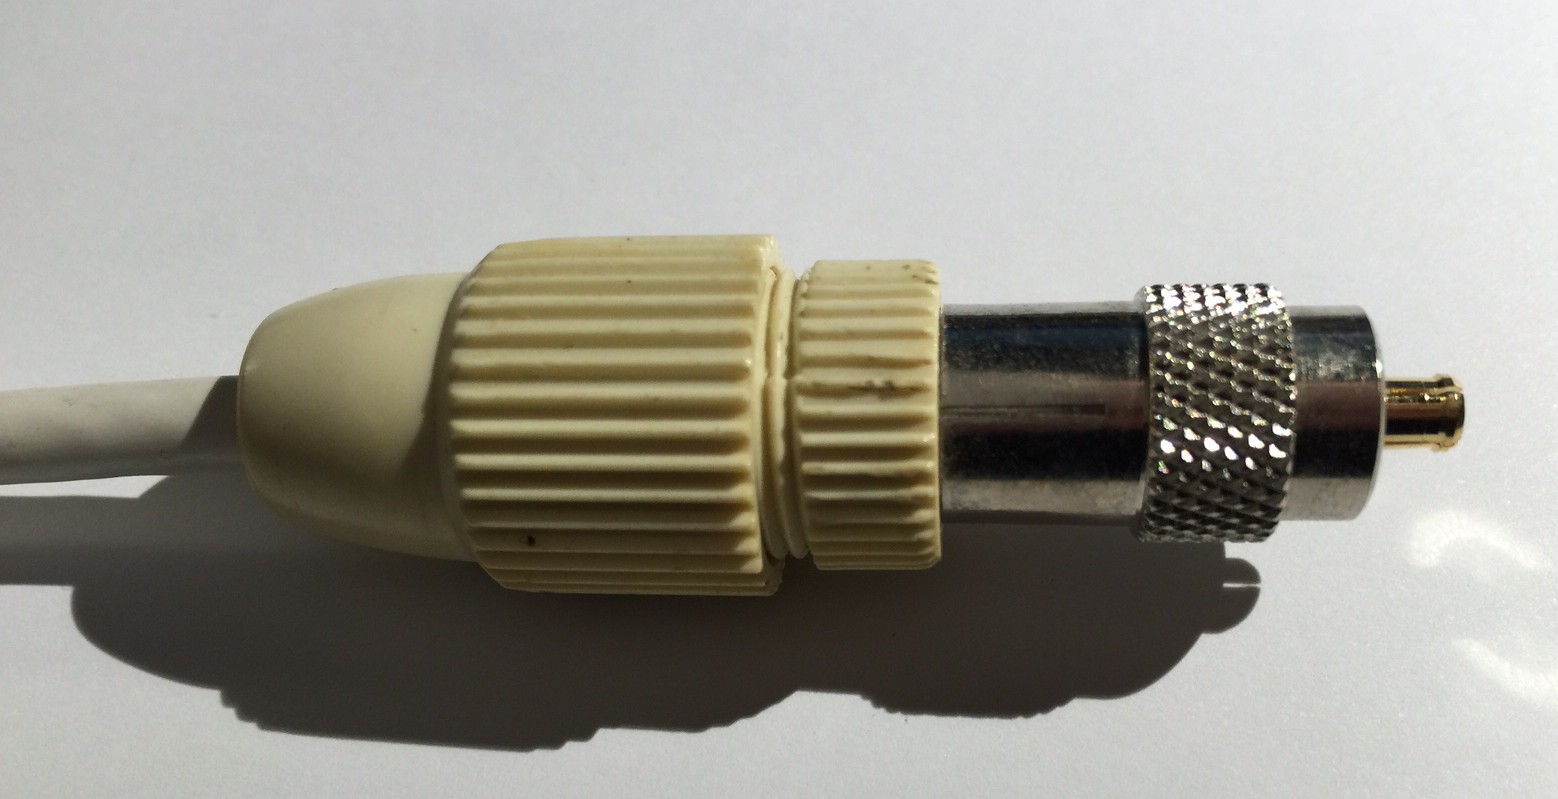
Und auf der anderen Seite des Koaxkabel ein Stecker mit Adapter:
So nun beide montieren:
Und das ganze in einen vorhandenen Kabelkanal mit etwas Klebeband fixiert:
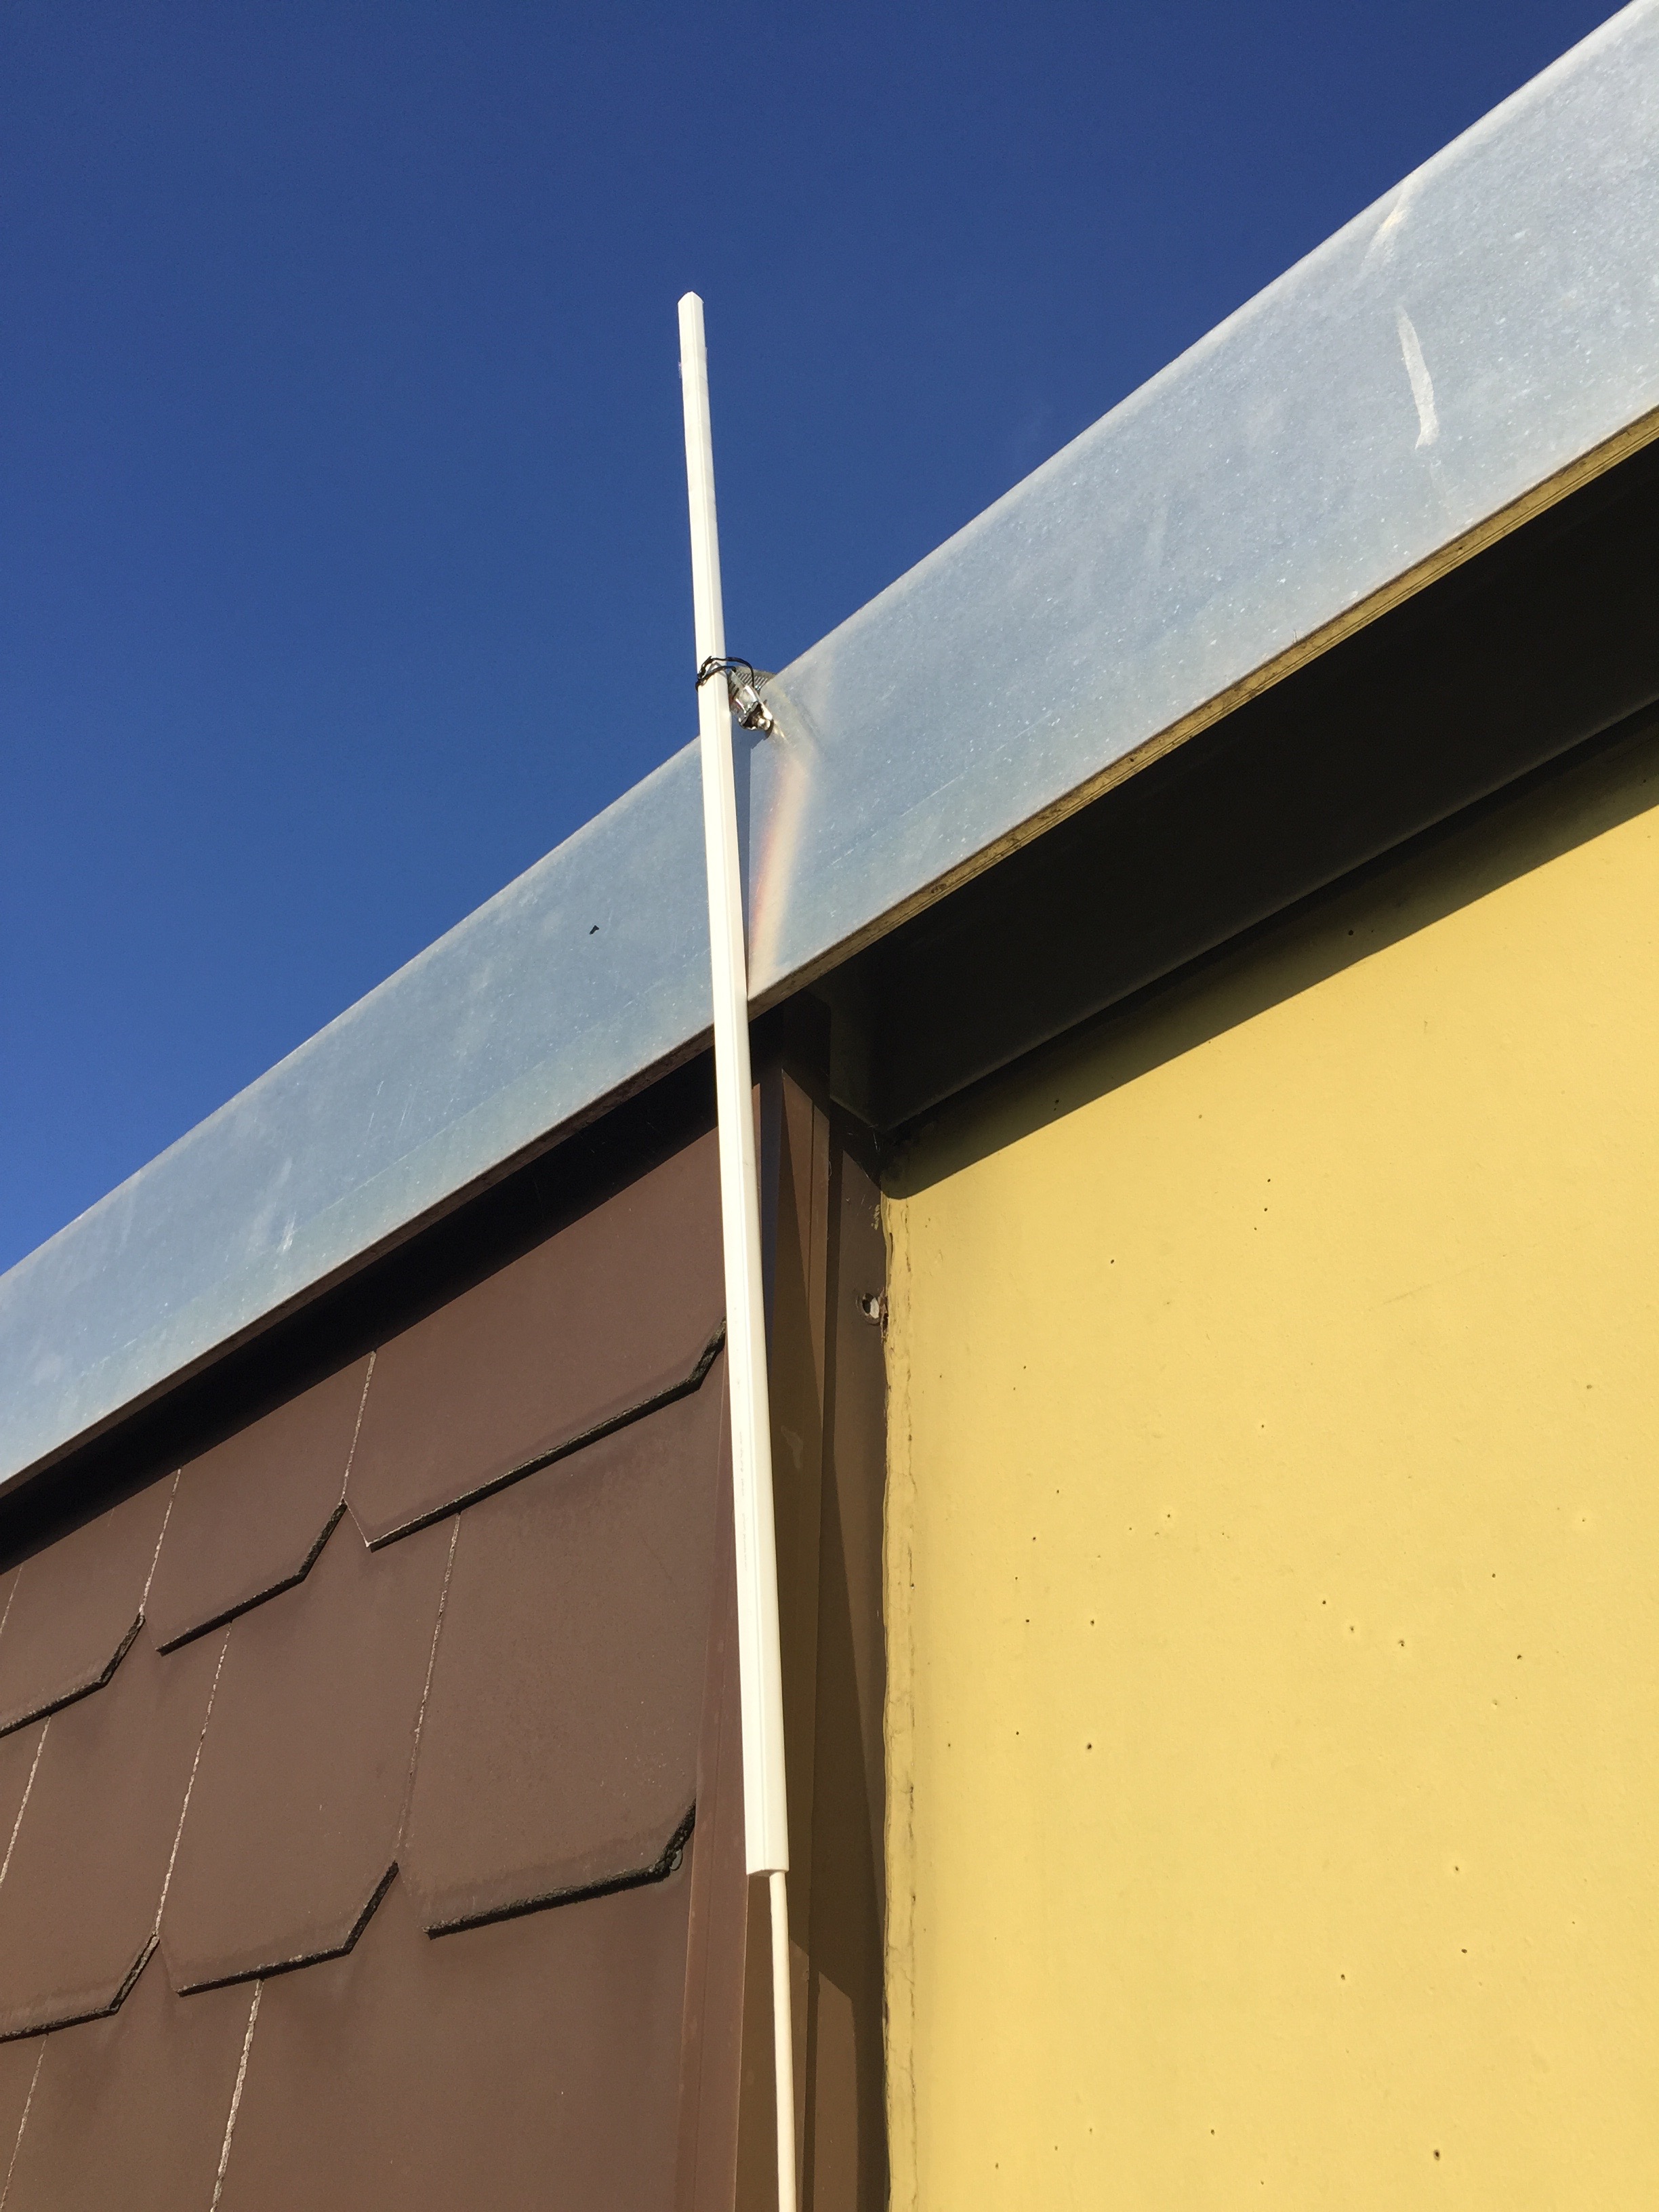
Nun das ganze in der 3. Etage mit frei Sicht in alle Richtungen auf dem Dach versuchsweise mit Klebeband montiert. Auf Anhieb konnte ich doppelt soviele Flugzeuge empfangen wie mit der Zimmerantenne. Und das bei „blue sky“.
Das Antennen Kabel geht leider nur nach draußen, wenn das Fenster auf ist.
Auch geht es nun in alle Richtungen.
Es ist schon cool, mit einen kleinen Dipol von Langenhagen bis nach Hamburg, Cuxhaven, Bremen, Münster, Düsseldorf, Aachen (fast in Belgien), Bonn, Kassel, Wolfsburg. Nach einer halben Stunde musste ich diesen Versuchsaufbau abbrechen, wegen Regen. Aber immerhin 54 gleichzeitige Flugkontakte auf Anhieb mit den selbstgebauten Dipol mit Verbesserungspotential. Der Dipol muss natürlich senkrecht angebracht werden.
Berechnung des Dipols:
Lichtgeschwindigkeit = 300 000 000 m/s
Ziel Frequenz= 1090 Mhz gleich 1090 000 000 Hertz
Wellenlänge = 300 000 000 / 1090 000 000 = 0,275 m = 275 mm.
Das ganze durch 2 teilen, da ich einen Dipol haben möchte. 275 mm/2 = 137 mm
Also die Gesammtlänge der Antenne muss ca. 140 mm sein.
Oder habe ich mich verrechnet? Gehts noch einfacher? Und wie sieht es mit Blitzableiter aus?
Das bekannte Windows Programm PlanePlotter sendet die Flugdaten von Transpondern an PlanePlotter. Wie können diese Daten aber mit einem Raspberry Pi und ohne Windows an den PlanePlotter Server versendet werden.
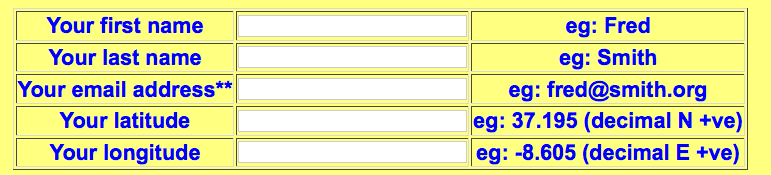
Zuerst muss auf der PlanePlotter Seite eine Registrierung erfolgen. Folgende Angaben sind nötig:
An die dort angegebenen E-Mail Adresse wird dann nach ein paar Minuten eine C- Header Datei mit Namen: coaa.h versendet.
Diese coaa.h ist wie folgt aufgebaut:
1
2
3
4
5
//coaa.h configuration file for Thomas Wenzlaff 2011-11-11 11:11:11
#define USER_REGNO 123456
#define USER_AUTHCODE 1234567890
#define USER_LATITUDE 52.4388
#define USER_LONGITUDE 9.7428
Dies Datei dann so wie sie ist, in das Homeverzeichnis von dem DUMP1090 Programm kopieren und das ppup (=plane plotter upload) Programm welches auch in dem Verzeichnis ist neu compilieren mit:
1
make-fmakeppup1090
wenn der compile ohne Fehler durchgelaufen ist, kann das Program mit
1
./ppup1090
gestartet werden (oder wenn das hochladen im Hintergrund geschehen soll mit ./ppup1090 &). Schon werden die Daten an PlanePlotter alle 60 Sekunden hochgeladen. Das ppup1090 muss nach dem start des DUMP1090 Servers erfolgen, da er ja die Daten von diesem Server erhält.
Wie kann nun aber kontrolliert werden, ob die Daten richtig an PlanePlotter gesendet werden?
Dazu den http://www.coaa.co.uk/rpiusers.php?authcode=USER_AUTHCODE link verwenden. Den USER_AUTHCODE aus der coaa.h, die man per E-Mail erhalten hat, ersetzen und den Link im Browser aufrufen.
Z.b. http://www.coaa.co.uk/rpiusers.php?authcode=1234567890
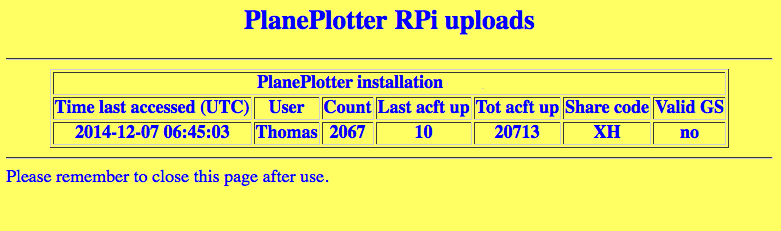
Hier mal mein Ergebnis.
Jeder User erhält dann einen eindeutigen Share code, der bei mir XH lautet. Diesen Code findet man dann, auf der Übersichtsseite (hier mal weiß makiert):
Habe ein Java Programm für die übersichtliche Anzeige der empfangenen Flugzeuge erstellt.
Wer einen DUMP1090 Server laufen hat, kann das TWFlug Programm starten.
Es werden bisher folgende Funktione geboten:
anzeige der Anzahl der sichtbaren Flugzeuge
erstellen einer Log Datei im Fhem Format
Das TWFlug Programm läuft auf unterschiedlichen Plattformen (Win, Linux, Mac…), bisher habe ich Mac OS X Yosemite (10.10.1) getestet. Wer vor der ersten öffentlichen Version am Test teilnehmen möchte, kann mir eine E-Mail senden.
So sieht das TWFlug nach dem Start aus:
TWFlug Programm
Folgendes Fhem-Format wird alle 5 Minuten geschrieben, damit in Fhem Grafiken erzeugt werden können:
1
2
3
4
5
6
7
8
9
10
2014-12-01_21:00:52flugdaten anzahl:31
2014-12-01_21:05:52flugdaten anzahl:31
2014-12-01_21:10:52flugdaten anzahl:32
2014-12-03_06:11:56flugdaten anzahl:7
2014-12-03_06:16:56flugdaten anzahl:12
2014-12-03_06:21:56flugdaten anzahl:10
2014-12-03_06:26:56flugdaten anzahl:11
2014-12-03_06:31:56flugdaten anzahl:9
2014-12-03_06:36:56flugdaten anzahl:18
2014-12-03_06:41:56flugdaten anzahl:20
Das Programmfenster läßt sich skalieren, so das es auf dem Desktop schön aussieht:
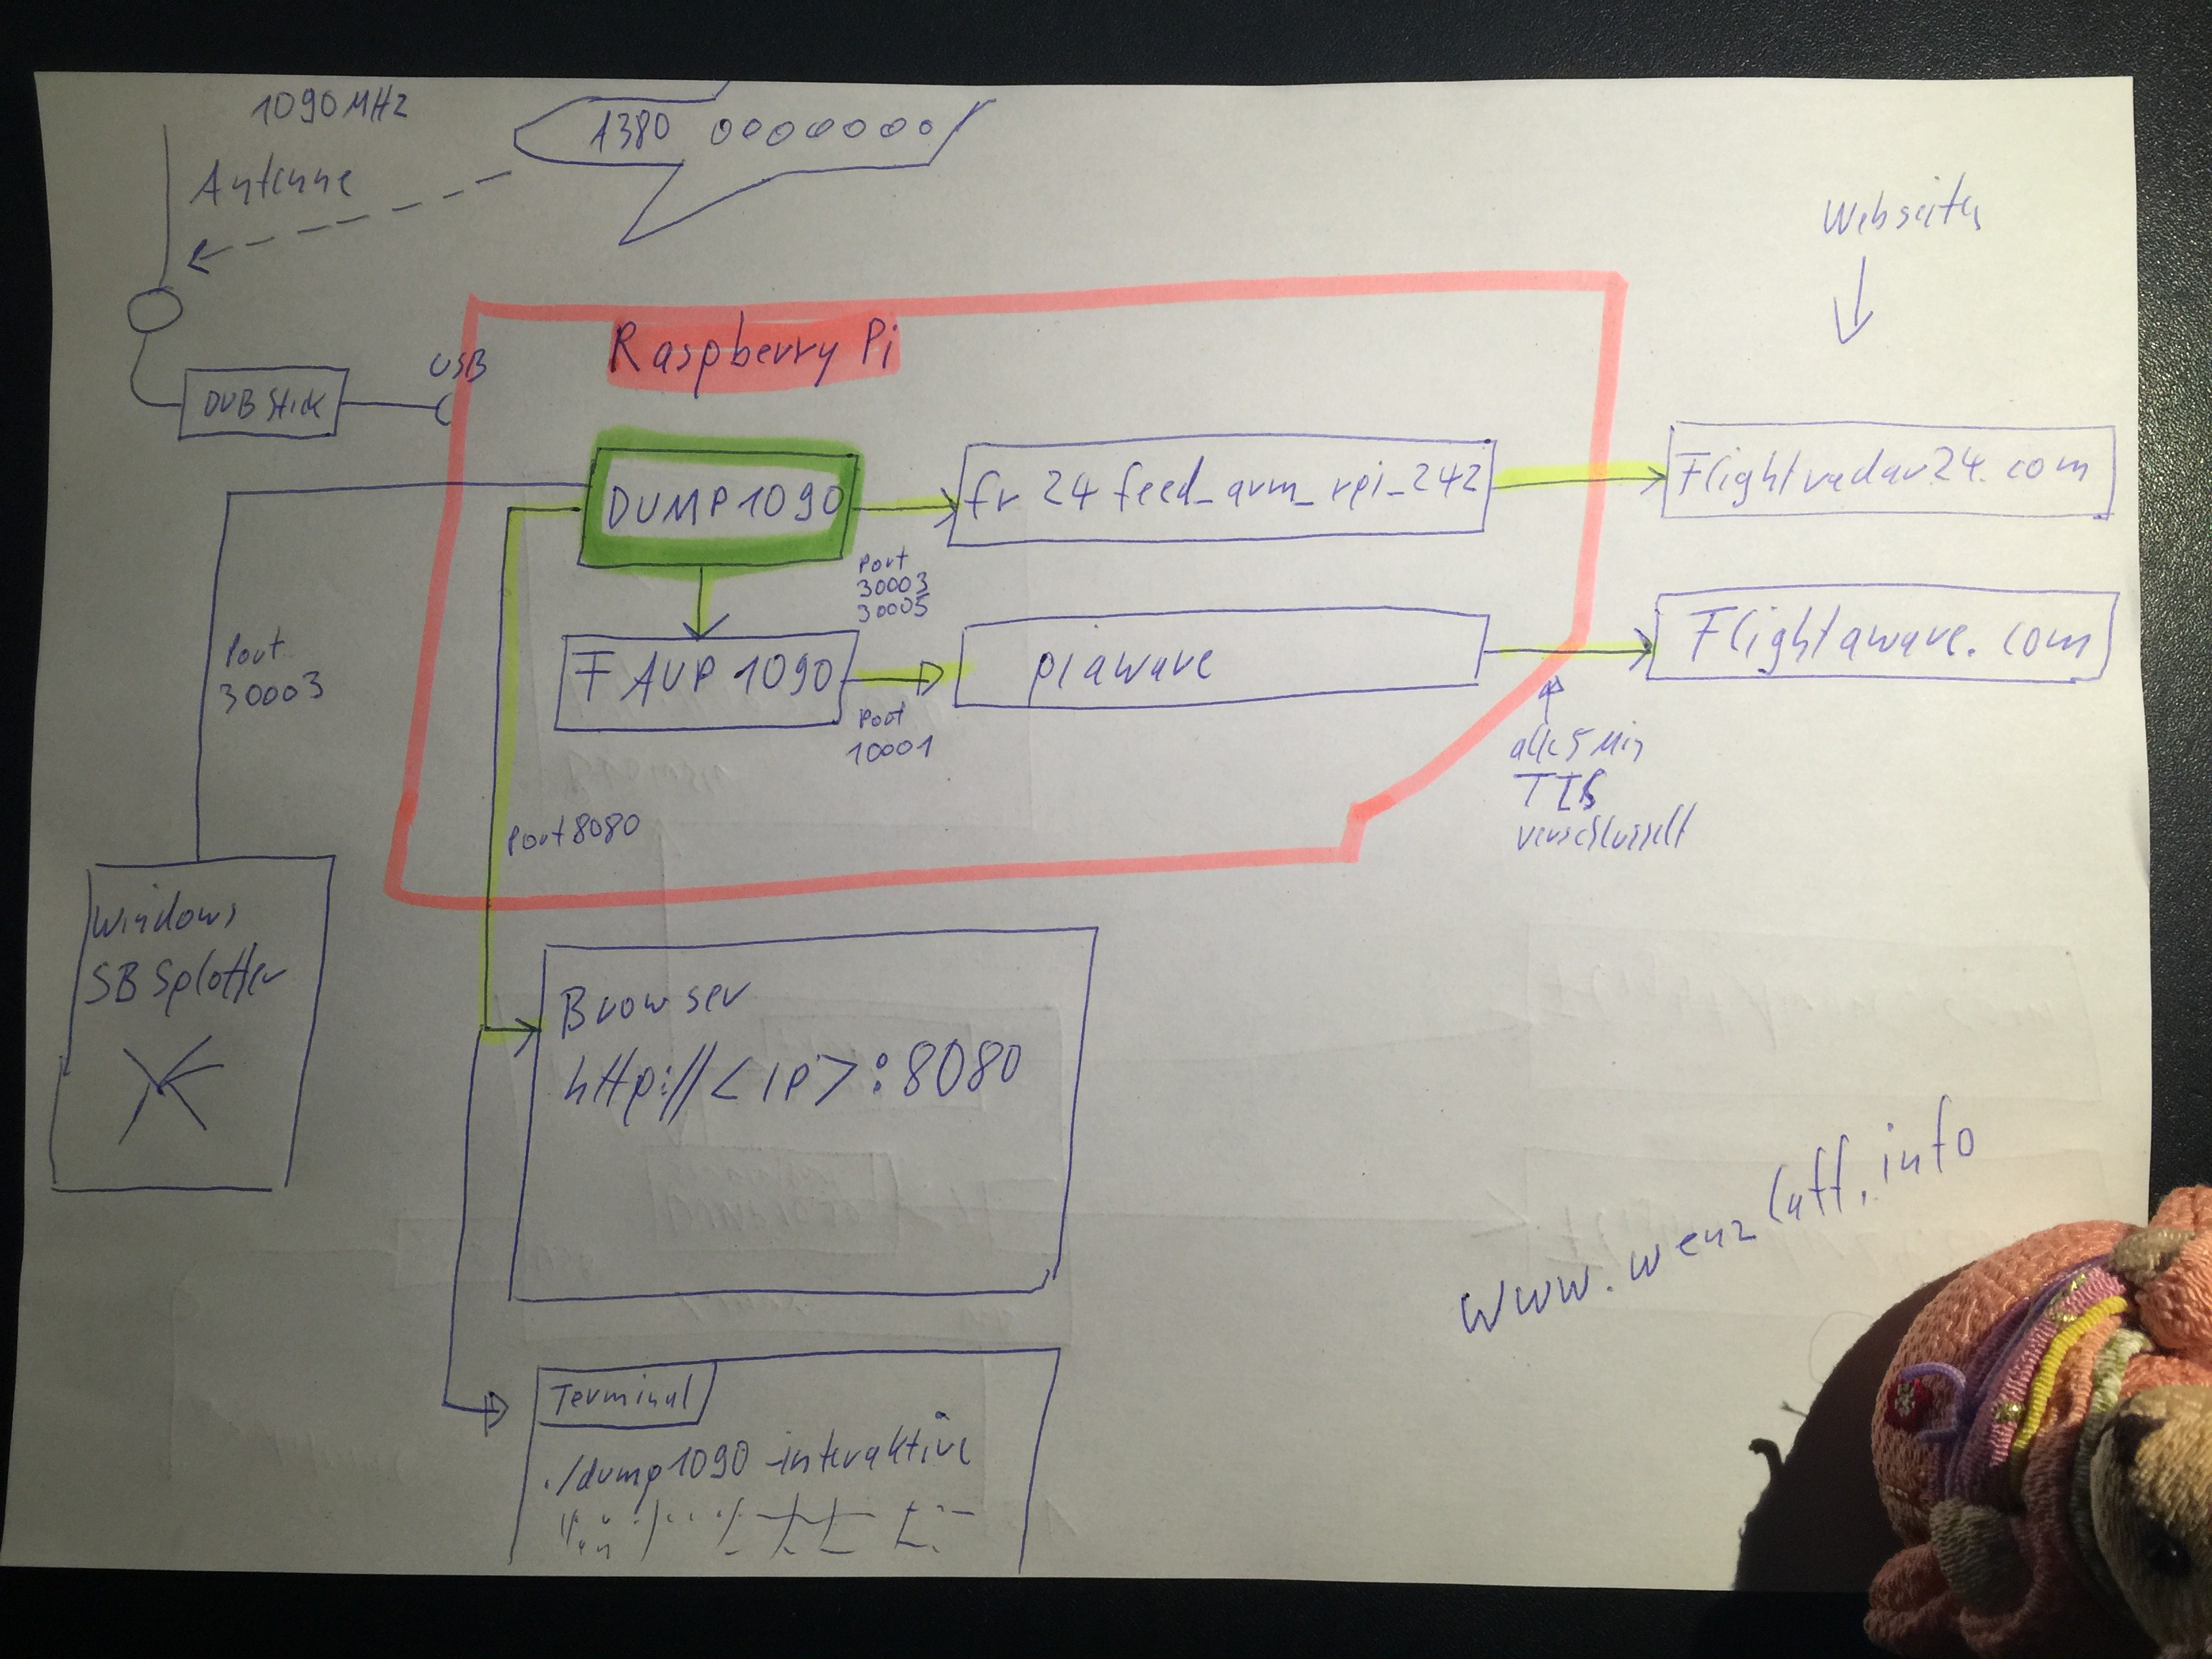
Vor einiger Zeit hatte ich schon mal beschrieben wie man die Flugzeugsignale mit dem Raspberry Pi empfängt und nach Flightradar24.com senden kann. Es gibt aber noch eine andere Flugseite FlightAware. Wie kann man die Flugsignale gleichzeitig auch nach FlightAware senden? Das geht mit dieser Beschreibung ganz gut. Man benötigt erst mal einen Account bei FlightAware. Der Dump1090 Server muss installiert sein und laufen. Das wurde von mir auch schon mal beschrieben.
Dann folgende Befehle im Terminal eingeben um die empfangenen Flugsignale vom DUMP1090 über faup1090 alle 5 Minuten verschlüsselt (TLS) an FlightAware zu senden:
-user value specify the user name ofavalid FlightAware account<>
-password interactively specify the password of the FlightAware account
-autoUpdate value1=allow FlightAware toautomatically update software on my Pi,0=no<>
-manualUpdate value1=allow me totrigger manual updates through FlightAware,0=no<>
-start attempt tostart the ADS-Bclient
-stop attempt tostop the ADS-Bclient
-restart attempt torestart the ADS-Bclient
-status get the status of the ADS-Bclient
-show show config file
--Forcibly stop option processing
-help Print thismessage
-?Print thismessage
Schon nach ein paar Minuten werden die Flugdaten bei FlightAware sichtbar.
Der Quellcode und Beschreibung zu dem piaware Programm findet man auf Github.
Was das piaware Programm so nach dem start macht, kann in der Logdatei unter /tmp/piaware.out eingesehen werden. Hier mal ein Auszug aus der Verbindung:
Wo macht ihr lieber Urlaub? Mein Favorit ist das erste, das man mit einem Wort zusammenfassen kann „Paradies“ (Paradeisos (griechisch παράδεισος) park).
Am 9.11.2014 wurde nach einem Jahre, eine neue Version von Fhem veröffentlicht. Die Änderungsliste ist umfangreich.
FHEM wird kontinuierlich weiterentwickelt, und die neue Version ist nur als Startpunkt für den update Prozess gedacht. Wer also FHEM laufen hat, braucht nur das update und restart Kommando ausfuehren, um den aktuellen Stand herunterzuladen.
Wer Fhem noch nicht installiert hat, kann es wie hier beschrieben tun.
Der Raspberry Pi wird zum empfangen von Flugdaten verwendet wie hier schon beschrieben.
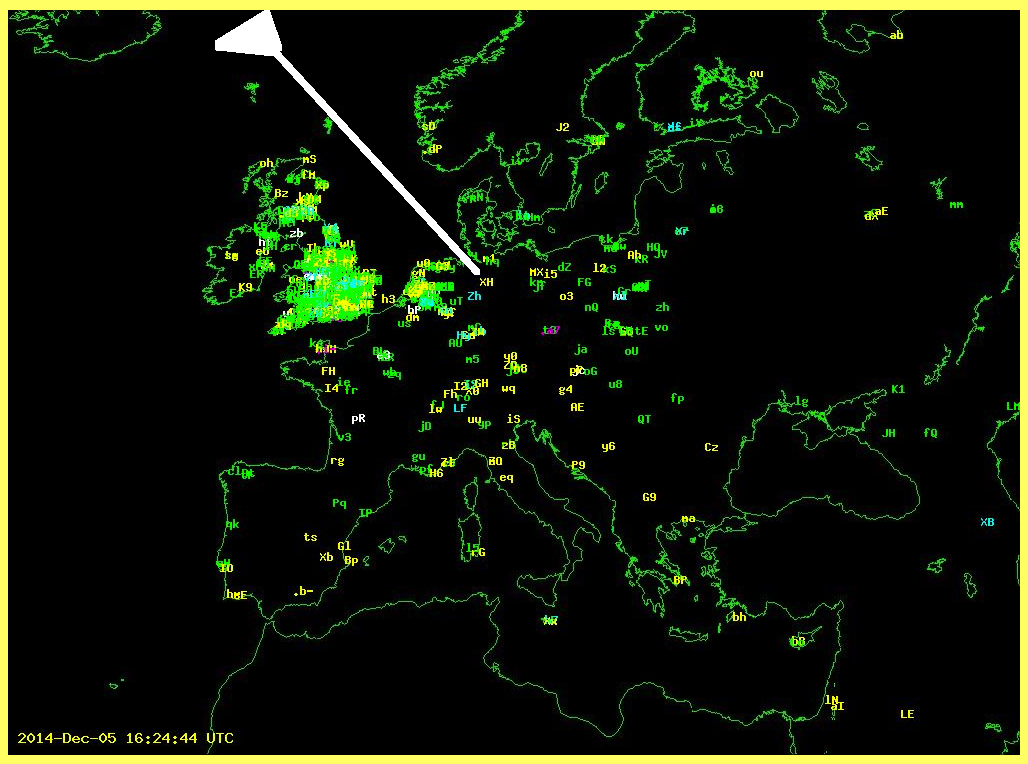
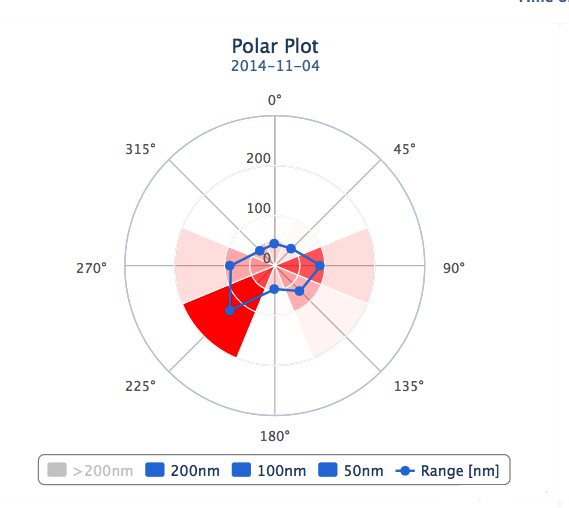
Wie weit ist nun die Reichweite wenn die Antenne innen auf der Fensterbank ohne freie Sicht nach alle Richtungen steht? Und in welche Richtungen ist der Empfang am besten?
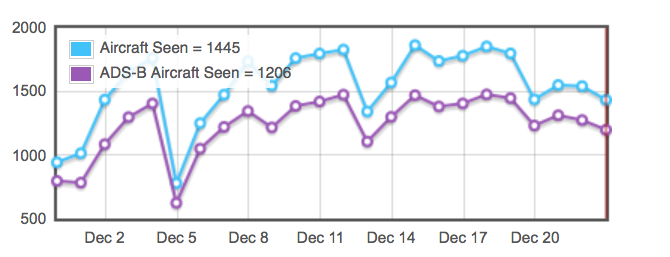
Die bisher weiteste Empfang eines Flugzeuges sind 138 nm (255 km).
Das geht aus diesem Diagramm hervor (1 nm = 1852 m)
Bin gespannt, wie es aussieht wenn die Antenne aussen montiert wird.
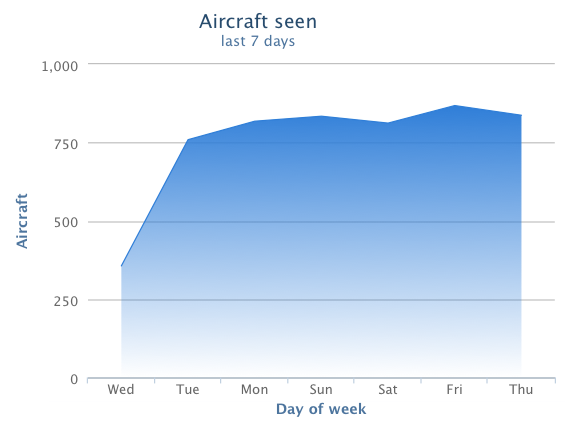
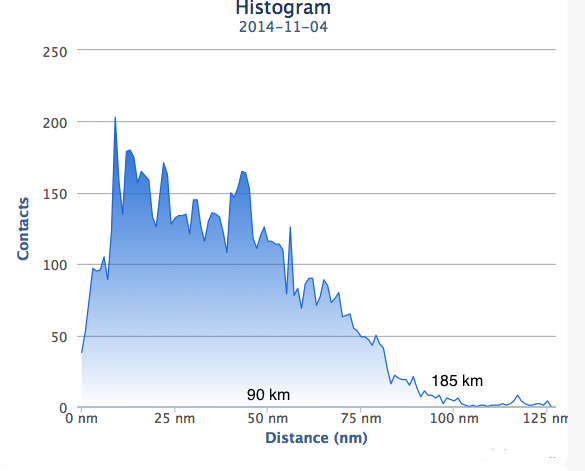
Und wieviele Flugzeuge werden so an einem Tag in Langenhagen empfangen? 872 Flugzeuge wurden an einem Tag (24 Stunden) empfangen.
Diese Website benutzt Cookies. Wenn du die Website weiter nutzt, gehen wir von deinem Einverständnis aus.